Showing posts with label house tour. Show all posts

Laundry Room Makeover: Reveal

If you have a huge laundry room, good for you. I may or may not be extremely jealous of you.

I, for one, have a teensy tiny laundry room that also doubles as a mud room, random home improvement products and housewares storage room, garden center, and school stuff dropoff. It hasn't been very attractive for many years (if ever)...here's proof.

Although it's far from the laundry room of my dreams, it's now functional and organized and simple and, dare I say, even a little bit pretty.

Directly to the right of the doorway (barely visible in the photo below), I painted the back of a corner shelves/hooks unit to match the walls and added some grey fabric storage cubes. Each of our children has one to throw their bike helmets and lunch boxes and whatever-else-makes-their-hearts-sing into because, hey, no one can see it!
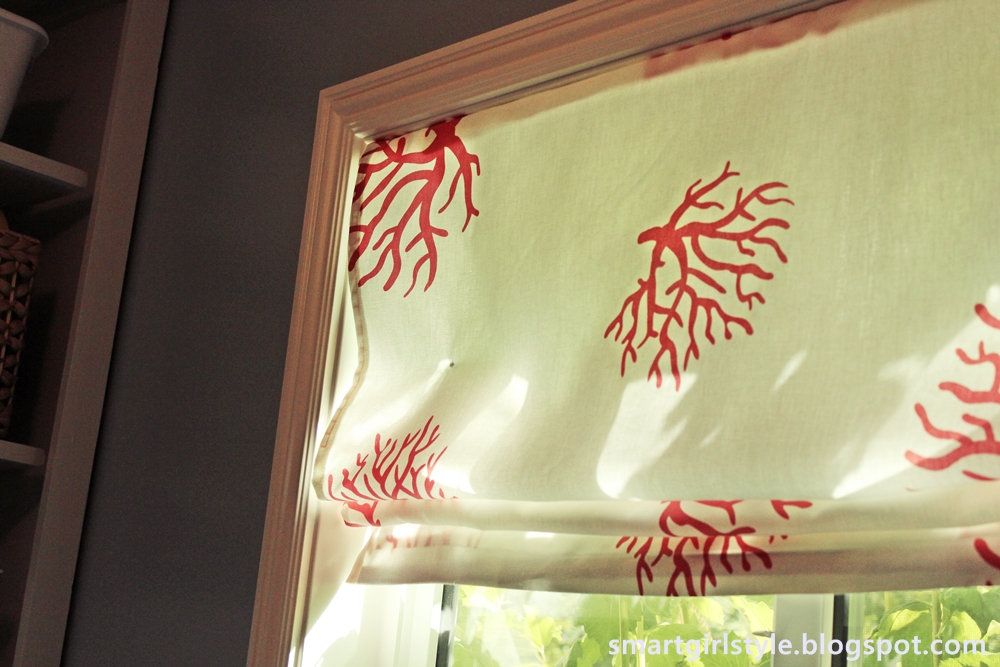
If you recall, we previously had some lame-length curtains hanging here that were constantly attracting dryer lint and getting in the way of the kids' hooks. No bueno. So I took part of one of the panels from my living room drapes FAIL (read all about it here) to create a laundry room window shade WIN. It only took about an hour one afternoon while I watched a What Not To Wear rerun. I absolutely love the funky coral fabric in this space.

Next up: the floor.

Check it (and more!) out after the break.

Pin It Now!

Bedroom Makeover: Putting it All Together

Guest Bedroom Makeover
Day 12: Putting it All Together

**Note: This is part of a 12-step bedroom makeover series. Find the previous steps at the bottom of this post.**
Hooray! Operation: Make-Guest-Bedroom-Not-So-Scary is complete! Of course, I think it will take a few months (years?) for this room to really and truly "gel." But that's okay.
 
My goal was to decorate this bedroom for as little money as possible. Like, $5. Okay, not quite. Realistically, I wanted to keep it under $100. I'll let you know how I did, but first, let's take a moment to enjoy a photographical montage, shall we?
 
Yes. Yes we shall. Remember where we started:


Okay, not like I think I'm so cool or anything, but I feel like incorporating just a few low-cost yet creative bedroom decorating ideas has made a big impact.
 
Below is a photo of the first view of the room from the doorway. The curtains are a little long, but I haven't found the energy to take them down and re-hem them just yet. Heh.


Those Petit Bateau onesies on the wall are meaningful on many levels for me...here's a closeup of part of their awesomeness:


Recognize the chevron rug? I actually ordered a different rug for this space but decided I liked it (the new one) better in the master bedroom, so I swapped.
 
 
I need another nightstand in the corner there, but it's a tricky teensy space, and I'll have to find just the right thing. Also, a clock of sorts would be great to add somewhere.


Have I mentioned how much I love my little pallet board bedside table? Yes? Many times? Oh. Well, then, ditto to what's been said before. (Times two or three.)


And in case you're wondering where all the games and unsightly binders ended up, they're in this Ikea Billy bookshelf on the other side of the fabric-backed one. This arrangement of bookshelves? It rules. Much better, takes up less space, and it can hide-yet-keep-accessible stuff on one side and be pretty on the other. Win-win.


Part of the guest command center, complete with note paper (hanging via clothespins on a rope line), mints (which the kids found and have significantly depleted), pencils, and coat/purse hooks. I even sharpened the pencils. Yes. Applaud.


 Found this suzani on ebay and hung it on the random bare wall between the door and the closet. I'm not thrilled with it, but I'll survive. And it'll do for now.


Okay. Moment of budgetary truth.
 
Complete Budget Breakdown:
$10 - headboard mounting hardware
$12 - pom trim on curtains
$19 - clamp lamps + spray paint
$3 - rope for hanging curtains & mirror
$3 - suzani fabric wall hanging
$15 - shelf-back fabric
$7 - bedding towers/Greek key trim
$12 - flat sheet for back of duvet cover
 Everything else I had on-hand, was repurposed, or was free.
 
TOTAL: $81
Wowie-wow-wow!! Under budget! That, like, never happens. Ever.
 
And now, may I just share a heart-warming story with you all? I've found my husband lying on this bed no less than three times in the past few days since finishing the bedroom makeover.
"You like the room, hon?" I asked him on the latest occurrence.
His reply: "This room is awesome. You did so great...I don't even want to leave."
 
Yesssss! *wipe a tear* Seriously. That's what home decor is all about - the feeling you get when you're in a space. Don't you think?
 

  Anyways. I hope you've maybe gleaned some bedroom decorating ideas for yourself and enjoyed this makeover as much as we did...and do...and will. (Especially my parents, whose room this has become when they visit.) Now I'm going to sit back and relaxy-lax for a little while before I embark on my next endeavor.
 
If you're interested, check out other bedroom ideas in my master bedroom makeover... or find living room ideas...or, heck, just take a tour of the whole house!
 
 Check out the previous steps to this bedroom makeover:
Day 2: Paint Walls
Day 7: Nightstands
Day 10: Bedding
Day 11: Throw Pillows
 
Featured!
   Lovely Crafty Home  
 
 
Pin It Now!

Nursery: House Tour

There's something about a plastic Dora bed that screams "style." I can't put my finger on it, exactly, but I'm pretty sure interior designists everywhere are flocking to take a look at this space:
 
(Photo taken circa 2009.)
It may not look it (perhaps you're distracted by the stylish toddler bed? it's understandable), but this is a teensy tiny bedroom. The smallest. It was our daughter's for a long time, until she grew up and moved into this room with her sister.
 
Then my son didn't want to sleep in the basement anymore, so we painted the room grey and white, found Dora a good home elsewhere, and moved him in here. Rats, no photos.
 
Then he decided he liked being in the basement after all, so we moved him back downstairs. Just in time to prep this room for Baby #4.


To be honest (maybe BECAUSE she's baby #4?), I didn't spend a whole lot of time creating this space into a showroom. I had great plans to make it fabulous, but they just didn't come to fruition.

And I'm fully aware that this rocking chair has to be one of the ugliest pieces of furniture known to man, but I'll tell you this: another much cuter (but less comfy) rocker was in here previously, and after the first night of having baby home, it was promptly swapped out for this basement-dwelling beast. It's super ugs, yes, but it's even moreso super soft, super comfy, and super appreciated during those newborn all-nighters.

(Do I sound defensive, or what? Because I'm not. I love that chair now. I'm just, y'know, explaining. In a nursery, and where budget requires choosing one or the other, function trumps style. Every time.
 
For other inspiring works-in-progress (you're reading the sarcasm, right? good.), click here.
 
 
Pin It Now!

Main Bathroom: House Tour

Here's the way our upstairs (main) bath looked when we moved in:
 
(Photo taken circa 2007.)
 It was pretty blugh, I'm not going to lie. Peeling and on-the-verge-of-molding wallpaper, a gross chipped countertop, and vanity drawers that didn't work.
 
A bit later, we painstakingly peeled off the wallpaper, did a subtle textured paint job, and replaced the mirror and sink/countertop and fixtures.
 

(Photos taken circa 2009.)
We've since replaced the old tile floors and the entire vanity (except we reused the countertop and undermount sink on the new vanity). I have lots of ideas for this space.
 
Updated photos forthcoming.
 
For a peek into other works-in-progress, check out my house tour.
Pin It Now!

Master Bathroom: House Tour

Okay, I would pay lots and lots of money if somehow someone could conjure up a nonexistent photo of our master bathroom when we bought our house. It had hideous floral wallpaper (for the record, I have absolutely nothing against wallpaper as a rule. just the hideous stuff I have a problem with.) paired with a yellow stripe (remnant seen below).
 
(Photo taken circa 2006.)
It's a pretty teensy bathroom to begin with, but the large vanity meant there was zero walking space, the shower door (or our shins, which was always awesome) would bang into the drawers, and the linoleum was just plain gross.
 
Annnnnd as we were redoing the floor we discovered that about 1/3 of the floorboards were rotted. That's always encouraging.

So. We painted, put in a tile floor, added a storage mirror, installed a pedestal sink, put in towel hooks, and redid the shower from yucky old tile to cultured marble.
 
It's nothing fancy (there's no room to be fancy here!), but now the master bath looks something like this:


(Photos taken 2012.)
For more house tour fun, click here.
Pin It Now!

Kitchen: House Tour

Once upon a time, there lived a woman who cooked over an open flame. She probably burned woolly mammoth stew a lot. She probably would've killed, or at least seriously maimed, for a kitchen like this:
 
(errr...minus the mid-renovation status...)


(Photos taken circa 2008.)
Not me, though! When we moved into our home in 2006, the kitchen was the armpit of the house. Dark wood, zero natural light, low-hanging fluorescent light tiles, cave-like and depressing.
 
We did some cabinet moving (swung the cabinet that caved-in the kitchen, which was originally mounted right above the countertop bar so as to block sightlines and light, out into the dining room so as to lighten up the kitchen but not lose precious cabinet space), repainted all cabinets white, added hardward, installed an over-the-range microwave, and put in a tile backsplash.


(Photos taken circa 2008.)
We've changed some things since doing this, but not a lot. Our dream is to replace countertops with something much awesomer than formica. Surely you have dreams as romantic and earth-shattering as ours.
 
To check out other lovely works in progress in my home, click here.
Pin It Now!

Girls Bedroom: House Tour

So, TECHnically when we moved in, this room was a boy's room:
 
(Hah! Yes, there's a boy in that bed. You can see his arm. Kind of.)
 
(Photo taken circa 2006.)
 For household noisiness purposes, we changed it into a nursery a couple years later.
 

(Photos taken circa 2009.)
 Then circumstances were such that we needed to turn this into a room for our two older girls to share. Repainted, restyled, re-everythinged...


(Photos taken circa 2011.)
They love playing in this space, so...success!

Welp, that's the history of this girls' bedroom. I'd like to change a few things up and out. One day. But for now, they love it and I love it! (When it's clean.) (Which is, like, never.) (But how important is that, really?) (Pretty important? Oh. Rats.)

Update on girls bedding here.

For your viewing pleasure, tour other rooms in my home here.
 
Pin It Now!

Family Room: House Tour

Our family room is in the basement. It's a large room, hindered only by the fact that there's a load-bearing post right SMACK in the middle of the room. Awesome.
 
Although the basement has seen its share of terrible furniture (how I wish I took photos of each phase. very entertaining.), here's what it looked like a few years ago:
 
(Photo taken circa 2009.)
 We knew when we bought the house in 2006 that the basement carpet would be the first thing to go. It only took a major basement flood in early 2009 (just, y'know, three years later) to get us to actually replace the carpet. Oh, and the flood destroyed the bottom of that wall o' cabinets. 
 
Although my vision for this space is bright, we haven't spent a ton of time working on making over the family room. Because we want it to be a hang-out comfort zone, where wrestling matches and buttery popcorn and workouts abound.


And don't forget this little lovebug! (Not sure why it's missing from the above photo.)

(Photos taken circa 2012.)
Yeah, it's a total rec room. Definitely won't win any design awards, but it works perfectly for our family!
 
If you're interested in touring other rooms, click here.

Pin It Now!
Related Posts Plugin for WordPress, Blogger...
Pin It button on image hover