
** My heart goes out to the surviving children, the families, the community of Newtown. Many tears shed and prayers prayed for them all. Heartbreak. **
____________________________________________________________________
Warning #1: This post takes foreevvvvvver.
____________________________________________________________________
Warning #1: This post takes foreevvvvvver.
Warning #2: But not nearly as long as the actual project takes.
Warning #3: But you still might love the end result so much you'll want to make one for every girl's bed in your house and the houses of your neighbors. Maybe.

So. Ombre. We know it, we love it, we want some more of it. Same goes with ruching.
(Of course, about duvet covers, we're like "meh," until they incorporate said ombre and ruche-age. Then we're all, hizzah and hello there!)
So...want to make an ombre ruched duvet cover? Answer: Yes. Yes you do.
So...want to make an ombre ruched duvet cover? Answer: Yes. Yes you do.

Let's get started.
(Click through to continue reading.)
I'm making a twin-sized duvet cover, so I bought a queen-sized white flat sheet from Walms, about $12. If you don't already have one, buy a white twin-sized flat sheet as well (for the underside of the duvet cover).

We're going to be upcycling this boring queen sheet into awesomeness by cutting it apart into tiers and dying those tiers into ombre gradients.
I wanted five tiers, which means I needed six thin strips in between them. (Two strips at the top and bottom, and four between the five tiers.) I cut the top, thicker hem off the queen sheet...

...and cut it in half lengthwise (where the factory fold is) and then half again (also lengthwise) to create four of the strips.

I then cut two more strips of equal width off the top of the sheet (where I had just cut off the hem). Cut these six strips to be as wide as your twin-sized duvet. (About 62" for mine, but I'm working with an odd-sized duvet, so be sure to measure yours.)
Here's where things get a little tricky. To maximize the ruching, turn the remainder of your queen sheet sideways, so that the width (90") becomes the height of the duvet cover. Measure the height of your duvet and trim the new sheet height (which was originally the width) to be an inch or two longer.
Divide the sheet into equal horizontal sections, as many as you want in your ombre gradient (I did five). I used a right angle to mark the lines. Cut them.
Divide the sheet into equal horizontal sections, as many as you want in your ombre gradient (I did five). I used a right angle to mark the lines. Cut them.

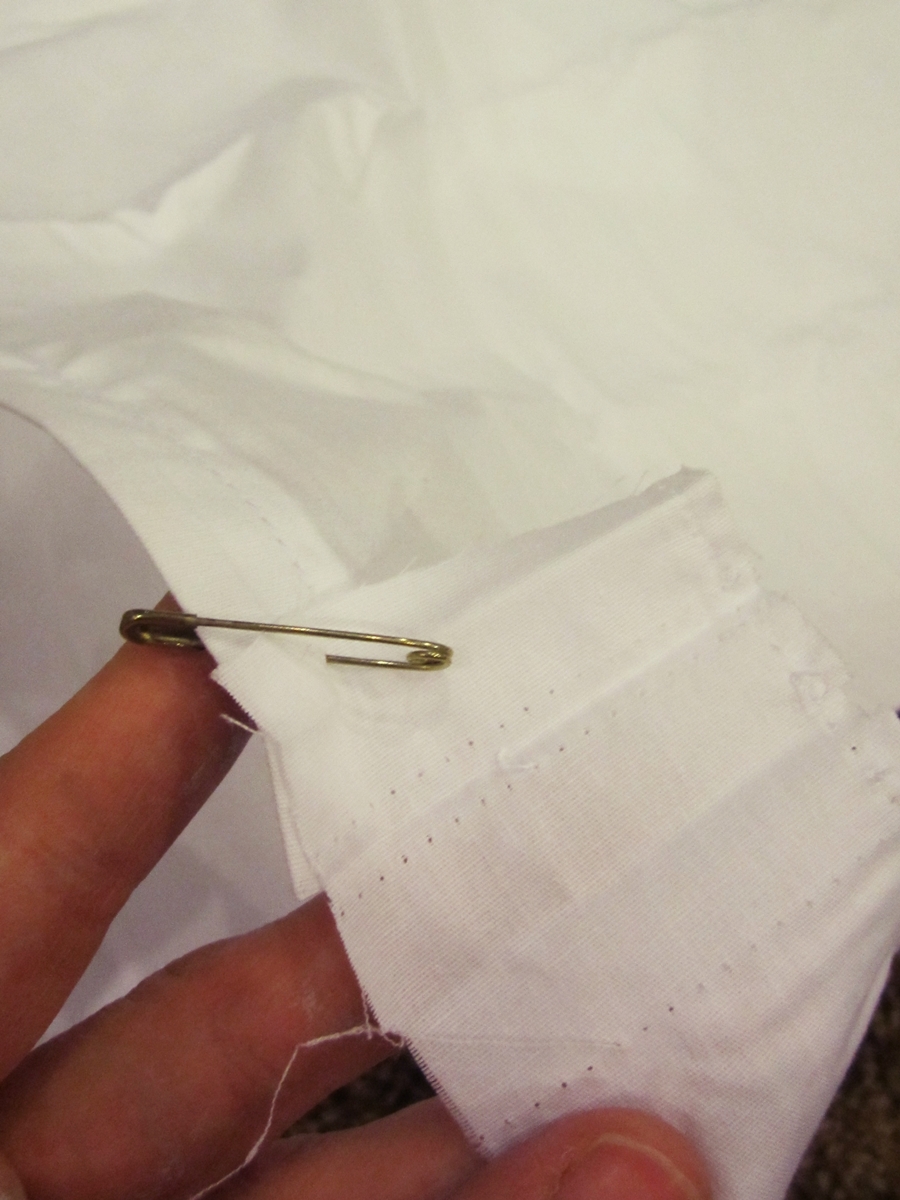
At this point, I had five large strips (about 16" wide) and six thin strips (about 2" wide). I set one large and two thin strips aside, because these would stay white (not be dyed). I then used safety pins to pin each thin strip to a large strip (called a "strip pair" from here on out) so that they'd match after being dyed.
Phew. Have you made it this far? Hang in there, this is where it gets fun!
There are all sorts of fabric dyes out there. I had never dyed fabric before (other than tie-dye), and I happened to be at Walms one day (to get the flat sheet), so I picked up this bottle of dye for a few dollars in the laundry detergent aisle.

(I was planning on dyeing the strips in my tub until I read at the last minute that this dye can stain tubs. Quick gear-switch to the invincible stainless steel kitchen sink. Worked better anyway.)
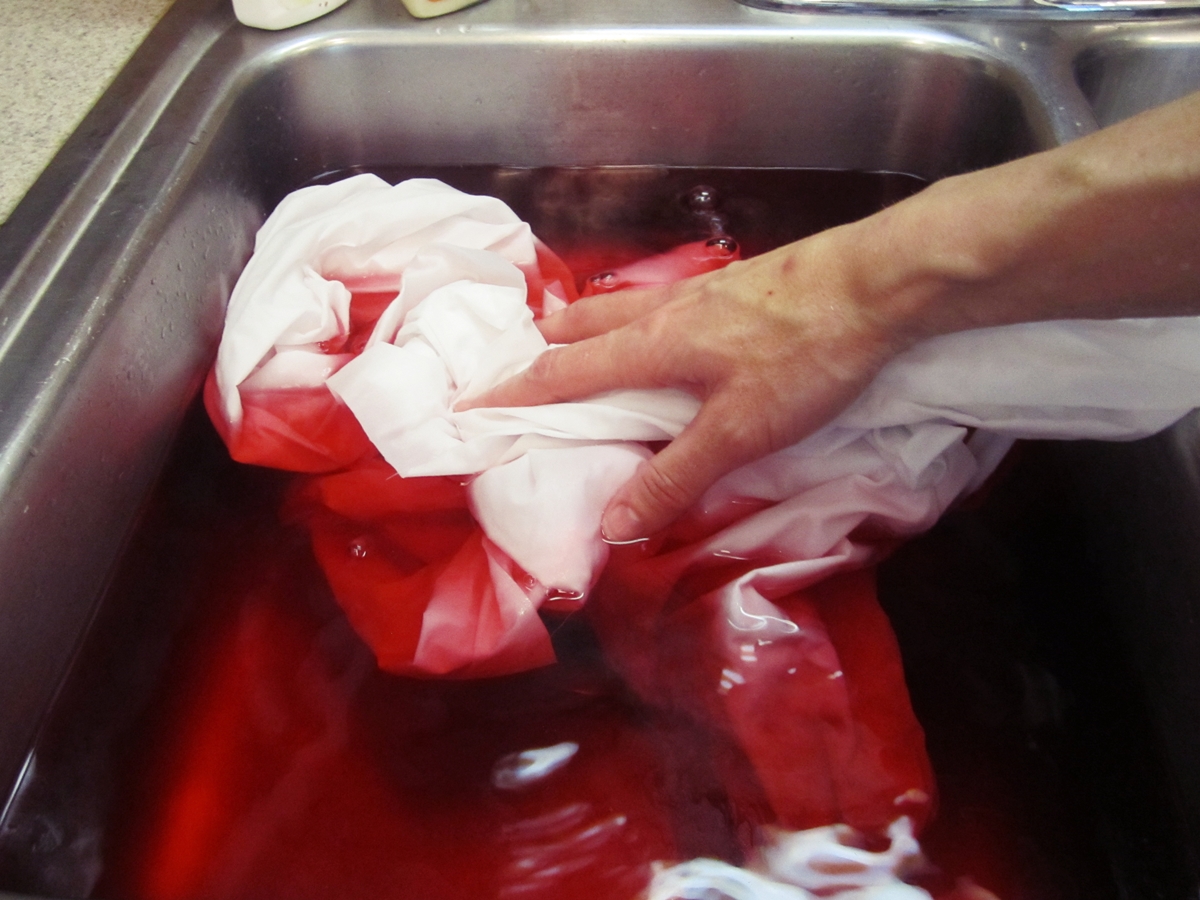
You could follow directions on the bottle, but I didn't really, because I wanted various gradients of color instead of one solid mass. I filled the sink about half full with piping hot water and stirred in some dye.
I wet down all my fabric strip pairs and then put them all into the water. Here's an important tip: One of the beauties of ombre is a subtle color change -- you don't want to go too dark too fast, or you lose all of the magic. So as soon as you put all the fabric in, you'll need to immediately pull out one of your strip pairs (after double checking to make sure it all got dyed). And I mean immediately. It should be a lovely pale hue.
After taking out the first strip pair, I added a teensy bit more dye (avoiding direct contact with the fabric) and stirred the other fabric around, opening and exposing all the fabric folds to the dye. I took out the second strip pair a minute or two later. Add a little more dye, stir, and take out the third one a minute or two after that, and repeat for the last one...except that one could stay in longer to get it nice and saturated.

[Editor's note: In one of my stirring passes, I accidentally pulled up my drain plug and lost most of my dye and water. So the third and fourth strip pairs ended up being about the same hue as the second one, because I had no more dye to make them darker. This brought me great sadness, because it was no longer an ombre gradient, it was just a bunch of pink. Blugh. But then I got an idea that saved the day. So I went back to Walms and got wine-colored dye. Used the same strategy to redo the third and fourth strip pairs, and it worked out well. Phew.]
On an unrelated note, I decided that if I could ever choose a color of skin to be, I'd choose wine. I got to have pinkish-tinted hands for about two days and it definitely grew on me.

Washed and dried all the (still-attached) dyed strip pairs. Looking good!
[Editor's note: Important! You'll want to run these through the wash several times, until the dye is officially fully and completely set. If you don't do this, you'll lose much of the ombre effect when you wash them after being sewn together.]

Now it's time to start sewing.
I started with my white. First, I did a baste stitch (translation: the biggest stitch your sewing machine makes) down both long edges of the large white strip. (No photo, sorry.)
In gathering fabric, it's important to space the gathers as evenly as possible. So I folded the large white strip into half (shortwise) and half again (also shortwise) to make quarters.

I pinned the halfway and each quarter fold to mark the spot. (You could also use a fabric pen or pencil here.)

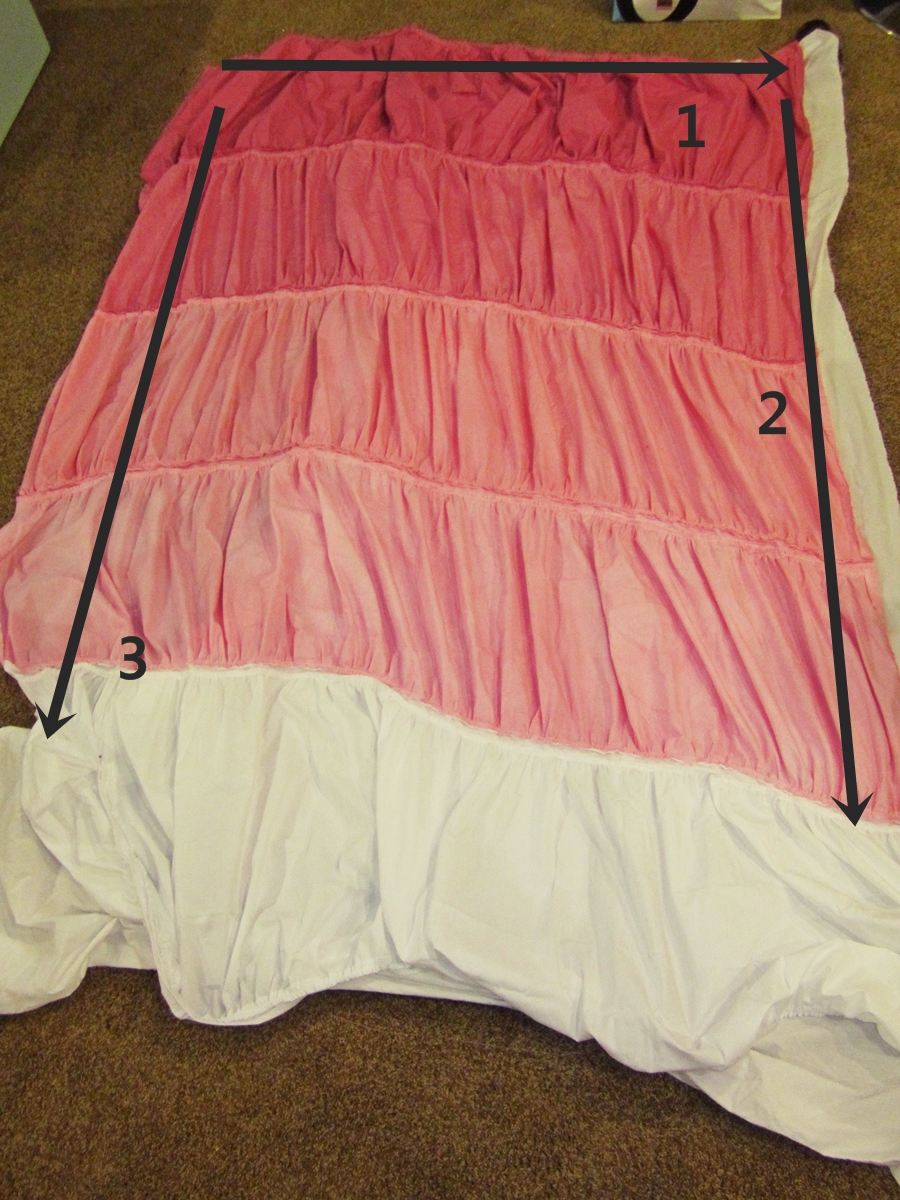
I quartered and marked the two thin strips as well using the same method. (Arrows show where the pins are, numbers show the quarter sections, from quarter 1 through quarter 4.)

I pinned the ends of the thin strip to the ends of the large strip, then pinned the half- and quarter-marks together. It'll look something like this:

You'll want to gather the inner quarters first, but you have to start on the outer quarters to do so. So, for example, in order to gather quarter 2 in the photo below, I would have to pull on the thread from the outer edge of quarter 1.

Take one thread (either the top or underside, it really doesn't matter which) of your baste stitch and start pulling it. The fabric will start to gather. Work the gathers inward (toward quarter 2) with your thumb and fingers.
(Note: In the photos below, I was gathering the factory hem edge, meaning 2-3 extra layers of fabric. This was a pain, and I'd recommend cutting off the hem edge completely and doing your baste stitch on the single layer.)
(Note: In the photos below, I was gathering the factory hem edge, meaning 2-3 extra layers of fabric. This was a pain, and I'd recommend cutting off the hem edge completely and doing your baste stitch on the single layer.)


Once the length of the large strip (gathered) in quarter 2 matches up with the length of the thin strip in quarter 2, pin every so often to hold that in place. Then do quarter 1 (which will probably already be a little bit gathered anyway). Then switch sides and, pulling the baste thread at the outer edge of quarter 4, work on finishing up quarter 3 and then quarter 4.

At the sewing machine, change your stitch size back to normal, then start sewing the two strips together. As you're doing this, make sure your "real" stitch is to the left (or whatever is further away from the raw edge) of the baste stitch, as shown in the photo below.

Phew. It's a lot of work, I know. This might take you several days and/or nights, I know it did for me. Hang in there!
Following these same steps, do the other thin white strip to the bottom of the large white strip. Then attache the first tier of ombre to that, and continue through until you're all done with each gradient.

If you haven't already, cut the twin-sized flat sheet to be almost the same size as your duvet (plus 1" to length and width). Now hem the top edge of the ombre cover (the thin white strip) and the top edge of the twin sheet. Lay your twin flat sheet down right side UP. Lay your ombre piece on top of that, right side DOWN (so they're facing each other). You can go ahead and pin the edges together for sewing, if you're professional like that.
I'm not professional, though, so I just started sewing across the bottom seam, then up one side. Cut thread, move sewing machine needle to other bottom corner and sew up the other side.
You're almost done! Just sew on some velcro, snaps, buttons, or whatever else to the tops so your duvet cover closes.
Insert duvet into the new cover, and viola! Cuteness.


I just think this turned out so great. I do wish the top pink tier was a touch lighter, but whatevs.


Did I mention I was making two of these? Because I did. Make two.

We couldn't love them more. I'm sure you can tell by the ridiculous quantitude of photos. So I'll stop slobbering all over and hit "publish."
(p.s. If you're interested, feel free to check out the history of this bedroom in my house tour here.)
Featured!


{shared A Diamond in the Stuff, A Glimpse Inside, A Little Knick Knack, A Round Tuit, Artsy Girl Connection, Be Colorful, Beyond the Picket Fence, C.R.A.F.T., Carolyn's Homework, Cedar Hill Ranch, Chic on a Shoestring Budget, Christina's Adventures, Coastal Charm, Craft-O-Maniac, Craftionary, Crafty Scrappy Happy, Creative Itch, Delicate Construction, DIY Dreamer, Dragonfly Designs, Finding Fabulous, Ginger Snap Crafts, Happy Hour, House of Hepworths, I Should be Mopping the Floor, JAQS Studio, Kurtz Corner, Ladybug Blessings, Lil Luna, Lines Across, Mercy Ink, Mums Make Lists, My Girlish Whims, New Nostalgia, Ninth Street Notions, Not Just a Housewife, Polka Dots on Parade, Sew Can Do, Sew Much Ado, Shabby Creek Cottage, Shabby Nest, Shades of Amber, Simply Designing, Skip to My Lou, Southern Lovely, Sugar Bee, Sweet Living, The Life of Jennifer Dawn, The Rustic Pig, Today's Creative Blog, Trendy Treehouse, Under the Table & Dreaming, What About, Winthrop Chronicles}
Cute!
ReplyDeleteThanks. I'm just glad it turned out okay...it took a long time to make these two!
DeleteStop it- you did two?? My brain exploded about 3 steps in, and that was when I thought you just did one. Extremely cute though! So cute that it warranted a comment from me instead of just a lurk.
ReplyDeleteBut you're, like, the funnest lurker around, Steph, so I'm glad you're here either way. Fo' shiz. (Yep.)
DeleteAnd, yes, I HAD to do two because both girls wanted one. Believe you me, it wasn't my first choice. Heh. Because I'm a loving mother like that.
That is just a great idea! I would have loved to have that in my room as a kid!
ReplyDeleteMe too! Would've felt so cute and girlified, right?
DeleteHoly crap. You're the real deal skeel girl. I bow to you.
ReplyDeletePlease. Don't bow to me. Let's do lunch instead. Oh, and p.s. I've been wearing this scarf nonstop. Thank you thank you! I love it so very much, and it makes me think of you and how once upon a time we actually got to hang out.
DeleteWow! This is so beyond cool. I would totally put one on my own bed! Maybe in shades of blue, though. ;)
ReplyDeleteThat's the beauty of this - you can do any color, as bright or as pale as you want. Seriously, I wish this was more masculine, because I'd bust one out for my son, too. Alas, I'm going to have to come up with something vastly different for him.
DeleteThis is so pretty! I love how it turned out. Makes me wish I was a little girl now. Link up anytime to I Made It! Monday at Ninth Street Notions.
ReplyDeleteThanks, Amanda. I'll head over and do that. :)
DeleteI am inspired! Would love to make on of these for my daughter. Thanks for the tutorial!
ReplyDeleteYou're welcome, Sara. I would love to see a photo of yours when you finish it! Really.
Deletei made one of these for my daughter's room and you're right, there's really no way to explain how loooong it takes:) i didn't dye it, i did different colored thread...why do we do these things to ourselves? love it!
ReplyDeleteYou know, I thought about doing something similar - just keeping the ruched sheet white and doing rainbow gradients of grosgrain ribbon between. Would've been cute, too. Can you send me a pic or a link, Carissa? I'd love to see yours!
DeleteReally pretty & a clever way to get the ideal width by using a queen sized sheet. Would love for you to link this to my Craftastic party:) Happy Holidays!
ReplyDeleteThanks, Cheryl! I linked up. Merry Christmas to you!
DeleteSo seriously in love with this duvet cover!! I have been racking my brain for something girly for my daughter but also something that she can grow into. And this. Is. Perfection. I cannot wait to make it. Thanks for the great post! New follower! :)
ReplyDeletewww.huckleberrylove.com
Oooh, good. I hope you do it! I had envisioned something less, ah, bright, but I like how it turned out for my young girls. If I were to do it again with the intent that they would have it for years, I'd probably do more subtle ombre colors so the overall effect was more whitish than pink. I'd love to see yours, Lydia! For real.
DeleteGorgeous! I would love for you to stop by and link this up to my weekly link party. http://thelifeofjenniferdawn.blogspot.com/2012/12/a-little-bird-told-me-link-party-21.html
ReplyDeleteDone and done. :)
DeleteSo cute. Great tutorial!
ReplyDeleteThank you. I struggle with tutorials, trying to make them clear but not tedious. I don't think I've mastered it yet...
DeleteCute matching headboards. I've been wanting to do that for my girls. Few probs...the rooms are tiny. We don't own any real double beds and...oh I guess that's it. The double look is just so cute. Great sewing project. You lost me on the second step. Im hopeless.
ReplyDeleteGah! Val, I'm always trying to write the tutes for you so they're clear. Dang! What do I need to clarify?
DeleteVery cute. I feel like it would probably be a lot easier to do the gathering if you used a ruffler foot. Or my favorite cheater ruffle method: longest stitch length, highest thread tension. Love the ombre. I've been checking out about a million ombre dying tutorials since I intend to do an ombre ruffled bedspread (heaven help me when I do that...)
ReplyDeleteAnd that is Exhibit A of why I'm no seamstress. I don't even know what a ruffler foot is! Impressed by your knowledge, Caitlin, and I would love to see your ombre bedspread when you do it! Really and truly, I would.
DeleteBeautiful! Love the bright pinks!!
ReplyDeletehttp://makingitfeellikehome.blogspot.com/
Thanks, Tricia. I had intended it to be a lot more subtle than what it turned out as, but I (and, more importantly, my daughters) like the end result. Phew!
DeleteThanks for linking to Take-A-Look Tuesday over at Sugar Bee Crafts - you were featured yesterday!
ReplyDelete--Mandy, www.SugarBeeCrafts.com
Aw, thanks Mandy! You had some great features over there. I'm honored to be included.
DeleteOh my goodness!! They are just fabulous!!
ReplyDeleteThanks for linking to a Round Tuit!
Hope you have a fabulous week!
Jill @ Creating my way to Success
http://www.jembellish.blogspot.com/
I'll take "fabulous" any day of any week. Thanks so much, Jill.
DeleteLove it! I can NOT believe you made TWO!! You must have some patience ;)
ReplyDeleteI found you on Sew Can Do Linky and I'm your newest follower :)
I can't believe I made two, either, Mandy. That's what happens when two little beauties who like to be "twinners" share a room. :) Thanks for stopping by!
DeleteHooray!! You've been featured at Tuesday Tutorials Link Party! http://www.thekurtzcorner.com/2013/01/tuesday-tutorials-link-party-no-54.html
ReplyDeleteThank you for linking up and I hope you'll stop by and grab a featured button :)
Audra
Thanks so much, Audra. I'm honored.
DeleteCONGRATS!!!
ReplyDeleteYou have been featured at The DIY Dreamer... From Dream To Reality!! Please come on over and grab your featured button... you deserve it!!! http://thediydreamer.com/from-dream-to-reality/from-dream-to-reality-linky-party-48/
So nice, Christine. All buttoned up. :)
DeleteBeautiful! I wish I hadn't bought my kids new bedspreads a few months ago! Pinning, and I'd love it if you shared this and any other idea you would like to link up to "One Creative Weekend" at OneCreativeMommy.com. The party is open every Fri-Wed.
ReplyDeleteIsn't that always the way it goes? Rats! Dah well. You'll have an idea for next time... and, look at it this way Heidi: buying is much faster than making these bad boys. You just saved yourself a bunch of hours. :)
DeleteAw, thanks Carolyn! Super sweet of you.
ReplyDeleteThanks for this post.....i like it...:-)
ReplyDeleteFor home decorations and quilt cover please visit us.
An enormous round of applause, continue the great work. Duvet Cover Sets For Teenage Boys
ReplyDeleteThe pinks look so pretty - great job.
ReplyDeleteI would absolutely love for you to share this at Empty Your Archive, we are linking up posts on bed linen of all sorts this week, Alice @ Mums Make Lists
http://mumsmakelists.blogspot.co.uk/2013/10/empty-your-archive-27.html
Hi, you explained the topic very well.
ReplyDeleteDuvet Cover Sets
king a twin-sized duvet cover, so I bought a queen-sized white flat sheet from ... ikingduvetcoverset.blogspot.com
ReplyDelete... girlsduvet.blogspot.com
ReplyDeleteThanks for your informative writing. Get 30%-70% Discount from FZillion.com on all branded Duvet Covers.
ReplyDeleteUSA Free shipping and free return. 75 days Return Policy.
Thank you for writing information. From Vansilk.com to got discounts about the Duvet Covers.
ReplyDeleteI liked the content on this site. Would like to visit again.
ReplyDeletequilt covers online
This comment has been removed by the author.
ReplyDeleteyour nice blog and more information visit in tajpak
ReplyDeleteThere are different types of cotton sheets available. The kind you will largely on what you are looking for in the way of comfort and felling
Wow, you did an amazing job! And I love how the rest of the room is coming together. Our master bedroom is half complete and it's driving me crazy! cotton duvet covers
ReplyDeleteWow what a great blog, i really enjoyed reading this, good luck in your work
ReplyDeleteKitchen Dining Suppliers
ReplyDeleteHad a wonderful insight reading this article on bed sheets and quilt covers.If you want to have more such insights and in dept information than you can continue to bed sheets and quilt covers
It’s really interesting to read your content and surely attracting for the new reader. Really appreciable I will definitely inform other to visit here. duvet covers set we all are aware of the word “duvet cover” as it is most popular nowadays. This cover is used to prevent duvets from dust, tough stains, and saves your time by preventing you to wash hefty and bulky duvets.
ReplyDeleteHad really wonderful reading this informative blog, i truly appreciate your work you did great job!!
ReplyDeleteYour blog really inspired me. Great Tutorial!!
dark grey duvet cover
burgundy duvet cover
lilac duvet cover
Thank You for providing this blog...!!! I look for the such article as Cotton Duvet Cover along time.
ReplyDeletedark grey duvet cover
burgundy duvet cover
lilac duvet cover
What a great idea! Thanks so much for sharing it with us.
ReplyDeleteYou can check out this too.!!
what goes inside a duvet cover?
Had a wonderful reading this article...really useful information.
ReplyDeleteRead this informative blog.
what goes inside a duvet cover?
Thanks for providing valuable information. For more information
ReplyDeletehttps://www.login4ites.com/web-designing-vaishali/
Do you think it's gross that hotels do not change the bedspreads?
ReplyDeleteHotels don't change their bedspreads very often. Isn't that nasty? At the hotel where I work its about 1 time a month.
You have written the blog in a very better way and it can be understood by everyone. It is very helpful and I suggest you all, also try this light blue duvet cover
ReplyDeleteThanks very much for this great article;this is the stuff that keeps me going through out these day.
ReplyDeletebest door curtains
Thank You for providing this blog. I look for such informative article like this..keep sharing!!
ReplyDeletegrey duvet cover queen
navy blue duvet cover
Very helpful blog. Thank you for the wonderful king size duvet cover tips.
ReplyDeleteHi. Great blog and content. Very informative.
ReplyDeleteAny bedsheet that has cotton in it is the best for any season or weather. I always buy Cotton Bedsheets in India from a online store called Blue Dahlia. Their products are amazing and have good quality and top-notch bedsheets.
we are an E-commerce company that provides high quality Double bed sheets at best price. you will get 100% Egyptian cotton made bedsheets and collection of beddings on comfort beddings.
ReplyDeleteBuy Double bed sheets online at best price at comfortbeddings.
I read your post. Thanks for sharing a good information about Duvet Cover. I loved it.
ReplyDeleteSomething innovative here to look for. Glad that you shared
ReplyDeleteSomething innovative here to look for. Glad that you shared
ReplyDeleteExplore the latest range of duvet covers at https://www.swayamindia.com/duvet-covers/
Something innovative here to look for. Glad that you shared
ReplyDeleteExplore the latest range of duvet covers at
Duvet covers
This article is an appealing wealth of informative data that is interesting and well-written. I commend your hard work on this and thank you for this information. You’ve got what it takes to get attention.
ReplyDeleteFitted Sheet
Thank You for providing this blog Logo Tablecloth I look for the such article from a long time and finally got one
ReplyDelete영동출장피쉬아로마
ReplyDelete증평출장피쉬아로마
진천출장피쉬아로마
괴산출장피쉬아로마
음성출장피쉬아로마
단양출장피쉬아로마
담양출장피쉬아로마
helping blog
ReplyDeletehttps://www.facebook.com/DonRoccoMobileBar
Don Rocco Mobile Baris your go-to service for adding a touch of class and fun to any occasion. Specializing in mobile bartending, Don Rocco offers a unique, fully-stocked bar experience that can be brought directly to your event. Perfect for weddings, corporate gatherings, birthdays, and more, our service includes a selection of premium cocktails, beers, wines, and non-alcoholic beverages, all served by experienced and friendly bartenders. Our beautifully designed mobile bar setups are not just functional but also serve as a stylish centerpiece that enhances the atmosphere of your event. With Don Rocco Mobile Bar, you can enjoy top-tier drinks and impeccable service, making your event truly unforgettable.
ReplyDelete