
Remember this entry table?

I wanted to shake things up a little bit. So I painted it green.
I wanted to shake things up a little bit more. So I added a paint dipped look to the legs.
(p.s. Want to know how to paint a crisp stripe/straight line? Here:
Step 1: Measure how high the paint dip contrast paint would go. My table's legs are long and skinny, so I knew a little paint would go a long way, as far as visual impact is concerned. I went up 8 inches and taped it.

Step 2: After pressing the tape edge down, paint over it with the same base color. Seems counterintuitive, I know. But this will "seal up" the blue tape edge and allow less leakage of the stripe color. Let the base color dry.

Step 3: Paint the stripe/contrast color.

Step 4: Wait just a few minutes, then peel the blue tape off at a 45-degree angle (this photo doesn't show that, but it's what I did). You should have a nice, crisp line with very few touchups required! Yeehaw!

--end of p.s.--)
The legs looked great, but I wanted to shake things up even MORE. So I taped out the top to include a simple yet classy border.
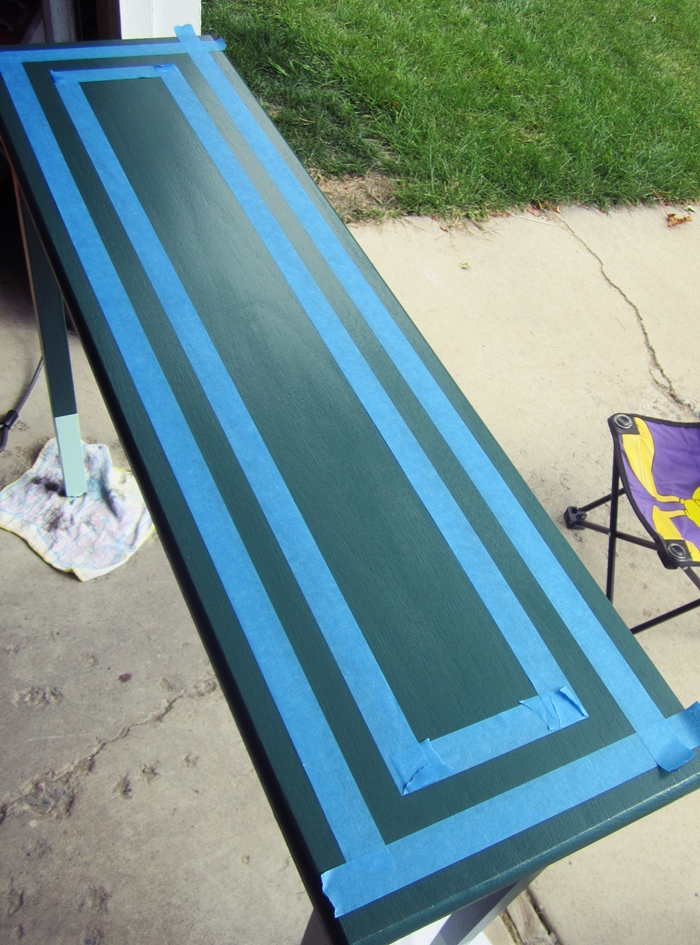
What I failed to do, however, was (a) prime the varnished top before I started to paint in the first place, and (b) wait long enough for the paint to actually dry before I taped it and painted on the contrast color. So when I removed the tape, my hard work peeled up before my eyes. And my eyebrows lowered. And I may or may not have berated myself with language my children aren't allowed to use.

Time Saved by Not Priming: negative 24 hours. Not even the weird pleasure I got from peeling up the paint (like I peel my sunburned skin sometimes. Which grosses out my husband, but I can't help it.) made the error worthwhile.
(Editor's Note: To be honest, I didn't want to blog that part. Because sometimes I'm an impatient idiot and try to get things done quickly. But I decided I'd use myself as Exhibit A in reminding us all of the importance of being patient and doing things right the first time. Learn from me, people.)
So. Back to square one. I sanded the top all the way down.

And, because I was running low on blue tape, I went a different route in achieving the stripe. I started with my contrast color and rolled it on. And I LET IT DRY COMPLETELY.

I then taped up and rolled on the "base" color on top of the tape. (You may or may not notice that I didn't do my stripe-sealing trick here...it's only because I had previously spilled most of the light green paint all over the garage floor and didn't have enough. So I just did small touchups afterward.)

Removed tape after a few minutes, let the whole thing dry overnight, and added a couple coats of polyurethane.
Here it is in my entry:

I like the crips lines and the color it adds. That shoe basket has got to go, and I have plans for a few accessory modifications, but it is what it is for now.

Took way longer than it should have, but I (re)learned some important painting rules. So. There's a silver lining...a silver lining that, hopefully, won't smear or peel up...
{shared Ginger Snap Crafts, Sew Much Ado}
Pin It Now!
Thank you for sharing this interesting and informative article, painting with airless spray gun will be faster and more interesting!
ReplyDeleteSpray Machine