Showing posts with label budget. Show all posts

DIY Gift Idea: Herringbone Paint Chip Art

Hey friends! The holidays are in full swing around here, and I couldn't be more thrilled. Other than the fact that every member of my household, sans myself, adores egg nog. Me, I prefer to not drink heart-attack-in-a-mug, thanks.
 
Anyway. If you're like me, you're always on the lookout for a great, fairly fast and easy but still personable, DIY gift idea. It's a bonus if it's inexpensive. This little number checks all those boxes and leaves you the rest of the afternoon to guzzle all the egg nog your soon-to-be-clogged heart desires.
 
 
(p.s. I totally have to give credit for this project's inspiration here.)

This is a great DIY art project that you can make for your own enjoyment or to give to someone else who has great taste. You'll need a frame, some paper or cardstock, some paint chips in an ombre gradient, scissors (puppy chew marks on said scissors are optional), and glue. I'd recommend grabbing several sticks of glue, because if you have kids the chances are high that half of them are dried out. But, again. Optional.
 
 
I began the project by cutting out the paint chips into herringbone-type parallelograms. I freehanded them, because I'm lazy like that. You could create a template if you prefer more exacting art. Also, be sure as you're cutting them out that you have about half the diagonals "going" each way - mirror images of each other shapewise, I mean. I just cut out a bunch because I wasn't sure what I'd want my ombre to look like.
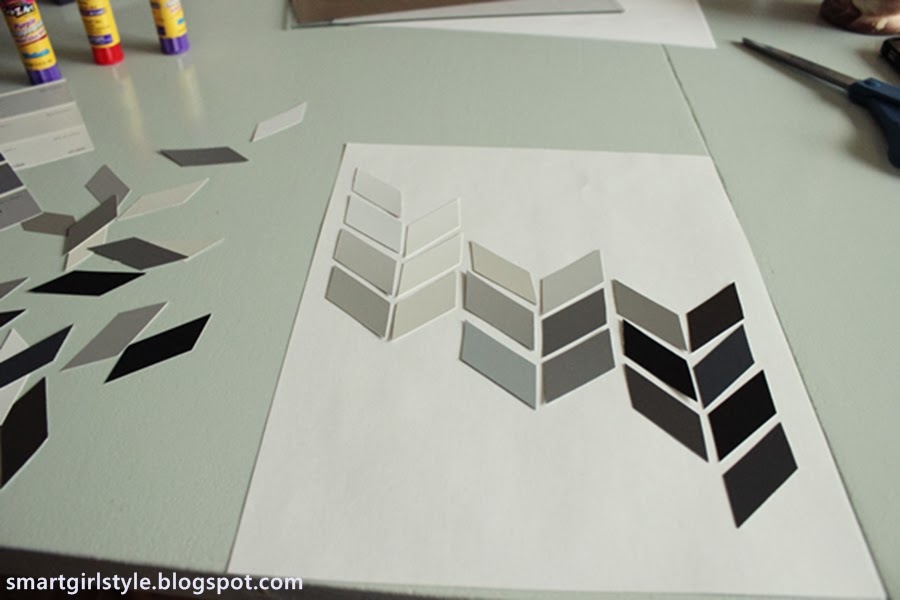
 
 
Laid them out on the paper (cut to frame size) to get a basic idea of what I wanted, then I started gluing them on piece by piece. I didn't mark anything here. You definitely could, and your herringbone pattern would look like perfection. Depends on how you like your DIY art, I guess!
 
 
Framed it. Loved it. Wanted some more of it...
 
 
...so I made a second one, this time with the herringbone in the landscape orientation.
 
 
Here's one of them, hanging at low height in the living room corner.
 
 
Nothing like mixing the Logan LDS temple, Georgia O'Keefe, and some herringbone paint chip art next to a faux bois table lamp, eh?
 
 
This was such a fun project for me. Therapeutic, with Christmas radio on in the background and my two youngest girls napping. Now go and do one (or four) yourself, either to keep or give away.
 
As always, thanks for stopping by!
 
(Feel free to check out my other ideas for paint chips: an ombre nursery mobile, a bit of art, or other great ideas for decorating on a tight budget.)
Pin It Now!

Grocery Shopping at Ikea...Minus the Groceries

I'm planning an Ikea adventure this weekend. Just some odds and ends to pick up...with no husband and four young kidlets in tow. Hoo boy. Here are some of the things on my list; we'll see what I actually end up bringing home:


Tray table a la (affordable) Saarinen style...ish:

Bunk beds for the girls' bedroom (although I'll admit, freely, that I'm super saddened to see their headboards go...):

Soap dispenser for the main bathroom:

Linen dish towels (I happen to love these):

Some frames, like this one:

 Wall-mounted reading lamps for the girls' bedroom:

A couple of stools for the girls' vintage double desk (I still can't get over how perfect this thing is!):

A couple of these clamp lamps for the kitchen (I have some ideas...):

Curtain rings for some new living room drapes thanks to the domino effect of decorating:

Plants (that's right, they're artificial. What of it?):
 
Some wall hooks, maybe like these, also for the girls' bedroom:
 
A tray or two (call me granny...I'm a sucker for purple accessories):
 
Some of these legs for a project I've got cooking...once it gets warm again!
 
And, let's be honest, probably about 50 bazillion other things will somehow end up in my cart. Because I'm impulsive like that.
 
What's your favorite thing to check out (or purchase) at Ikea? Am I forgetting some must-haves?
Pin It Now!

The Best Materials for Decorating on a Tight Budget

Have I told you all that we're trying to save up to take our kidlets to Hawaii this year? Well, we are. That's part of the reason I'm so budget-focused right now. Of course, I still have expensive dreams...

(Like Jennifer Aniston's luxe purple velvet chairs here, for example. If you had a cool $42 mil lying around a coupla years ago when her house was for sale, she probably would've thrown the chairs in for free.)
 
source
...but, for now, our family's financial priorities lie elsewhere. (ahem)
 
So, in the spirit of budgeting and decorating my home, the first thing I do is shop my house. What do I already have? Could it be repurposed? If so, awesome. However, there are times when the interior decorator in me needs something else to add a little home decorating boost but can't quite afford to make my whole dreams come true. ($42 million, anyone?)

Therefore, I present to you, my lovely readers, my top list of budget-friendly (translation: free, or pretty close to it) decorating resources. They're not for every project, to be sure, but they'll do in a pinch for a quick pick-me-up.


Pallet boards.
source
You knew I'd go here first, didn't you? Wood pallets are all the rage lately, and I've used them for several projects myself (like here and here). I've had the most success with finding quality pallets at my local Sears store. Just be sure to ask before taking, and be selective in choosing "safe" pallets to work with (what were they used for? were they chemically treated? are they moldy?). Also, keep those Tetanus boosters up-to-date!


Paint chips.

source
 

I've totally taken advantage of this free decorating resource for paint chip projects. I just love that you can choose any color(s) you want and then create artwork or functional pieces with paint chips for next to nothing. Just as a courtesy, though...make sure that you don't abuse the priviledge. Purchase some paint on occasion, too. :)


Sheets.

source
I've said it before, and I'll say it again: repurposing stuff (especially fabric) is a great use of resources. Using flat sheets as a fabric source, whether for curtains, bedding, or even artwork, is a great way to save money. Shop your own linen closet or get them inexpensively at supercenters. I think I'd bypass the thrift store on this one, though.


Mason jars.
source
These glass jars are sturdy and available in a variety of sizes and tints (or you could tint or paint your own), which make mason jars a prime candidate for a variety of home decor projects - lighting fixtures, planters, vases, random decorative accessories, you name it. Admit it...you've got some of these lying around with the well-intentioned plan that someday you're going to learn how to can, don't you? No? Just me? Oh...okay. Regardless, put them to good decorating use.


Cotton drop cloths.


source

Think beyond interior painting and how to paint a room when you look at drop cloths. These aren't free, but for a lot of yardage of heavy-duty cotton, they are a great budget option when sewing slipcovers, drapes, or anything, really, that could use a durable neutral fabric. You can purchase these at any hardware store starting at just $10. I just finished sewing a chair slipcover (my first one) using a 4'x15' drop cloth from Home Depot, and I'm pretty pleased with it (and the $12 price tag!).


Spray paint.

source

Also, I know that spray paint technically isn't "free," but I couldn't create a home decorating budget resources list and leave it out. Because for what you can do with a can of this stuff, it's such a great budget-friendly option. (Or, if you're a spray painting junkie like myself, you probably already have a bunch of cans sitting around waiting to be used up.) Transform furniture, frames, lighting, or random objects with some spray paint, and it'll freshen up an entire space. As I'm sure you already know.


 Am I forgetting anything obvious?

xox

Featured!

{shared: A Little Knick Knack, A Vision to RememberChic on a Shoestring Budget, Fingerprints on the Fridge, Finding Fabulous, Fireflies & Jellybeans, My Romantic Home, The Shabby Nest, What-About}

Pin It Now!

Create a Custom Weekly Chore Chart for your Kids

Hi!

Raise your hand if you watched the SuperBowl yesterday.
Raise your hand if you didn't care so much about the game itself but enjoyed watching the SuperBowl commercials yesterday.
Raise your hand if you sat in the room with your husband and father-in-law during the SuperBowl yesterday and pretended to care but, instead of the game, you watched the clock because you were anxious to use the TV to finish up Season 2 of Downton Abbey on dvd.

My hand is raised for one of those. I'll never tell which one. :)

Switching gears: As parents, Paul and I feel it's important to teach our kids about hard work and also about how to handle money. It seems like we've tried ev.ery.thing. to organize a chore/allowance method but, unfortunately for our household, couldn't find any chore chart ideas that worked for more than a week for one reason or another.
 
Our older kids (now ages 8, 6, and 4) have recently set big goals about things they want to save up for and buy. So Paul and I knew we had to get serious about figuring out a successful chores chart and allowance system. We also knew it couldn't be a fancy, complicated deal or we wouldn't stick with it.
 
So I created a super-easy, customizable clear vinyl modifiable weekly chore chart for our three oldest children. It features "pockets" where chores/responsibilities can be added, removed, and swapped out as needed. We've had it up and running for a little while now, and I must say, it's working. For all of us. We're so pleased.
 

If you're interested in doing something similar at your house, here's how I made it (with an explanation of how we use it):
 
Decide how big you want your chore chart to be. Ours needed three columns (for each "working" child) and about 10 rows under the names. Cut two pieces of clear vinyl to this size. (I got 2/3 of a yard of vinyl at JoAnn's for mine and have extra.)
 
Take one of these vinyl pieces and cut it into horizontal strips about 1-1.5 inches high (or whatever size you want, really). These will be your "pocket" rows.
The other piece of vinyl, which you've left intact, will be the back of your chart.
 
 
Take one of your vinyl strips and sew just the bottom edge to the bottom edge of your larger vinyl piece. (I used a large zigzag stitch with a small stitch size.) Lay a second vinyl strip above that and sew just the bottom edge of the second strip to the larger piece. Make sure you leave enough space between rows that you don't accidentally sew the top of one row closed as you're attaching the bottom of another.
 
 
(I apologize for the photos...clear vinyl isn't the easiest to photograph.)

Finish attaching the bottoms of all the strips to the larger vinyl piece. (Because of the slight spacing between rows, you might end an extra/unused strip.) Then sew up the two sides of the thing overall. You should have something that looks like this:

 
Next, you'll want to create your columns. Because mine is for three kids, I sewed mine into thirds. You can measure, but I kind of eyeballed mine. In fact, I eyeballed this whole project. Doesn't have to be exact!

 
You should end up with something like this, where each rectangular "pocket" opens up at the top:

 
A lovely pocketed organizer to fill with whatever your heart desires. We desire slave labor around here. :)

 
Ours includes (from top to bottom):
- Child's name (in white)
- Kitchen duty day (in blue)
- Everyday chores (in orange)
- 5 money-earning chores (in green)
- Bonus chores for extra money
- and some slots for extra chore cards, blank chore cards, and seasonal chore cards. As kids get older, these rows may be used for additional chores.

 
These chore slips will be swapped out each Saturday, after chores are completed and earnings are noted. Payday will be once a month (because I rarely keep the right cash on-hand).

 
So, it's nothing fancy, but it works for us. And, bonus, it helps our house get clean...ish.
 
I'm interested, though. What method(s) have worked for you for teaching your kids about jobs and money?
 
Featured!

Pin It Now!

Bedroom Makeover: Putting it All Together

Guest Bedroom Makeover
Day 12: Putting it All Together

**Note: This is part of a 12-step bedroom makeover series. Find the previous steps at the bottom of this post.**
Hooray! Operation: Make-Guest-Bedroom-Not-So-Scary is complete! Of course, I think it will take a few months (years?) for this room to really and truly "gel." But that's okay.
 
My goal was to decorate this bedroom for as little money as possible. Like, $5. Okay, not quite. Realistically, I wanted to keep it under $100. I'll let you know how I did, but first, let's take a moment to enjoy a photographical montage, shall we?
 
Yes. Yes we shall. Remember where we started:


Okay, not like I think I'm so cool or anything, but I feel like incorporating just a few low-cost yet creative bedroom decorating ideas has made a big impact.
 
Below is a photo of the first view of the room from the doorway. The curtains are a little long, but I haven't found the energy to take them down and re-hem them just yet. Heh.


Those Petit Bateau onesies on the wall are meaningful on many levels for me...here's a closeup of part of their awesomeness:


Recognize the chevron rug? I actually ordered a different rug for this space but decided I liked it (the new one) better in the master bedroom, so I swapped.
 
 
I need another nightstand in the corner there, but it's a tricky teensy space, and I'll have to find just the right thing. Also, a clock of sorts would be great to add somewhere.


Have I mentioned how much I love my little pallet board bedside table? Yes? Many times? Oh. Well, then, ditto to what's been said before. (Times two or three.)


And in case you're wondering where all the games and unsightly binders ended up, they're in this Ikea Billy bookshelf on the other side of the fabric-backed one. This arrangement of bookshelves? It rules. Much better, takes up less space, and it can hide-yet-keep-accessible stuff on one side and be pretty on the other. Win-win.


Part of the guest command center, complete with note paper (hanging via clothespins on a rope line), mints (which the kids found and have significantly depleted), pencils, and coat/purse hooks. I even sharpened the pencils. Yes. Applaud.


 Found this suzani on ebay and hung it on the random bare wall between the door and the closet. I'm not thrilled with it, but I'll survive. And it'll do for now.


Okay. Moment of budgetary truth.
 
Complete Budget Breakdown:
$10 - headboard mounting hardware
$12 - pom trim on curtains
$19 - clamp lamps + spray paint
$3 - rope for hanging curtains & mirror
$3 - suzani fabric wall hanging
$15 - shelf-back fabric
$7 - bedding towers/Greek key trim
$12 - flat sheet for back of duvet cover
 Everything else I had on-hand, was repurposed, or was free.
 
TOTAL: $81
Wowie-wow-wow!! Under budget! That, like, never happens. Ever.
 
And now, may I just share a heart-warming story with you all? I've found my husband lying on this bed no less than three times in the past few days since finishing the bedroom makeover.
"You like the room, hon?" I asked him on the latest occurrence.
His reply: "This room is awesome. You did so great...I don't even want to leave."
 
Yesssss! *wipe a tear* Seriously. That's what home decor is all about - the feeling you get when you're in a space. Don't you think?
 

  Anyways. I hope you've maybe gleaned some bedroom decorating ideas for yourself and enjoyed this makeover as much as we did...and do...and will. (Especially my parents, whose room this has become when they visit.) Now I'm going to sit back and relaxy-lax for a little while before I embark on my next endeavor.
 
If you're interested, check out other bedroom ideas in my master bedroom makeover... or find living room ideas...or, heck, just take a tour of the whole house!
 
 Check out the previous steps to this bedroom makeover:
Day 2: Paint Walls
Day 7: Nightstands
Day 10: Bedding
Day 11: Throw Pillows
 
Featured!
   Lovely Crafty Home  
 
 
Pin It Now!
Related Posts Plugin for WordPress, Blogger...
Pin It button on image hover