Showing posts with label reuse. Show all posts

Laundry Room Makeover: Reveal

If you have a huge laundry room, good for you. I may or may not be extremely jealous of you.

I, for one, have a teensy tiny laundry room that also doubles as a mud room, random home improvement products and housewares storage room, garden center, and school stuff dropoff. It hasn't been very attractive for many years (if ever)...here's proof.

Although it's far from the laundry room of my dreams, it's now functional and organized and simple and, dare I say, even a little bit pretty.

Directly to the right of the doorway (barely visible in the photo below), I painted the back of a corner shelves/hooks unit to match the walls and added some grey fabric storage cubes. Each of our children has one to throw their bike helmets and lunch boxes and whatever-else-makes-their-hearts-sing into because, hey, no one can see it!
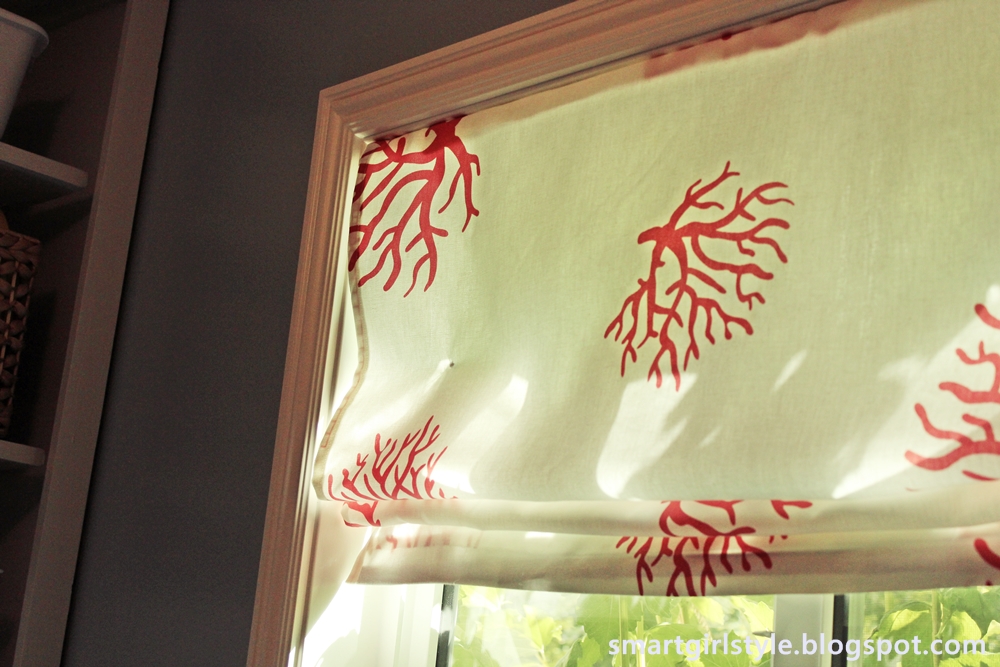
If you recall, we previously had some lame-length curtains hanging here that were constantly attracting dryer lint and getting in the way of the kids' hooks. No bueno. So I took part of one of the panels from my living room drapes FAIL (read all about it here) to create a laundry room window shade WIN. It only took about an hour one afternoon while I watched a What Not To Wear rerun. I absolutely love the funky coral fabric in this space.

Next up: the floor.

Check it (and more!) out after the break.

Pin It Now!

How to Paint a Striped Rug

So I've been working really hard on redoing my laundry room. Which is a totally true statement if you replace the words "really hard" with "not really all that hard." Heh.
 
Because some makeovers require tons of time and effort. And some require just a little TLC and some new storage containers. Guess which one my laundry room falls into?
 
Be that as it may (a phrase that instantly ages me by about four decades), I've tried to be pretty creative in this transformation to save a little bit of cash and to focus on reusing what we already have. Because, truly, I'm getting tired of waste. Such a drain on this fine planet of ours!
 
So, yeah. Recycling. Starting with creating the rug of my dreams(ish) out of a rug from my closet.
 
 
I started with this old 3x5 flatweave rug that has literally been folded up in my closet for months if not years.
 
 
Wanting to start with the lightest color, I grabbed some old white interior latex paint and eyeballed the chunkiness of my stripes. That's right. Totally guessed on those suckers. I don't think I even get an "A" for effort here. Dah well. "A" for efficiency. So. That's something.
 
 
I didn't focus so much on paint thickness here as just getting the stripes laid out. Because my rug is a flatweave, it was actually quite simple to keep the lines straight. What I did try to do was make sure the sides of each stripe (as in, down into the weave lines) were crisp and well-painted. It didn't matter if I went outside of my "stripe zone."
 
 
The original woven stripes of my rug did show through for the first 2-3 coats. I probably could've primed the rug first to decrease the amount of absorption, but for some reason that was too much work for me. I kept the coats of paint fairly thin and just worked from one end of the rug to the other, over and over and over again.
 
 
I think I ended up doing four(ish) coats of white paint. Then I grabbed some leftover salmon-coral paint (from my ombre painted dresser) and used this for my darker stripes.
 
I didn't even rinse out my brush, that's how laaazzzzzzzyyyy I went on this project.
 
Same method as with the white stripes, except this time I was more careful about the stripe sides. Because I had focused on getting the white paint thoroughly into the weave "grooves," I just painted my darker lines along the tops of the weave lines for a crisp result.
 
This is making no sense, is it. Sighhh...
 
 
I think I only had enough paint to do two and a half coats of the coral, and it kind of shows the original woven stripes. Not super noticeable in real life, though. I let the freshly painted rug dry overnight and brought it inside the next day.
 
 
Not bad for about an hour of painting and $free$. I love the graphicality that a striped rug adds to a space, especially a cheerful one like a laundry room. Oh, and if you're interested, feel free to check out the complete post on my tiny laundry room makeover.

Featured!
    http://linda-coastalcharm.blogspot.com/


{shared: A Glimpse Inside, A Jennuine Life, Angels Homestead, Be Colorful, Be Different Act Normal, Boogieboard Cottage, Chic on a Shoestring Budget, Coastal Charm, Craft-O-Maniac, Creating my Way to Success, DIY by Design, DIY Showoff, Domestically Speaking, Finding Fabulous, Fingerprints on the Fridge, GingerSnap Crafts, House of Hepworths,  I Should be Mopping, Lines Across, Mercy Ink, My Girlish Whims, My Romantic Home, My Uncommon Slice, New Nostalgia, Not Just a Housewife, Sew Can Do, Simply Designing, Sugar Bee Crafts, Sumo's Sweet Stuff, The 36th Avenue, The DIY Dreamer, The Shabby Creek Cottage, The Shabby Nest, Thrifty Decor Chick, Under the Table & Dreaming, What-About}
Pin It Now!

Got branches?

This tree in our backyard has been a great climbing tree for the kids when they're too small/short to climb the "big kid" cherry tree.
 
 
Unfortunately, it was becoming dangerously lopsided, and Paul and I feared that one day it would break under the weight of an unsuspecting climbing kidlet. So we chopped it, leaving a stump. (Which, fortuitously, can now double as an au natural hose holder.)
 
 
 Good news, though. See the beautiful ringed pattern in that wood? The branches became the start of our living room fireplace filler.
 
 
I've been looking for something non-lame to do with our unused fireplace for literally years. We definitely need more wood, but I like the direction this is headed.


What do you guys do with your unused fireplaces? Or are we the only ones on the planet who don't actually use the fireplace?
Pin It Now!

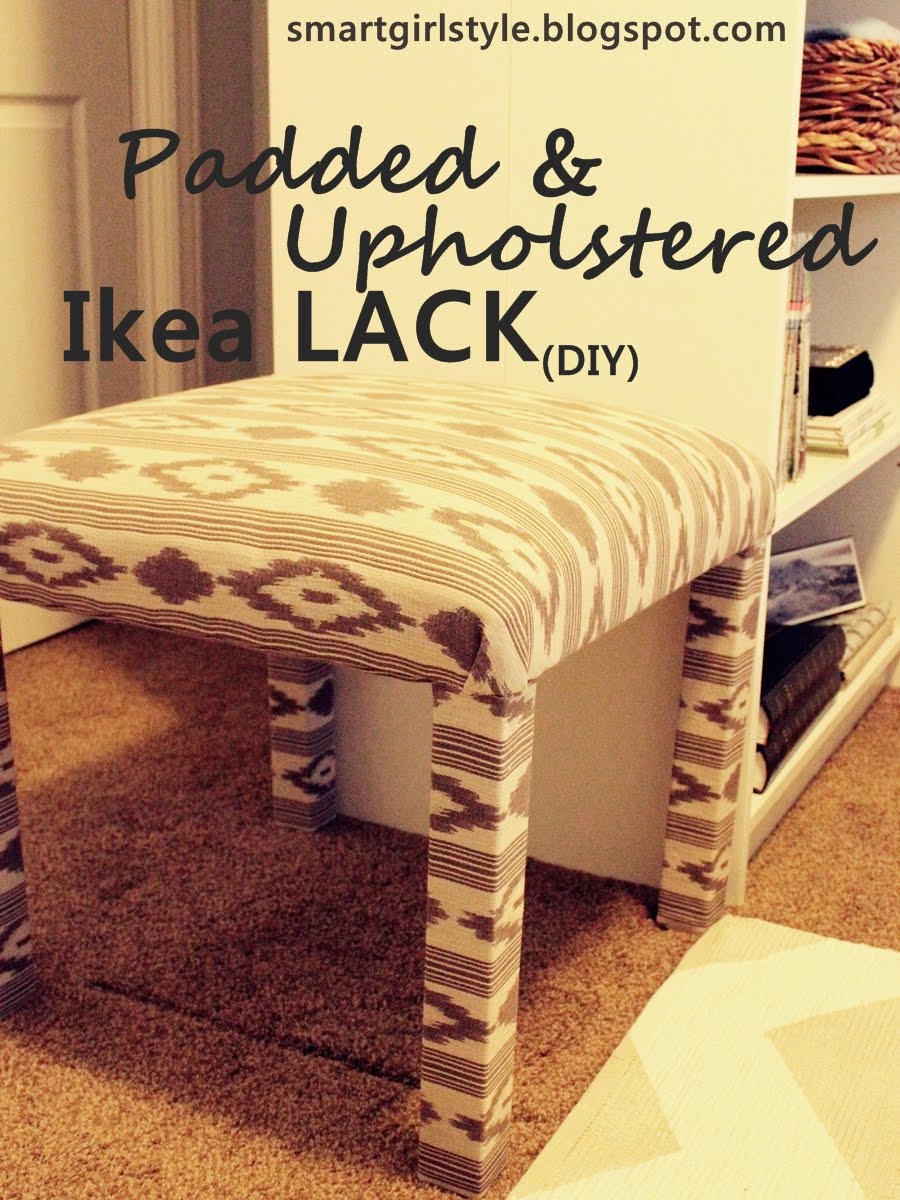
Ikea LACK Table into Padded Bench

Do you have a LACK table from Ikea? If so, may I humbly recommend giving its mass-produced-ness a quick & easy makeover? Padded & upholstered & fabulous.
 
 
And the good news is: you don't have to have reupholstery experience to do this. Seriously. Anyone can do this!
 
 
Start by removing the legs from your table.
 
 
Cut whatever you're using for your padding. I used high density foam, about 2" thick.
 
 
Layer on the floor these things in this order: batting (you want about 6" larger than your foam on all sides), foam, and upside-down table top.
 
 
Pull up and staple your batting to hold everything in place and smooth out the edges. Don't worry about getting it too taut - that's what you'll do with the fabric.Staple all the edges and the corners down, keeping things as smooth as possible.
 
 
Lay your fabric down (right side down against the floor) and then your freshly padded top (top side down) on it. Fabric should be about 6" larger on all sides as well. Begin stapling as shown below.
 
 
One of the most important things to remember about upholstery is to pull very taut. You want your fabric super smooth. In fact, while stapling mine, I knelt on top of the table (to smoosh down the padding) as I stapled...and I still pulled the fabric very taut before stapling.
 
 
After stapling the edges, fold your corners neatly so there is no bunching or gathering. Staple in place. Trim all excess fabric, because you'll be screwing the legs back in. Mine had a ton of fabric here, so I cut it as close to the staples as I dared and hoped for the best.
 
Now onto the legs. You upholstery purists are probably going to die, but I totally blatantly left visible staples on my legs. My table is going against a wall, and since the legs will all be turned so staples are facing the wall, it will not be noticeable.
 
 
If you feel uncomfortable doing it this way, by all means bust out your nailhead trim and go to town. I did add a dab of hot glue to the tops of my legs to hold the fabric in place (because the fabric at the top of the legs did not overhang. I wanted as little excess fabric there as possible.), and when I screwed the legs on I made sure all the stapled edges were facing the back.
 
 
Fabric used: Mill Creek Beau Geste 100% Cotton Upholstery Fabric in Praline from here. I love this table-turned padded bench now. Like, so so much.
 
 
p.s. I use and recommend this spray adhesive:
 
Pin It Now!

Bedroom Makeover: Throw Pillows

Guest Bedroom Makeover
Day 11: Throw Pillows (or: How to Sew a Ruched Throw Pillow)

**Note: This is part of a 12-step bedroom makeover series. Find the previous steps at the bottom of this post.**
 
 
This tutorial is kind of cheating. It's like take-n-bake pizza, where the metaphorical "pizza place" that does all the hard work is this lady's tutorial on how to sew an envelope pillow, and your hypothetical "oven" is my post here on how to do the ruching.
 
Which...mmmmm...pizza.
 
So. First become familiar with how to do an envelope-style pillow. Then combine that knowledge with the simple steps in this post. Then pop something pre-made into the oven and feel domestic.
 
*For explanation purposes, I'm assuming a square pillow form. If yours is different, adjust accordingly.*
 
For the front (ruched) pillow piece, you'll want a rectangle that's as wide as your pillow form (maybe give yourself an extra half inch, but don't go too big) and about 2ish times as long as it is wide. (Longer than that for a more intense ruche, shorter than that for more subtle gethers. Measure to your taste.)
 
Decide how many lines of gathering you want in your ruche. (I wanted 4.) To figure out uniform spacing between each ruche line, divide the width of your pillow by one more than that (in my case, 5) to determine the spacing between each ruche line. 
 
So, for example: if your pillow width is 18" and you want 4 ruche lines, you would divide 18 by 5 for a spacing distance of approx. 3.5". (You can fudge the actual measurements slightly.)
 
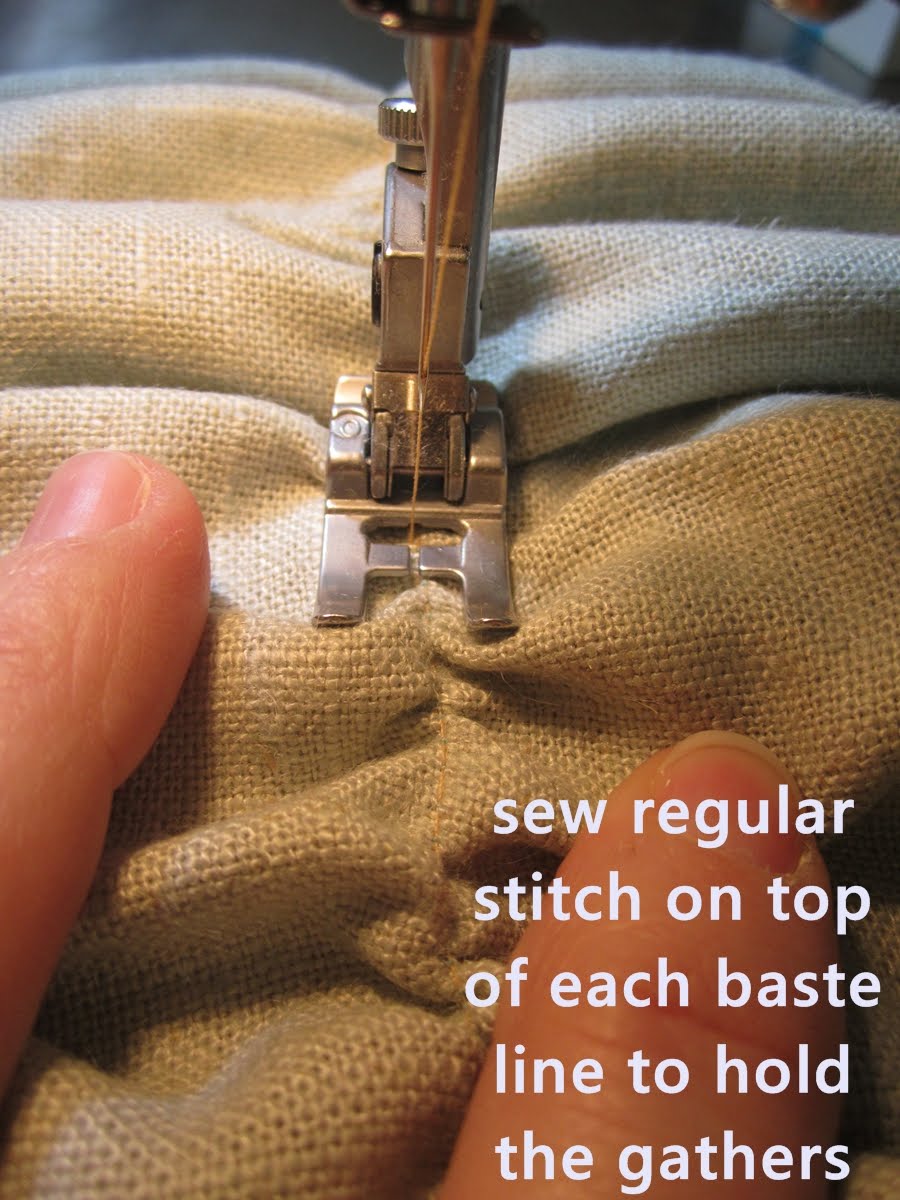
Start by doing a baste-stitch along the two sides as close to the edge as you can safely do it. Then measure, mark (pin or pencil on the fabric's wrong side), and baste-stitch (or ruffle-stitch) down each of those lines, which run the length of your fabric piece.
 
Because I wanted four lines of ruching on my pillow, I ended up actually sewing six lines. This is because the two sides must be gathered in order to fit to the pillow's back-side fabric. (They're hard to see on the photo above, but the lines are there in light blue thread.)
 
Gather a line until it is as long as the width of your fabric (for example, 18"). Secure it in place by sewing a regular stitch on top (or just to the side) of your baste-stitch. (You can then rip out your baste stitches if you want. I did not, because you can't really see the thread anyway on mine.)  
 
 
Do this for each baste-stitch line. This is the most time-consuming part, for sure. You should have a securely ruched square when you're done. Sew your ruched piece to your two envelope-style back pieces (right sides together), all four sides.
 
 
From the back:
 
Turn it right-side out, and put in your pillow form. Success!
 

Come back for Day 12: Putting it All Together to see the whole room (mostly) completed! This is my favorite day of this whole process, hands down, when I get to share the finish line with you all.
Check out the previous steps to this bedroom makeover:
Day 2: Paint Walls
Day 7: Nightstands
Day 10: Bedding
 
Featured!
Project Inspire   
 
Pin It Now!

Bedroom Makeover: Stuff on the Walls

Guest Bedroom Makeover
Day 9: Stuff on the Walls

**Note: This is part of a 12-step bedroom makeover series. Find the previous steps at the bottom of this post.**
 Hey! Let's get something on those guest bedroom walls, shall we? Remember the rope-hung mirror on the inspiration board? Well, I was considering all sorts of ways to make that happen but was dragging my feet because they all seemed too hard.
 
(Please tell me sometimes you don't do stuff, too, because it seems too hard? Pretty please?)

Regardless of my impressive level of laziness, in doing some major reorganization and deep cleaning to make this much-needed guest bedroom makeover happen, I stumbled across this Ikea mirror I had purchased years ago but never used.
 
 
I then stumbled myself to Hobby Lobby and purchased some sisal rope.


I began by donning my most neon belt. (Just kidding. I had already donned that. But its neon-inity rockets me into the superpowers realm, I think.

(A realm in which sleep is unnecessary and women are encouraged to flock to peanut m&ms like salmon to the River Capistrami.)
(I have no idea what/where Capistrami is, or even if that's how it's spelled. I would guess Italy?)
(What kind of ridonculous tangent is this? C'mon. Back to bidness.)
 
I began, for real this time, by unscrewing the swivel attachment from the sides.


I ended up with a free-floating mirror with two side attachment screws, which was perfect.


Except the screws were too short to tie rope to. So I rummaged through our "leftover screws" jar and found a replacement. Two of 'em. The thread variance didn't matter.

 
Tied a single knot around the screw as tightly as possible. Repeat on other side.
 
 
To secure the knot, I hot-glued some key spots and also, subtly, the rope-end so it wouldn't unravel.
 
 
I like how it's looking hanging from my hand in the kitchen. That's a good sign, I guess.
 
 
Maybe I'll like it even more if I actually clean the thing? Hmmm. A clean, non-toothpaste-splattered mirror. An interesting concept I'd like to ponder for a while.
 
Come back for Day 10: Bedding. You're going to love this one. Maybe. And if you don't, at least you'll have time between now and then to bake yourself some muffins that for SURE you'll love. So. Win-win scenarios, that's what I'm all about.
Check out the previous steps to this bedroom makeover:
Day 2: Paint Walls
Day 7: Nightstands
Pin It Now!

Bedroom Makeover: Curtains

Guest Bedroom Makeover
Day 6: Anthropologie-Inspired Curtains

**Note: This is part of a 12-step bedroom makeover series. Find the previous steps at the bottom of this post.**

K, not a ton to say here, so I'll be brief...and if that concept isn't jaw-dropping, I don't know what to say. Which should make me even more brief, which would cause your jaw to drop even closer to the floor... Isn't this a fun never-ending cycle of brevity opposition.
 
So. I really like these curtains from Anthropologie. They're friendly, fun, and bee-boppy. (Nope, not an adjective. But if "bee-bop" could be used more often and in more grammatical functions in the world, communication as we know it would be enhanced. Just sayin'.)
 
 But, no shocker here, the $100ish pricetag for the curtains was a little too steep for me. So I recreated them using 10 yards of pom trim (ebay) and a white flat sheet I had on-hand, cut in half vertically.
 
 
Then I hung the two panels from a rope just for something playful.
 

I happen to love it, what can I say. It's all unexpected and maybe awesome.
 
Speaking of awesome, you should totes come back for Day 7: Nightstands. Yep. Totes.
Check out the previous steps to this bedroom makeover:
Day 2: Paint Walls
 
 
Pin It Now!

Bedroom Makeover: Ikea Malm Dresser

Guest Bedroom Makeover
Day 3: Ikea Malm Dresser Makeover

**Note: This is part of a 12-step bedroom makeover series. Find the previous steps at the bottom of this post.**


A few years ago, our house experienced a major flood. Much of our basement furniture was destroyed, so our insurance company gave us money to replace it. In a hurry to be done with the painful coordinate-with-insurance-company experience, we went to Ikea.
 
Oh, to have that pivotal moment back again! Would have made different decisions. Dah well.
 
One of the purchases we made was this lovely (cough) Malm dresser. We placed it in the equally lovely (cough hack snort) guest bedroom.
 
 
Here it has sat for several years. *yawn* I know. So. Boring.
 
Because I'm recently obsessed with Greek key trim (here and here), and because it's in the dead of frigid ice-capped winter around here (thus, doing a full-fledged furniture paint project isn't possible), I thought a golden trim around the front of the dresser would be a simple way to add a little style.
 
I got some 1.5" frog tape and sketched out some measurements.


Then I transferred said awesome sketch onto true-size graph paper. The frog tape was slightly less than 1.5", so I adjusted measurements accordingly.

 
Cut it out. Because I excel at using scissors. Me & my 4-year-old, we're awesome like that.

 
I used a clear cutting board to find the corner point, then taped my homemade stencil there. (As it turns out, a "simple" Greek key pattern isn't the easiest to reproduce...if anyone has an easier way to do this, I'd love to hear!) ('Cept then I'd be mad because I did it the hard way. So. Nevermind.)

 
Penciled in around the corners where I'd be putting tape...

 
...and taped out the dresser's four corners accordingly.

 
Then I added in the stripes of frog tape between the key-detailed corners.

 
I used watered down acrylic gold paint because I've heard it's hard to get a good finish on gold latex (is that true? lies?) and because it's too cold to spray paint around here for the next bunch of months. In hindsight, I'm not sure I'd make the same decision again, but it turned out okay for what it is...a dresser in a largely unused basement guest bedroom. So.
 
And also: I started out using a foam brush. Because I always associate acrylic paints with craft projects and craft projects with foam brushes. But I quickly swapped the foam out for a regular skinny paint brush. Way better, less streaky. 

 
Look, ma! No dropcloth!
 
Painted two or three coats, then peeled off the tape. I love frog tape, you guys. This was my first time using it, actually, and I found it to be far superior to blue painter's tape. Crisper lines and everything. 
 
After the paint dried, I did a suuuuuper light sanding of the paint edges (didn't want to sand off the drawers' original white finish). Then I quickly sprayed the whole thing with clear coat spray. Which officially makes this a craft project instead of furniture makeover. And also we all almost died from the fumes, but it would've been for a good cause, so it's fine.
 
 
Here's the freshly sprayed finished product.
 
 
I like it. Not, like, break down into sobs of joy while I stroke it and give it a name or anything, but it doesn't make me sad, for sure. I'd give the acrylic paint a 7.5 out of 10 -- love the sheen and actual color ("antique gold"), but don't love how it's so thick and a little streaky.
 
Regardless, you should totally come back for Day 4: Pallet Headboard. I love this one! I promise it involves no acrylic paint. And if that doesn't impress you at this point, well, I don't know what to say. 'Cept this: come back anyway. :)
Check out the previous steps to this bedroom makeover:
Day 2: Paint Walls
 
Featured!
featured button  
 
Pin It Now!
Related Posts Plugin for WordPress, Blogger...
Pin It button on image hover