Showing posts with label stripes. Show all posts

How to Paint a Striped Rug

So I've been working really hard on redoing my laundry room. Which is a totally true statement if you replace the words "really hard" with "not really all that hard." Heh.
 
Because some makeovers require tons of time and effort. And some require just a little TLC and some new storage containers. Guess which one my laundry room falls into?
 
Be that as it may (a phrase that instantly ages me by about four decades), I've tried to be pretty creative in this transformation to save a little bit of cash and to focus on reusing what we already have. Because, truly, I'm getting tired of waste. Such a drain on this fine planet of ours!
 
So, yeah. Recycling. Starting with creating the rug of my dreams(ish) out of a rug from my closet.
 
 
I started with this old 3x5 flatweave rug that has literally been folded up in my closet for months if not years.
 
 
Wanting to start with the lightest color, I grabbed some old white interior latex paint and eyeballed the chunkiness of my stripes. That's right. Totally guessed on those suckers. I don't think I even get an "A" for effort here. Dah well. "A" for efficiency. So. That's something.
 
 
I didn't focus so much on paint thickness here as just getting the stripes laid out. Because my rug is a flatweave, it was actually quite simple to keep the lines straight. What I did try to do was make sure the sides of each stripe (as in, down into the weave lines) were crisp and well-painted. It didn't matter if I went outside of my "stripe zone."
 
 
The original woven stripes of my rug did show through for the first 2-3 coats. I probably could've primed the rug first to decrease the amount of absorption, but for some reason that was too much work for me. I kept the coats of paint fairly thin and just worked from one end of the rug to the other, over and over and over again.
 
 
I think I ended up doing four(ish) coats of white paint. Then I grabbed some leftover salmon-coral paint (from my ombre painted dresser) and used this for my darker stripes.
 
I didn't even rinse out my brush, that's how laaazzzzzzzyyyy I went on this project.
 
Same method as with the white stripes, except this time I was more careful about the stripe sides. Because I had focused on getting the white paint thoroughly into the weave "grooves," I just painted my darker lines along the tops of the weave lines for a crisp result.
 
This is making no sense, is it. Sighhh...
 
 
I think I only had enough paint to do two and a half coats of the coral, and it kind of shows the original woven stripes. Not super noticeable in real life, though. I let the freshly painted rug dry overnight and brought it inside the next day.
 
 
Not bad for about an hour of painting and $free$. I love the graphicality that a striped rug adds to a space, especially a cheerful one like a laundry room. Oh, and if you're interested, feel free to check out the complete post on my tiny laundry room makeover.

Featured!

    http://linda-coastalcharm.blogspot.com/


{shared: A Glimpse Inside, A Jennuine Life, Angels Homestead, Be Colorful, Be Different Act NormalBoogieboard Cottage, Chic on a Shoestring Budget, Coastal CharmCraft-O-Maniac, Creating my Way to Success, DIY by Design, DIY Showoff, Domestically SpeakingFinding Fabulous, Fingerprints on the Fridge, GingerSnap Crafts, House of Hepworths,  I Should be Mopping, Lines Across, Mercy Ink, My Girlish Whims, My Romantic Home, My Uncommon Slice, New Nostalgia, Not Just a Housewife, Sew Can Do, Simply Designing, Sugar Bee Crafts, Sumo's Sweet Stuff, The 36th Avenue, The DIY Dreamer, The Shabby Creek Cottage, The Shabby Nest, Thrifty Decor Chick, Under the Table & Dreaming, What-About}
Pin It Now!

Classic B&W Stripe

Happy Valentine's Day!

Speaking of love...what's not to love about a little classic black-and-white-stripe? 

 
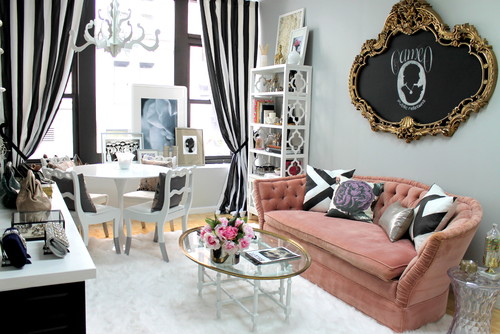
It's a pattern that's been around forever, I know, but it's such a graphic, memorable pattern. Do you remember this space of Kirsten Hollister's in Oprah magazine a few years back? 
 

And how about this striped headboard? Simple, bold, and beautiful.
 
Pinned Image
source
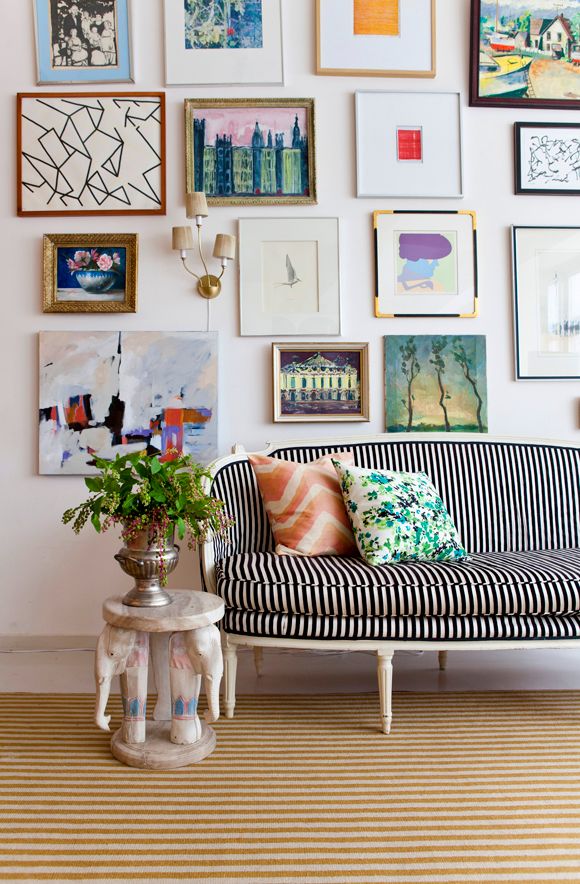
This one (below) of Jenny's from LGN just might be my favorite - I love everything about this photo, from the gallery wall to the throw pillows to the modern slim b&w striped upholstery on a vintage settee.

source

I know stripes can sometimes look a little circus-tent-ish. I think a narrower stripe helps to avoid that, though.

I hope your day is wonderful. I've got kids a little under the weather (again) (or "still," really), so we get to cozy up at home today. Just, y'know, not too close...

Happy Valentine's Day.
xoxo
Pin It Now!

Ikea Hemnes Dresser + A Racecar Stripe

**Addendum: See the complete(ish) bedroom makeover here.**

Question: "Can you paint Ikea furniture?" Answer: Yes!
And what's more, you can do a relatively simple upgrade with big-time impact. Paint furniture, then paint stripes to create a two-thumbs-up Racecar Stripe Painted Dresser. Great for a boy bedroom (at least for the boy at my house), and inexpensive to do.
 
 
Here's what I did: Take your furniture...
 ...and pull out all drawers, then remove all hardware. Lightly sand all surfaces to be painted with 220-grit sandpaper. (I know everyone hates sanding. It doesn't take long, though, to just rough up the surface a bit, and the paint job will be so much better in the ened. I'd recommend it.) You don't want to scratch the laminate, but you want to give your primer every possible chance of adhering to the surface.
 
Prime with 1-2-3 Zinsser primer. One or two coats, and sand any obvious areas. Then pull out your oil paint and spread on your first coat. A few things I noticed:

(1) This was my first time using oil based paint. I used Rustoleum's Aluminum oil paint (premixed, from Home Depot). Everything I read prior to painting talked about thinning out your oil-based paint before painting with it, but in this case, my paint was as thin as thin could be. Seriously. Like water. There was a massive glob at the bottom of the can when I first opened it, so I spent quite a long time stirring to break that up. The glob finally did go away/dissolve, but the paint was still very thin.
 
(2) A high quality paintbrush is the way to go. Not a cheapo brush, not a foam brush, not a roller. And it worked best for me when I just applied the paint and left it alone to dry.
 
 
(3) Let each coat dry com.plete.ly. Like, at least 24 hours. At least.
 
 
(4) I ran out of 220-grit sandpaper (which is pretty fine), so before my 2nd coat of paint, I used the finest grit I had. I'm not sure what number it actually was, but using it was a HUGE mistake. Totally scratched the paint rather than sanded it smooth. Then, like a rookie (and a lazy one at that), I thought that I didn't want to re-sand everything again, so *maybe* if I just painted over the scratches, the new coat of oil paint would fill them in. Nope. Let the record show that oil based paint is pretty much the same as latex paint - what you see in smoothness along the way is what you'll get at the end.
 
 
Crap. But it was a good lesson for me, if nothing else (kind of like how this experience was a good lesson in the importance of priming). So I bought the right sandpaper and came home and resanded everything down to the laminate. Basically, I started over. Which was a huge pain, as I'm sure you can imagine. But the finish ended up perfectly smooth. Yessss!
 
Taped out the stripes with frog tape (my new heart-throb of painters tape), painted two coats of blue latex stripes, and applied a topcoat of polyurethane. If you do a furniture painting project like this involving multiple coats and multiple colors, please please please promise me you won't rush it. In one sentence (above), I summarized about 4 days' worth of work and wait.

All in all, the project took me about 6 days (2-3 were due to my mistake. Oops.). Don't be overanxious, and do let the paint dry absolutely thoroughly between coats. I can't stress this enough. If you don't, and you paint on top of a mostly (but not completely) dry surface, it will be forever tacky when you put stuff on the furniture.
 
 
We really really like the finished result. And that oil paint? I'm a believer. My kids aren't exactly easy on furniture, and this paint job is actually standing up to them.
 
 
I like the impact of the stripe - a little retro, a little boyish, a little detail awesomeness that goes a long way. Plus, bonus, it was super simple to measure out (just four strips of frog tape) and paint. 
 
 
Anyone ever painted with oil based paints that were super duper thin before? Or have yours been thick (like all the places I've read) and needed thinning?
 
Either way: I like this look in my son's bedroom. And so does he. Victory all around.

If you're interested, feel free to check out the rest of his simple yet effective bedroom upgrade.

Featured!
      UndertheTableandDreaming


{shared: A Glimpse Inside, A Jennuine Life, A Little Knick Knack, Angels Homestead, Be Colorful, Beyond the Picket FenceBoogieboard Cottage, Busy BeesC.R.A.F.T., Chic on a Shoestring Budget, Coastal Charm, Crafty Texas Girls, Creating my way to Success, DIY by DesignDIY Showoff, Domestically Speaking, Dragonfly Designs, Fireflies & Jellybeans, GingerSnap CraftsHouse of Hepworths, I Should be Mopping the Floor, Lil Luna, Mercy Ink, Miss Mustard Seed, My Girlish Whims, My Romantic Home, My Uncommon Slice of Suburbia, New Nostalgia, Not Just a Housewife, Parlo & Logi, Sew Can DoSew Much Ado, Shabby Nest, Simply Designing, Somewhat Simple, Style Sisters, Sugar and Dots, Sumo's Sweet Stuff, The Shabby Creek CottageUnder the Table & Dreaming, What-About}
Pin It Now!

Racecar Stripes & Some Random Words

I don't remember much about elementary school, but one thing I do remember was from 2nd grade, where I learned that the word "racecar" is spelled the same forward and backward.

And if you're amazed at that little tidbit, well, the learning never stops here at SmartGirlStyle. Which is completely true if you replace the words "never stops" with "is going to start any minute now."
 
 
I know it seems like my DIY posts have been a little sparse lately. This isn't because I'm being lazy! It's because I've decided a few things about my blog and life and home.
 
Firstly: Contrary to what I maybe have led you to believe, I don't do deadlines in home decorating very well (as discussed in my living room design post). I don't like to force things that should, over time, come out naturally. I read somewhere that home decorating decisions should be smart and they should be honest. I've mulled those words around in my head lately, and I feel like I need to get back to them.
 
Secondly: I have no professional interior design programs under my belt, but I enjoy analyzing inspiring interiors and figuring out ways to make UNinspiring interiors better. You might see more of this here. Because I'm queen of this little interior design-ish blog, that's why. (Not to go all Napoleon on you, of course.) (Although the man did crown himself Emporer. And I may have nicknamed this blog "Frenchy." So. There is that.)
 
Thirdly: I've been working on updating my son Carson's bedroom (it's been in desperate need for quite some time now) but haven't blogged about that yet. Not-a-baby-anymore-but-not-a-teenager-either boys' room designs are a challenge, at least for me, unless you're okay with lego- and plants.vs.zombies-themed posters and tchotchkes everywhere. As a rule, I'm not okay with that. But then when I see how much it means to him, I figure there has to be a balance somewhere.
 
Fourthly: It's cold outside, and I have nowhere to paint furniture. Well played, Old Man Winter. Well played.
 
Fifthly: BUT I thumbed my nose at Old Man W and set up shop in the recently redone guest bedroom to paint my son's Ikea Hemnes. I've definitely learned a lot about how to paint furniture with oil based paint...starting with the realization that if a color is named "aluminum," chances are it's going to look like, well, aluminum. I'm now a virtual fountain of knowledge of such things. 
 
 
I'll post "real" photos when his room begins coming together, maybe later this week.
 
Anyway.
 
I don't really know how to end this post. With a joke? With an exclamation of gratitude? With an awkward silence followed by an abrupt walkaway? Yes, let's do that one.


*door closes*
 
 
Pin It Now!

Bedroom Makeover: Ikea Malm Dresser

Guest Bedroom Makeover
Day 3: Ikea Malm Dresser Makeover

**Note: This is part of a 12-step bedroom makeover series. Find the previous steps at the bottom of this post.**


A few years ago, our house experienced a major flood. Much of our basement furniture was destroyed, so our insurance company gave us money to replace it. In a hurry to be done with the painful coordinate-with-insurance-company experience, we went to Ikea.
 
Oh, to have that pivotal moment back again! Would have made different decisions. Dah well.
 
One of the purchases we made was this lovely (cough) Malm dresser. We placed it in the equally lovely (cough hack snort) guest bedroom.
 
 
Here it has sat for several years. *yawn* I know. So. Boring.
 
Because I'm recently obsessed with Greek key trim (here and here), and because it's in the dead of frigid ice-capped winter around here (thus, doing a full-fledged furniture paint project isn't possible), I thought a golden trim around the front of the dresser would be a simple way to add a little style.
 
I got some 1.5" frog tape and sketched out some measurements.


Then I transferred said awesome sketch onto true-size graph paper. The frog tape was slightly less than 1.5", so I adjusted measurements accordingly.

 
Cut it out. Because I excel at using scissors. Me & my 4-year-old, we're awesome like that.

 
I used a clear cutting board to find the corner point, then taped my homemade stencil there. (As it turns out, a "simple" Greek key pattern isn't the easiest to reproduce...if anyone has an easier way to do this, I'd love to hear!) ('Cept then I'd be mad because I did it the hard way. So. Nevermind.)

 
Penciled in around the corners where I'd be putting tape...

 
...and taped out the dresser's four corners accordingly.

 
Then I added in the stripes of frog tape between the key-detailed corners.

 
I used watered down acrylic gold paint because I've heard it's hard to get a good finish on gold latex (is that true? lies?) and because it's too cold to spray paint around here for the next bunch of months. In hindsight, I'm not sure I'd make the same decision again, but it turned out okay for what it is...a dresser in a largely unused basement guest bedroom. So.
 
And also: I started out using a foam brush. Because I always associate acrylic paints with craft projects and craft projects with foam brushes. But I quickly swapped the foam out for a regular skinny paint brush. Way better, less streaky. 

 
Look, ma! No dropcloth!
 
Painted two or three coats, then peeled off the tape. I love frog tape, you guys. This was my first time using it, actually, and I found it to be far superior to blue painter's tape. Crisper lines and everything. 
 
After the paint dried, I did a suuuuuper light sanding of the paint edges (didn't want to sand off the drawers' original white finish). Then I quickly sprayed the whole thing with clear coat spray. Which officially makes this a craft project instead of furniture makeover. And also we all almost died from the fumes, but it would've been for a good cause, so it's fine.
 
 
Here's the freshly sprayed finished product.
 
 
I like it. Not, like, break down into sobs of joy while I stroke it and give it a name or anything, but it doesn't make me sad, for sure. I'd give the acrylic paint a 7.5 out of 10 -- love the sheen and actual color ("antique gold"), but don't love how it's so thick and a little streaky.
 
Regardless, you should totally come back for Day 4: Pallet Headboard. I love this one! I promise it involves no acrylic paint. And if that doesn't impress you at this point, well, I don't know what to say. 'Cept this: come back anyway. :)
Check out the previous steps to this bedroom makeover:
Day 2: Paint Walls
 
Featured!
featured button  
 
Pin It Now!

Burlap Tree Skirt: No-Sew DIY

Let's pretend you have an old tree skirt that you don't love, about a yard of burlap and red fabric, and 25 sticks of hot glue gun glue that you don't know what to do with. Oh, and a naked Christmas tree. And also two hours. And a handful of cookies.
 
If I just described you, go buy yourself a lottery tickey (you'll only need one) because today is your lucky day. (Actually, you better make it two.) (Okay, fine, maybe three. But three really should cover you for some big winnings.) Because those are the only ingredients you need to make a no-sew tree skirt just like this one:
 
 
(I supPOSE the cookies might be optional. But barely.)
 
Let's start at the beginning of this very short and, let's be honest, probably boring tale.
 
Recently, someone handed-me-down (handed-down-me?) this tree skirt:


It wasn't quite to my taste, but I didn't turn it down because...well, I just didn't. I thought I could make it work somehow. And that "somehow" became today. With chunky stripes of burlap.
 
(We scour the forest and cut down our own tree every year, which is a great tradition. However, these trees are much sparser than artificial ones, and a tree skirt definitely shows up.)
 
I started by cutting lots of strips (probably used about a yard of each fabric) about 4" wide. You probably all know this, but just in case you don't: to cut burlap straight, make a snip on the edge and then pull a single strand all the way through the full length of the burlap. That opens up a straight line wide enough to cut.


K, so now we have lots of red and burlap strips. Perfect. I flipped my tree skirt over and started hot gluing the burlap to the quilted side. You'll figure out a method that works for you, but basically what I ended up doing was laying down a line of hot glue about 6-8" long on the existing skirt, gluing the strip to it (while leaving a little extra fabric/burlap at the top as a "pleat"), then gluing down the pleat.


I started using a weight (rather than my fingers) to hold down the freshly glued pleats while I moved on to the next 8", and that worked well.

 
Around and around. My circles had gotten a little off by the time I got to the top/inside of the tree skirt. There was an awkward space there -- too much to be covered by one ruffle, but not enough for two ruffles all the way around. So I glued down some red fabric to hide the white skirt and did my last red ruffle on top of that.

 
Then I decided that I actually had a little more space than I thought but just a small strip of burlap left, so I added a "half" ruffle. (An exact science, this ain't.) I did make sure that the top ruffle was centered to the front of the tree skirt. *gold star*

 
Here she is:


And look what cuteness I spied: my sweet 6-year-old daughter already leaving Christmas gifts for everyone under the tree.

 
Welp, there you have it.* I'd highly recommend this project. It's inexpensive (free!), and the end result is delightful.
 
Happy burlap-ing.
 
*Addendum: I just saw a verrrry similar skirt like this on Pinterest. Hooray for great minds thinking alike!
 
Featured!
IhookedupwithHoHlamespice  


Pin It Now!
Related Posts Plugin for WordPress, Blogger...
Pin It button on image hover