Showing posts with label plants. Show all posts

Cobalt Blue Front Door

I was "reading" a book on how to build sheds the other day, when I came across an image that has stuck with me ever since.
 
It was of this quaint old shed, goldish-yellowy-orange, with a cobalt blue door and window trim and a plethora of red flowers in pots all around it. I'm sorry I don't have a pic to share, but trust me. It was warm, fresh, inviting, and exuberantly unapologetically colorful. Loooooove the cobalt.
 
 
I decided yesterday that, frankly, front doors are huge. I mean, their impact and their ability to set the stage (or not) for the home.

On that soapbox note, here's the dreariness that greeted people to my own home for the past (insert embarrassingly high number) years:
 
 
The weird part is, the people who live inside actually do have personalities! And aren't color blind! Although the random passerby would have no clue about either case.
 
I've actually struggled with customizing our front door space for a while because the rock is a bit dated and represents a color scheme I'm not big into, but it's permanent as far as we're concerned. I also wanted a replacement front door with glass, for more natural light inside. But that would lend zero privacy to much of our upstairs, and that wasn't a great option.
 
What to do, what to do.
What I did in the end was paint the door and ignore the rock altogether. Pretend like it's not there. Because I'm nice like that.
 
So. A quick coat (or three) of blue, and you can see immediate life starting to stir within. Or without. Whatever. Not so happy were the wooden house numbers straight from the 80s. I painted them the same color as the door (obv) but soon realized my mistake. Wowsahs. 


I bought some great contemporary house numbers from Home Depot and was going to hang them up, but I chickened out because (a) I'd be mounting them into stone, and I've never done that before, (b) I couldn't even figure out how to take the old numbers off, and (c) I was going to royally screw up the whole thing. I mean, it's kind of a prominent place to be debuting a hammer drill.
 
So I brushed a few coats of black paint over the numbers to tide us over until I could work up the courage to deal with stone and drills and scariness like that. It's not great, but it'll do.
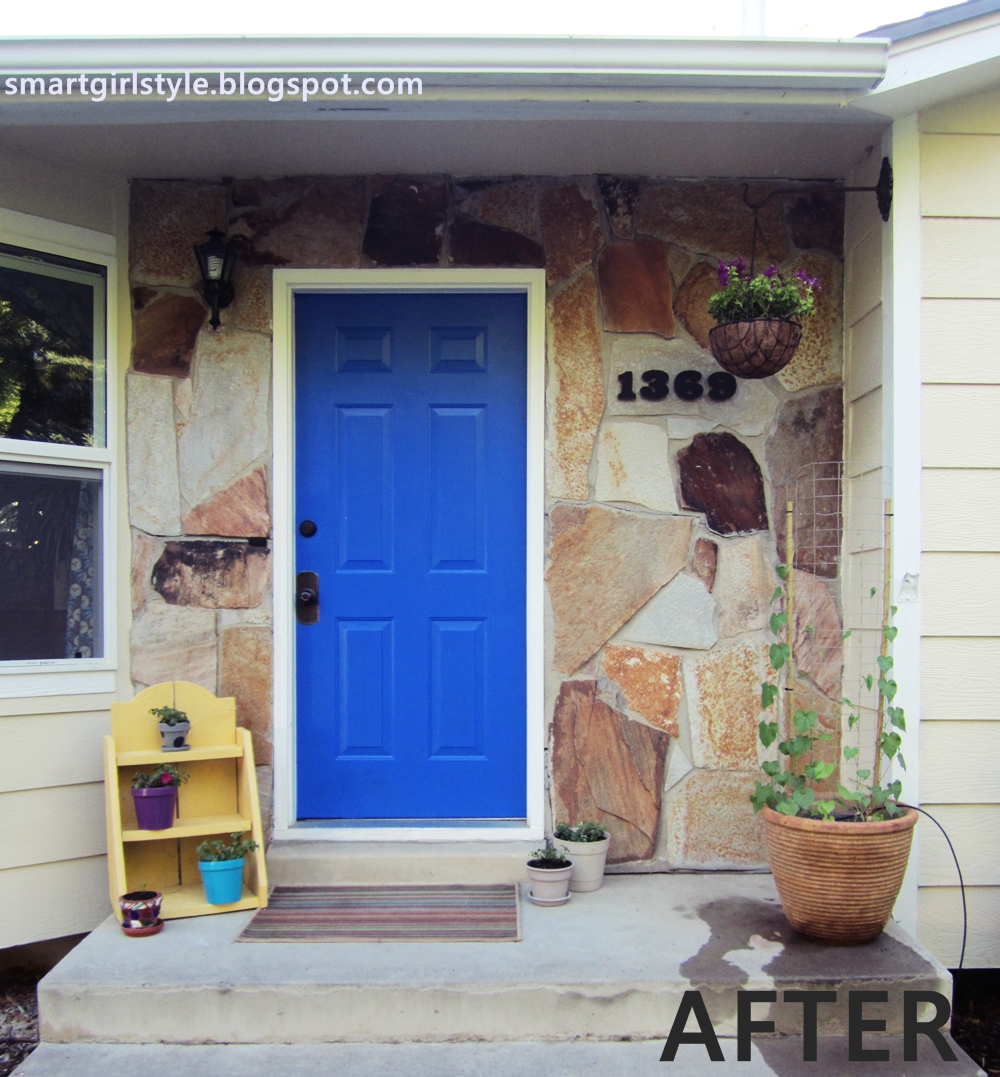
 

Watered some plants, which I realize now makes for a not-so-lovely photo detail. Dah well. I also had some leftover exterior yellow paint from another project, so I gave this sad pot spot a buttery facelift. (mmmm...butter...) And swapped out the welcome mat for a rug I had on-hand until I fall in love with something else to replace it.

Looking better.
 

I thought some color up top would be nice, so I dug up an old hanging basket and hung it from a metal planter-holder-upper thing mounted on the side of the house. (Didn't like how high the flowers would have been if hooked from the ceiling.) I potted some petunias and am sending them all the green-thumb vibes I can muster. Which is about two, total.

 
The lone impatien. Grow, friends!
 
 
And here we are again:
 
 
Still some things to do (like deal with that drip hose and get the flowers to bloom, baby, bloom), but I like where this is headed. It's out there, it's wild, it's bold. But what about you all? Are you a yay or nay on colorful front doors?

{shared: A Glimpse Inside, A Jennuine Life, Be Colorful, By Stephanie Lynn, C.R.A.F.T., Chic on a Shoestring Budget, Coastal Charm, Craft-O-Maniac, Crafty Texas Girls, DIY by Design, DIY Dreamer, DIY Showoff, Domestically Speaking, Dragonfly Designs, Finding Fabulous, Fireflies & Jellybeans, GingerSnap Crafts, House of Hepworths, I Should be Mopping, Ivy and Elephants, Jembellish, Lil Luna, Mercy Ink, My Girlish Whims, My Romantic Home, My Uncommon Slice, Not Just a Housewife, Sew Can Do, Simply Designing, Sugar & Dots, Sumo's Sweet Stuff, The 36th Avenue, The Shabby Creek Cottage, The Shabby Nest, The Style Sisters, }
Pin It Now!

Box Vegetable Garden: The Early Stages

Part of my recent absence from blog-ville has been due to our intensified gardening efforts. Paul and I built boxes for raised gardens last fall. And now we're putting things together for this growing season.
 
We're new at this. Box gardening, I mean. But we're researching a ton and approaching things carefully and intentionally. I'll tell you what we've done so far and keep you up-to-date on our process (including fails and successes) if you're interested in doing something similar.

 
FYI: We are in LOVE with this gardening method. It's so awesome and crisp and awesome and organized and did I say awesome.
 
 
So. Here's the north side of our house, where our box garden layout resides. Last fall, we built our two garden boxes to be 5' x 18' each. When we redid our sprinkler system last fall, we had the guys install a drip line for the garden.
 
After reading this fantastic square foot gardening book (All New Square Foot Gardening), we realized our boxes were too big, because we wouldn't be able to easily access stuff growing in the middle. So my husband had the genius idea of separating out partial "walkways" in the boxes.
 
 
What we now have in each original box are three square(ish) growing boxes (the big sections you see above), two 1'x2' boxes (the small parts on the left side of each), and two 4'x2' walkways (next to the small parts). Each box is 10" high, I think. Or maybe 12". We weather-proofed the outer wood last fall with something like this but were too impatient to waterproof the walkway edge boards, so I guess time will tell if that's a regrettable move.

We then added the soil, a combination of 1/3 vermiculite, 1/3 peat moss, and 1/3 compost varieties. No pics of the process, sorry, but it's not hard to figure out. Just dumped equal amounts onto a big old tarp, shook it up P.E.-parachute-style, and dumped it into the boxes. For the record, my husband is Rake-Man Extraordinaire. 11 years married, and I had no idea he possessed this super power.

Next step: trellises.
 
 
Using 1/2" electrical conduit, we constructed trellis frames for the north sides of both boxes. They are removable but secured into the ground by rebar. We bought nylon trellis netting at the hardware store (also available at garden centers) and tied it securely to the conduit frames. These will be for our climbing plants (e.g., peas, beans, tomatoes, etc.).
 
Paul built two 8'x8" boxes (long and skinny) for climbing flowers to create a "wall" between the yard and the garden. We added a trellis for these as well.
 
 
And what backyard is complete without a big blue ball by the fence?
 
We also put an archway, inherited from Paul's parents, in the corner so that the garden's entrance/exit would be intuitive and, hopefully, beautiful (once we get our climbers growing). Here's what it looks like from the backyard:
 
 
Pea gravel all around the boxes has been awesome, so you don't get muddy and can easily maneuver a wheelbarrow around all sides.
 
 
Planting is continuing to be a whole-family affair, which is fun.  The kids have all been super helpful, in their own way...
 
...from 8-year-old Carson,
 
 
...to 7-year-old Layla,
 
 
...to 4-year-old Addie (her swinging IS helpful, actually),

...to 1-year-old Violet, the cutest supervisor of all time. Those big baby blues don't miss a beat.
 
 
We planted some bare root strawberries (four per square foot) and constructed a simple yet *hopefully* effective bird keepaway cage out of PVC pipe and plastic bird netting for this section. It's removable (just lift up the cage) and secured into the ground with rebar.
 
 
We planted half Hecker and half All-Star varieties, I believe.
 
 
Grow, you bundles of potential deliciousness. GROW.
 
 
A large section is devoted to onions (16 per square foot). We grew some from seeds but then realized it's way faster and easier to get onion starts at the local garden store. So we supplemented with a million of those babies.
 
 
I'll say here that we marked out each square foot with nylon string, triple-strung for each line and tied onto metal 1/2" brackets screwed onto the box garden walls. This may seem like an unnecessary step, but it's been great for us - makes planning and planting (and, we anticipate, harvesting) so much easier. Plus, don't you think it just looks cool?
 
Red candy onions. Never tried 'em, but...c'mon. CANDY onions? I'm in.
 
 
So far, we've only been able to plant our strawberries, peas, cabbage & leafy greens, and onions outside. The rest of the stuff is in the greenhouse, patiently awaiting mother nature to officially go on spring break.
 
 
There you have it. Box gardening at the Smarts' house. Next up for the backyard: building a shed and a clubhouse for the kids. This should be interesting...
 
Featured!
A Jennuine Life Thrifty to Nifty Thursdays Feature
 
Pin It Now!

DIY Boxwood Wreath

Raise your hand if you're kind of intimidated by the faux foliage aisles at craft stores. (I totally made that name up, btw. Faux foliage, I mean. But I'm going to roll with it.)
 
 You can't see me, but both my hands were raised for about 4 minutes, until I realized this post isn't going to write itself. So. If your hands flew to the sky, let's be new best friends.
 
But I've got boxwood bushes outside. And an old grapevine wreath. (Unless the stick-like wreath I've got isn't grapevine, and if that's the case...my only excuse is that I wasn't kidding about avoiding the faux foliage craft supplies.) And I like greenery that I'm not bringing to a slow yet inevitable black-thumb demise. (Which, for the record, includes about everything.)
 
Nothing ground-breaking in this little tutorial here. But if you're interested:
 
 
I know many people could whip out a great wreath out of almost anything. I'm not one of them. Because I'm usually afraid that (a) the wreath will be crap, (b) it will look like my great-grandmother did it, (c) nothing against my great-grandmother and her craftiness, (d) I really could've stuck with option A and been good here.
 
My, we're chatty today. Let's get started. It really is an easy project. Here's what I used:
 
 
I just kind of started by tucking in the boxwood branches between the wreath's grapevine-sticks.
 
 
Kept working my way around, trying to keep the tips of the boxwoods at an even(ish) distance from the wreath itself as I moved around.
 
 
I added hot glue sparingly at first. Then, as I got into it, I was hot gluing everything...the stems, the leaves, the wreath, my thumb...

 
Ultimately, I wanted things pretty secure without the glue where possible, but having the hot glue there will help me sleep better at night.
 
 
From the side: I didn't go all the way toward the back of the wreath, but after completing the front, I did go back and glue on some light "filler" boxwood branches to camouflage the sticks. I mean grapevines. Whatever.
 
 
And here it is. It's a wild child, and I like it. It actually brings out a little bit of green in the painting above it. We've had that painting there for 2-3 years, and I had no idea it had green in it. Go figure. 
 
 
That blue shelf is still on my hit-list, but I haven't found its replacement yet. The new wreath looks super dark in this pic of my ridiculously ever-evolving (but not necessarily improving) entryway, but it's actually a lovely bit of fresh green in reality:

 
So anyways. There. Go forth and make your own faux foliage wreath now! I think you could really use anything, not just boxwood branches (their benefit is that they stay green). It was actually kind of fun and therapeutic. And I've got two thumbs, anyway, so burning one of them off with hot glue is no big deal in the grand scheme of things.

Featured!
       A Vision to Remember

{shared: 36th Avenue, A Glimpse Inside, A Jennuine Life, A Little Knick Knack, A Vision to Remember, Be Colorful, Beyond the Picket Fence, Boogieborard Cottage, C.R.A.F.T., Chic on a Shoestring Budget, Coastal Charm, Craft-O-Maniac, Crafty Texas Girls, Creating my Way to Success, DIY by Design, DIY Dreamer, DIY Showoff, Finding Fabulous, Fireflies & Jellybeans, GingerSnap Crafts, House of Hepworths, I Heart Naptime, I Should be Mopping, Keeping it Simple, Lil Luna, Mercy Ink, My Girlish Whims, My Repurposed Life, My Romantic Home, My Uncommon Slice of Suburbia, New Nostalgia, Not Just a Housewife, Parlo & Logi, Pretty Things for You, Sew Can Do, Sew Much Ado, Shabby Nest, Simply Designing, Somewhat Simple, Sugar and Dots, Sugar Bee, Sumo's Sweet Stuff, The Busy Bees, The Shabby Creek Cottage, Thrifty Décor Chic, Under the Table & Dreaming, What-About Co.} Pin It Now!

Living Room Makeover

** Addendum: If you're interested in seeing further updates to the living room, check out this post. **
 
Remember how last week was supposed to be living room makeover week? Yeah...well, a day (or week) late and a dollar (or more) short. That's me.
 
Even though it's not finished (it won't ever be "finished," that's part of the fun!), I've loved incorporating a variety of living room ideas that have resonated with me into this space. This has been a slow process for me (going on six years now)...I wonder what the next six years will bring...
 
So. Buckle up for transformation time. This minivan lady can haul.
 
It's a pretty basic/modest living room design; here's the room before:
 
 
You guys, so many things about the setup above I want to address but am almost embarrassed to. Furniture pushed up to the walls and a wiiiiiiide open No Man's Land in the middle of the room, the blinds-only windows, the plant with a single huge stalk being held up by the wall (whut the...), the grossly undersized clock above the mantel, the two 80s track lights, the unintentional focus on an unused stark fireplace, the blah-ness of it all.
 
 
 But here's the thing. We didn't have money (or it wasn't a priority) for a huge one-stop living room overhaul. I've had lots of living room decorating ideas over the years, though, so we've changed things up and out, one piece at a time. 
 
Over the course of a few years, the living room coming closer to how I actually want it. It's certainly not perfect now, but here's where we're at today:


We've changed a lot (starting with the color scheme), and it's still a little busy. But I love it so much more as a room that's closer to what our family is all about.


We changed the paint color (BM Phoenix Fossil 3/4), added ceiling-to-floor drapes (Amy Butler), added bookcases to flank the fireplace (Ikea) and painted the backs, changed out track lighting...for more track lighting (Lowe's), added a large mirror above the mantel (TJ Maxx), added a rug (Overstock), added old & new furniture, and did some DIY projects (sunburst mirror, reading lamp, throw pillows, etc.).

 
I love how mixing old and new tells "our" story. Like my gramma's ottoman that I recovered with an Ikea sheepskin, this vintage trunk as a coffee table, the reupholstered thrift store tulip chair, the bookshelves filled with books and objects from my childhood (which are now weaving themselves into the childhoods of my own children).
 
 
I'm working on trying to increase the calmness of a space by being well-edited. Not there yet, but I'm learning my own style as I go.


It's a work in progress. For life. But a fun work in progress!
 
 
Some projects still looming: slipcover the grey loveseat, find another lamp (or pair of lamps) for the white sofa, make the bookcases look more built-in, and redo that light blue side table.


What people see immediately when they walk through our front door into our entry way:
 
 
I don't think decorating a living room space is ever "done." At least, not for me. Which...hooray! Because changing things up brings me joy.
 
 
Annnnd, one more time. Just because it's like a cyber-pat on the cyber-back:
 
 
Addendum: I'm constantly changing things up... Exhibit A: This sneak peek into the most recent living room changes:
 
 
If you're interested, check out my most recent living room update, some of my other room makeovers, or the full (yet incomplete) house tour. 
 
Have a wonderful week!
xox 


Featured!
    My Uncommon Slice of Suburbia   New Nostalgia
 
also shared:


TDC Before and After
Pin It Now!
Related Posts Plugin for WordPress, Blogger...
Pin It button on image hover