Showing posts with label how to. Show all posts

How to Paint a Dining Room Table

Hey kids, as you can probably tell from the title, this post is about painting a dining room table. Because I'm crazy like that.
 
 
I'm not talking about slapping on a coat of paint and calling it good. I'm talking about durability. About kid-friendly. About withstanding milk spills and spaghetti night. About not worrying whether or not the tabletop is going to survive its next Kids' Craft Hour.
 
If you get what I'm saying, nod your head.
If you're nodding your head, read on...
 
I've been wanting to swap our current counter-height dining set for a standard table height for some time now, just because our dining room space is so small. I felt like everything was disproportionate.
 
Fortuitously enough, we looted a dining table and four chairs from an unsuspecting and sweet neighbor who's moving. (By "looted," I mean we hauled away her table while she practically did a happy dance because it meant she wouldn't have to move it anywhere herself.)
 
 
It's in decent shape but not great. Hey, it was free - no complaints here.
 
 
I love wood, don't get me wrong, but as you can see from the photos above, this particular table is (a) not real wood, and (b) possessing a wood tone that is too dark for our small dining room. We needed a little more light-n-bright. Stat.
 
 
The chairs are in good condition, but not exactly what I'm after. That's another project for another day. Soon.
 
 
There are a million and three ways to paint a dining table (believe me, I've scoured the interwebs and have taken copious notes), but this is the way I went about it. If you're looking to embark on a similar project yourself, feel free to add my humble account here into your mix of research.
 
(Continue reading after the jump.)
Pin It Now!

How to Make a Roman Shade (using everyday materials)

I don't know why it is, but for some reason, roman shades seem super intimidating to make, don't they? I thought so for a long time, until several years ago I bit the bullet and just made one. Then two. Then a few more. Now I don't know why I ever made curtains. Roman shades are, honestly truly and sincerely, very DIY-able.
 
I hope to convince you in this post. Ready? Let's get to it.
 
 
This post is super photo-heavy, so you'll want to click through for the full tutorial.

Pin It Now!

Building a Clubhouse, Part Deux

I don't know if it's the cooler weather or the craziness of back-to-school life with swimming, piano, scouts, and the miscellaney of life, but I'm struggling finding time to do projects around here. Does anyone else ever go through days or weeks (or, fine, months...) like that? Where the hours in your day simply don't allow for all you want to do?
 
That's me, right now.
 
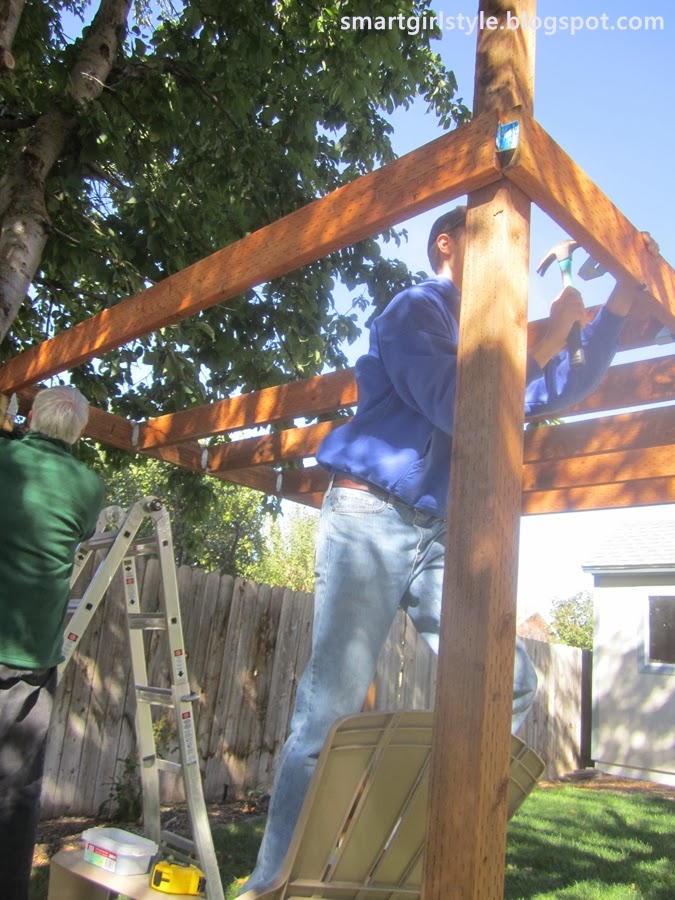
But remember how we started building a clubhouse, slash, treehouse for the kids in the backyard? Good news: we're still making progress on it! 
 
Let's begin where we left off last. First, we added brackets to attach the floor frame to the bolted tree support.
 
 
Broke some child slave labor laws to do so.
 
 
After the four outer frame boards (pretreated 2x6 lumber) were leveled and attached to the posts, we started hanging the floor joists with brackets. The floor joists were spaced 16" apart, center to center.
 
 
Click through for the rest of building a clubhouse...
Pin It Now!

How to Paint a Striped Rug

So I've been working really hard on redoing my laundry room. Which is a totally true statement if you replace the words "really hard" with "not really all that hard." Heh.
 
Because some makeovers require tons of time and effort. And some require just a little TLC and some new storage containers. Guess which one my laundry room falls into?
 
Be that as it may (a phrase that instantly ages me by about four decades), I've tried to be pretty creative in this transformation to save a little bit of cash and to focus on reusing what we already have. Because, truly, I'm getting tired of waste. Such a drain on this fine planet of ours!
 
So, yeah. Recycling. Starting with creating the rug of my dreams(ish) out of a rug from my closet.
 
 
I started with this old 3x5 flatweave rug that has literally been folded up in my closet for months if not years.
 
 
Wanting to start with the lightest color, I grabbed some old white interior latex paint and eyeballed the chunkiness of my stripes. That's right. Totally guessed on those suckers. I don't think I even get an "A" for effort here. Dah well. "A" for efficiency. So. That's something.
 
 
I didn't focus so much on paint thickness here as just getting the stripes laid out. Because my rug is a flatweave, it was actually quite simple to keep the lines straight. What I did try to do was make sure the sides of each stripe (as in, down into the weave lines) were crisp and well-painted. It didn't matter if I went outside of my "stripe zone."
 
 
The original woven stripes of my rug did show through for the first 2-3 coats. I probably could've primed the rug first to decrease the amount of absorption, but for some reason that was too much work for me. I kept the coats of paint fairly thin and just worked from one end of the rug to the other, over and over and over again.
 
 
I think I ended up doing four(ish) coats of white paint. Then I grabbed some leftover salmon-coral paint (from my ombre painted dresser) and used this for my darker stripes.
 
I didn't even rinse out my brush, that's how laaazzzzzzzyyyy I went on this project.
 
Same method as with the white stripes, except this time I was more careful about the stripe sides. Because I had focused on getting the white paint thoroughly into the weave "grooves," I just painted my darker lines along the tops of the weave lines for a crisp result.
 
This is making no sense, is it. Sighhh...
 
 
I think I only had enough paint to do two and a half coats of the coral, and it kind of shows the original woven stripes. Not super noticeable in real life, though. I let the freshly painted rug dry overnight and brought it inside the next day.
 
 
Not bad for about an hour of painting and $free$. I love the graphicality that a striped rug adds to a space, especially a cheerful one like a laundry room. Oh, and if you're interested, feel free to check out the complete post on my tiny laundry room makeover.

Featured!
    http://linda-coastalcharm.blogspot.com/


{shared: A Glimpse Inside, A Jennuine Life, Angels Homestead, Be Colorful, Be Different Act NormalBoogieboard Cottage, Chic on a Shoestring Budget, Coastal CharmCraft-O-Maniac, Creating my Way to Success, DIY by Design, DIY Showoff, Domestically SpeakingFinding Fabulous, Fingerprints on the Fridge, GingerSnap Crafts, House of Hepworths,  I Should be Mopping, Lines Across, Mercy Ink, My Girlish Whims, My Romantic Home, My Uncommon Slice, New Nostalgia, Not Just a Housewife, Sew Can Do, Simply Designing, Sugar Bee Crafts, Sumo's Sweet Stuff, The 36th Avenue, The DIY Dreamer, The Shabby Creek Cottage, The Shabby Nest, Thrifty Decor Chick, Under the Table & Dreaming, What-About}
Pin It Now!

How to Sew a Professional Pillow Cover

 
I'm no seamstress, you guys. But when I bought this settee with the intent of reupholstering it, I knew that I'd have to BRING IT in the sewing department. Because it's mostly pillows, and the crispness of how they looked would make or break the end result.
 
I'm super happy with the result, and the reason why, in a nutshell, is that I took my time and paid attention to detail. Period. If you're interested, here's how I did it:
 
Here's the original pillow, one of the two back cushions on the settee:
 
 
I decided to take the pillow cover apart, piece by piece, so I could use these bits for my pattern.

Read more about this process after the jump...
Pin It Now!

How to Sew a Patchwork Accent Pillow (DIY)

If you're like me, you probably have a bajillion fabric scraps lying around.
(Hopefully, for your sake, that's where the similarities end...because I do things like burn dinner and "forget" to make my bed.)
 
Let's use those scraps to make something Mr. Anthro Paul Ojee would be proud of, shall we?
(For the record...I'm not proud of that last sentence. Apologies.)
Enter: DIY Patchwork Throw Pillow Tutorial. (Check out this post for other patchwork eye-candy, if you're so inclined.)

Transforming an old drab throw pillow into a patchwork accent pillow is cheery, it's bright, and it costs nothing, or very very little (if you need cording, for example, you might have to buy that).

 
Read more after the jump...
Pin It Now!

Box Vegetable Garden: The Early Stages

Part of my recent absence from blog-ville has been due to our intensified gardening efforts. Paul and I built boxes for raised gardens last fall. And now we're putting things together for this growing season.
 
We're new at this. Box gardening, I mean. But we're researching a ton and approaching things carefully and intentionally. I'll tell you what we've done so far and keep you up-to-date on our process (including fails and successes) if you're interested in doing something similar.

 
FYI: We are in LOVE with this gardening method. It's so awesome and crisp and awesome and organized and did I say awesome.
 
 
So. Here's the north side of our house, where our box garden layout resides. Last fall, we built our two garden boxes to be 5' x 18' each. When we redid our sprinkler system last fall, we had the guys install a drip line for the garden.
 
After reading this fantastic square foot gardening book (All New Square Foot Gardening), we realized our boxes were too big, because we wouldn't be able to easily access stuff growing in the middle. So my husband had the genius idea of separating out partial "walkways" in the boxes.
 
 
What we now have in each original box are three square(ish) growing boxes (the big sections you see above), two 1'x2' boxes (the small parts on the left side of each), and two 4'x2' walkways (next to the small parts). Each box is 10" high, I think. Or maybe 12". We weather-proofed the outer wood last fall with something like this but were too impatient to waterproof the walkway edge boards, so I guess time will tell if that's a regrettable move.

We then added the soil, a combination of 1/3 vermiculite, 1/3 peat moss, and 1/3 compost varieties. No pics of the process, sorry, but it's not hard to figure out. Just dumped equal amounts onto a big old tarp, shook it up P.E.-parachute-style, and dumped it into the boxes. For the record, my husband is Rake-Man Extraordinaire. 11 years married, and I had no idea he possessed this super power.

Next step: trellises.
 
 
Using 1/2" electrical conduit, we constructed trellis frames for the north sides of both boxes. They are removable but secured into the ground by rebar. We bought nylon trellis netting at the hardware store (also available at garden centers) and tied it securely to the conduit frames. These will be for our climbing plants (e.g., peas, beans, tomatoes, etc.).
 
Paul built two 8'x8" boxes (long and skinny) for climbing flowers to create a "wall" between the yard and the garden. We added a trellis for these as well.
 
 
And what backyard is complete without a big blue ball by the fence?
 
We also put an archway, inherited from Paul's parents, in the corner so that the garden's entrance/exit would be intuitive and, hopefully, beautiful (once we get our climbers growing). Here's what it looks like from the backyard:
 
 
Pea gravel all around the boxes has been awesome, so you don't get muddy and can easily maneuver a wheelbarrow around all sides.
 
 
Planting is continuing to be a whole-family affair, which is fun.  The kids have all been super helpful, in their own way...
 
...from 8-year-old Carson,
 
 
...to 7-year-old Layla,
 
 
...to 4-year-old Addie (her swinging IS helpful, actually),

...to 1-year-old Violet, the cutest supervisor of all time. Those big baby blues don't miss a beat.
 
 
We planted some bare root strawberries (four per square foot) and constructed a simple yet *hopefully* effective bird keepaway cage out of PVC pipe and plastic bird netting for this section. It's removable (just lift up the cage) and secured into the ground with rebar.
 
 
We planted half Hecker and half All-Star varieties, I believe.
 
 
Grow, you bundles of potential deliciousness. GROW.
 
 
A large section is devoted to onions (16 per square foot). We grew some from seeds but then realized it's way faster and easier to get onion starts at the local garden store. So we supplemented with a million of those babies.
 
 
I'll say here that we marked out each square foot with nylon string, triple-strung for each line and tied onto metal 1/2" brackets screwed onto the box garden walls. This may seem like an unnecessary step, but it's been great for us - makes planning and planting (and, we anticipate, harvesting) so much easier. Plus, don't you think it just looks cool?
 
Red candy onions. Never tried 'em, but...c'mon. CANDY onions? I'm in.
 
 
So far, we've only been able to plant our strawberries, peas, cabbage & leafy greens, and onions outside. The rest of the stuff is in the greenhouse, patiently awaiting mother nature to officially go on spring break.
 
 
There you have it. Box gardening at the Smarts' house. Next up for the backyard: building a shed and a clubhouse for the kids. This should be interesting...
 
Featured!
A Jennuine Life Thrifty to Nifty Thursdays Feature
 
Pin It Now!

DIY Boxwood Wreath

Raise your hand if you're kind of intimidated by the faux foliage aisles at craft stores. (I totally made that name up, btw. Faux foliage, I mean. But I'm going to roll with it.)
 
 You can't see me, but both my hands were raised for about 4 minutes, until I realized this post isn't going to write itself. So. If your hands flew to the sky, let's be new best friends.
 
But I've got boxwood bushes outside. And an old grapevine wreath. (Unless the stick-like wreath I've got isn't grapevine, and if that's the case...my only excuse is that I wasn't kidding about avoiding the faux foliage craft supplies.) And I like greenery that I'm not bringing to a slow yet inevitable black-thumb demise. (Which, for the record, includes about everything.)
 
Nothing ground-breaking in this little tutorial here. But if you're interested:
 
 
I know many people could whip out a great wreath out of almost anything. I'm not one of them. Because I'm usually afraid that (a) the wreath will be crap, (b) it will look like my great-grandmother did it, (c) nothing against my great-grandmother and her craftiness, (d) I really could've stuck with option A and been good here.
 
My, we're chatty today. Let's get started. It really is an easy project. Here's what I used:
 
 
I just kind of started by tucking in the boxwood branches between the wreath's grapevine-sticks.
 
 
Kept working my way around, trying to keep the tips of the boxwoods at an even(ish) distance from the wreath itself as I moved around.
 
 
I added hot glue sparingly at first. Then, as I got into it, I was hot gluing everything...the stems, the leaves, the wreath, my thumb...

 
Ultimately, I wanted things pretty secure without the glue where possible, but having the hot glue there will help me sleep better at night.
 
 
From the side: I didn't go all the way toward the back of the wreath, but after completing the front, I did go back and glue on some light "filler" boxwood branches to camouflage the sticks. I mean grapevines. Whatever.
 
 
And here it is. It's a wild child, and I like it. It actually brings out a little bit of green in the painting above it. We've had that painting there for 2-3 years, and I had no idea it had green in it. Go figure. 
 
 
That blue shelf is still on my hit-list, but I haven't found its replacement yet. The new wreath looks super dark in this pic of my ridiculously ever-evolving (but not necessarily improving) entryway, but it's actually a lovely bit of fresh green in reality:

 
So anyways. There. Go forth and make your own faux foliage wreath now! I think you could really use anything, not just boxwood branches (their benefit is that they stay green). It was actually kind of fun and therapeutic. And I've got two thumbs, anyway, so burning one of them off with hot glue is no big deal in the grand scheme of things.

Featured!
       A Vision to Remember

{shared: 36th Avenue, A Glimpse Inside, A Jennuine Life, A Little Knick Knack, A Vision to Remember, Be Colorful, Beyond the Picket Fence, Boogieborard Cottage, C.R.A.F.T., Chic on a Shoestring Budget, Coastal Charm, Craft-O-Maniac, Crafty Texas Girls, Creating my Way to Success, DIY by Design, DIY DreamerDIY Showoff, Finding Fabulous, Fireflies & Jellybeans, GingerSnap Crafts, House of Hepworths, I Heart Naptime, I Should be Mopping, Keeping it Simple, Lil Luna, Mercy Ink, My Girlish Whims, My Repurposed Life, My Romantic Home, My Uncommon Slice of Suburbia, New NostalgiaNot Just a Housewife, Parlo & Logi, Pretty Things for You, Sew Can Do, Sew Much Ado, Shabby Nest, Simply Designing, Somewhat Simple, Sugar and Dots, Sugar Bee, Sumo's Sweet Stuff, The Busy Bees, The Shabby Creek Cottage, Thrifty Décor ChicUnder the Table & Dreaming, What-About Co.} Pin It Now!
Related Posts Plugin for WordPress, Blogger...
Pin It button on image hover