Showing posts with label spray paint. Show all posts

Easily Customized Ikea Wall Lamps

As much as I love Ikea's affordable furniture designs, I don't usually take their products at face value (as evidenced here, here, and here) (and I guess here). Meaning, I typically change them up in some small (or big) way to make them unique and better fit my space and style.
 
Even the tiniest changes make a big difference. For example, I got two Kvart wall lamps for the girls to read in their bunk beds. They weren't my first choice of lamp, but I was getting desperate.
 
 
They were...fine, I guess. But I wanted my girls to have something a little more special than a straight-from-the-box cheap-o silver light. So, with the help of a little spray paint, I gave them a straight-from-the-box cheap-o gold light, instead. I'm sure you'll agree: much better. Right, guys?... Guys?... Friends?... Aw, nuts.
 
 
Anyway. I left the cord in the bag and Frog Taped everywhere else where I didn't want paint.


After making these necessary preparations, I proceeded to cover the lamps in two light coats of gold spray paint. (Apparently, I like a touch of gold in a reading lamp. Rorschach that out for me, will you?) Mounted them on the wall as easy as you please, and BAM. Golden light from above.


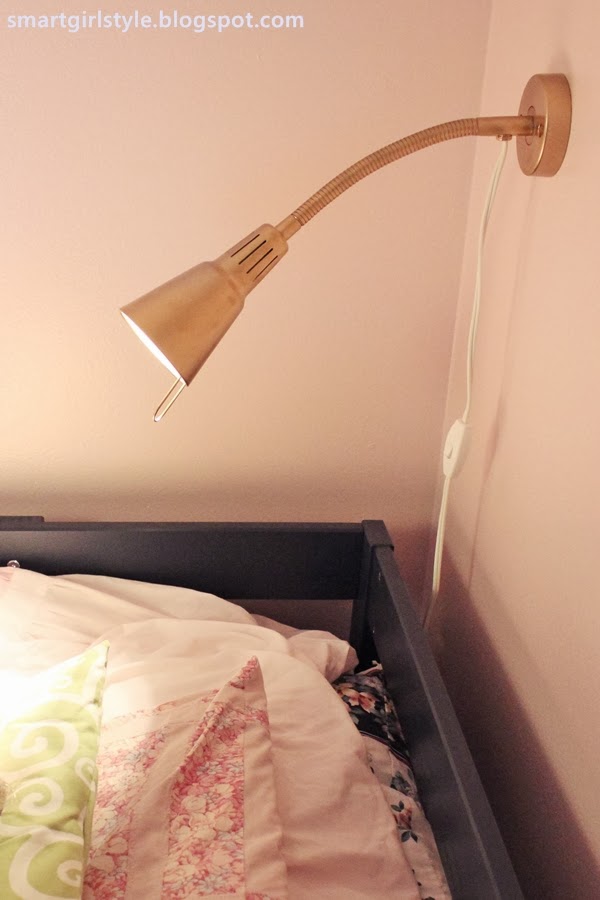
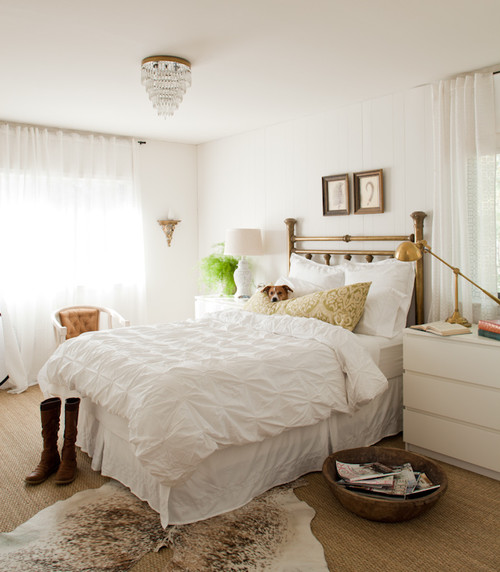
Here they are, double-mint style. The cutest thing is when I come to tuck the girls in at bedtime and one of them is propped up on pillows, asleep with a book on their lap, lamp a-blazin'. Good thing they're LED.

 
I'm just glad the little ladies are happy and feel special. That's really all I'm going for. Well, that, and an easy project crossed off ye ol' To-Do list.

(Check out the entire girls bedroom makeover if you'd like!)


{shared: Chic on a Shoestring Budget, Fingerprints on the Fridge, Fireflies & Jellybeans, My Romantic Home, Remodelaholic, Shabby Nest, Simply Designing, What-About}
Pin It Now!

The Best Materials for Decorating on a Tight Budget

Have I told you all that we're trying to save up to take our kidlets to Hawaii this year? Well, we are. That's part of the reason I'm so budget-focused right now. Of course, I still have expensive dreams...

(Like Jennifer Aniston's luxe purple velvet chairs here, for example. If you had a cool $42 mil lying around a coupla years ago when her house was for sale, she probably would've thrown the chairs in for free.)
 
source
...but, for now, our family's financial priorities lie elsewhere. (ahem)
 
So, in the spirit of budgeting and decorating my home, the first thing I do is shop my house. What do I already have? Could it be repurposed? If so, awesome. However, there are times when the interior decorator in me needs something else to add a little home decorating boost but can't quite afford to make my whole dreams come true. ($42 million, anyone?)

Therefore, I present to you, my lovely readers, my top list of budget-friendly (translation: free, or pretty close to it) decorating resources. They're not for every project, to be sure, but they'll do in a pinch for a quick pick-me-up.


Pallet boards.
source
You knew I'd go here first, didn't you? Wood pallets are all the rage lately, and I've used them for several projects myself (like here and here). I've had the most success with finding quality pallets at my local Sears store. Just be sure to ask before taking, and be selective in choosing "safe" pallets to work with (what were they used for? were they chemically treated? are they moldy?). Also, keep those Tetanus boosters up-to-date!


Paint chips.

source
 

I've totally taken advantage of this free decorating resource for paint chip projects. I just love that you can choose any color(s) you want and then create artwork or functional pieces with paint chips for next to nothing. Just as a courtesy, though...make sure that you don't abuse the priviledge. Purchase some paint on occasion, too. :)


Sheets.

source
I've said it before, and I'll say it again: repurposing stuff (especially fabric) is a great use of resources. Using flat sheets as a fabric source, whether for curtains, bedding, or even artwork, is a great way to save money. Shop your own linen closet or get them inexpensively at supercenters. I think I'd bypass the thrift store on this one, though.


Mason jars.
source
These glass jars are sturdy and available in a variety of sizes and tints (or you could tint or paint your own), which make mason jars a prime candidate for a variety of home decor projects - lighting fixtures, planters, vases, random decorative accessories, you name it. Admit it...you've got some of these lying around with the well-intentioned plan that someday you're going to learn how to can, don't you? No? Just me? Oh...okay. Regardless, put them to good decorating use.


Cotton drop cloths.


source

Think beyond interior painting and how to paint a room when you look at drop cloths. These aren't free, but for a lot of yardage of heavy-duty cotton, they are a great budget option when sewing slipcovers, drapes, or anything, really, that could use a durable neutral fabric. You can purchase these at any hardware store starting at just $10. I just finished sewing a chair slipcover (my first one) using a 4'x15' drop cloth from Home Depot, and I'm pretty pleased with it (and the $12 price tag!).


Spray paint.

source

Also, I know that spray paint technically isn't "free," but I couldn't create a home decorating budget resources list and leave it out. Because for what you can do with a can of this stuff, it's such a great budget-friendly option. (Or, if you're a spray painting junkie like myself, you probably already have a bunch of cans sitting around waiting to be used up.) Transform furniture, frames, lighting, or random objects with some spray paint, and it'll freshen up an entire space. As I'm sure you already know.


 Am I forgetting anything obvious?

xox

Featured!

{shared: A Little Knick Knack, A Vision to RememberChic on a Shoestring Budget, Fingerprints on the Fridge, Finding Fabulous, Fireflies & Jellybeans, My Romantic Home, The Shabby Nest, What-About}

Pin It Now!

Bedroom Makeover: Reading Lamps

Guest Bedroom Makeover
Day 8: Reading Lamps

**Note: This is part of a 12-step bedroom makeover series. Find the previous steps at the bottom of this post.**
 
(channel your inner Osmond before singing) I'm a little bit viiiiintage...I'm a little in-dus-tri-alllllll...
 
 
I've been loving a slick industrial vibe mixed into highly textural organic elements lately. As evidenced by my DIY nightstand post and also how I ate my granola with a blue plastic spoon this morning.
 
(On a totally unrelated note...apparently we can't go three meals without doing the dishes around here. Good to know.)
 
It should come as no surprise, then, that I went with this same look for reading lamps in the guest bedroom: 
 
 
I bought two $7 clamp lamps from Lowe's, taped over the electrical inside, spray painted the inner side gold and the outer side blue. I like the peekaboo goldness inside. And also the pairing with this DIY rustic-chic headboard.
 
 
Apparently these babies can "only" handle 200W bulbs. Hello, indoor sunshine. Not wanting to frighten away, slash, permanently blind any guests, I stuck with a meagre 60W and may even downgrade to 40W.
 
 
I'm pretty happy with them...and the <$20 total price tag, of course. 
Come back for Day 9: Stuff on the Walls (super technical title, I know).
 
And also? Try to have a very wonderful day today, whatever your circumstances may be. Because life is definitely hard...but also beautiful. Thanks for stopping by my little blog.
  
Check out the previous steps to this bedroom makeover:
Day 2: Paint Walls
Day 7: Nightstands
 
Featured!

the artsygirl connectionPhotobucket         TheRusticPig DIY Show Off
 
 
Pin It Now!

DIY Animal Bookends

 
 I've been haunted - in a good way - by these golden pig bookends from CB2 for months now.
So. Fantastic.

But the $30 price tag was more than I wanted to spend, and I knew I could bust out a DIY version anyway. (Hello, Pinterest.) But after mentioning this to my kids, they (and here's a shocker) couldn't bring themselves to sacrifice any toys in the name of house accessorization.
 
Fair enough.
 
You can imagine my tenderized heart when I came home from the grocery store a coupla days ago and found these lovelies waiting for me on the kitchen counter with a note from my 8-year-old son.
"For Mom. Carson."
 

(I think my heart would have been even more tender if I knew what those front two animals even are. Armadillos? Anteaters? Some prehistoric creature that doesn't even exist today?)
 
They're small animals, but he offered them so sweetly, I couldn't back out now. I figured I just wouldn't cut them in half but instead use two animals (rather than two halfs of an animal) as a set.
 
So I found some thin wooden blocks, measured, cut, and sanded them.

 
I glued two pieces of wood together first and used a toothpick to smooth out the excess.
 

Then I put small drops of glue on each paw and glued the animals down.


Here they are, awaiting the spray primer step...


...which can't come soon enough, if you ask me. Those red eyes have got to go. Creepy! Who designed these kid toys, anyway?


So. Primed and painted with Krylon metallic gold spray paint. In hindsight, it would've been easier to spray paint the stand and the animals thoroughly prior to gluing them together. Not a huge deal, but consider it a little tippy-tip to you from me. You're welcome.
 

Oh, and I also hot-glued four little dots to the bottom of each frame so they wouldn't slide whilst trying to hold up books.

For a super-fast, super-free project, I totally love how they turned out. Even knowing those red eyes are lurking under the bear's paint doesn't deter my love.

Any repurposing project that can make two I-have-no-idea-what-kind-of-animal-it-is figurines look even remotely chic? Winner winner chicken dinner.


I was thinking the gold might end up being a little stuffy-looking, but even with paperbacks they look great. I guess it's hard to make a bear-elephant duo look too stuffy...anywhere.


K, for real now. Here they currently live, on my super simple living room mantel.

 
There you have it. Now off you go, to raid your child's toy animals bin.
 
Featured!
The DIY Dreamer Were You Featured?
 UndertheTableandDreaming
Pin It Now!

Brassiness

Guess what I've been thinking about today? (I'll give you a hint: it's in the post title. Because I'm subtle like that. Just ask my husband, the dear man.)

That's right. Brass all by itself and brass lines in general. Maybe I'm super late on the gravy train (mmmm...gravy...), but I just love this metal lately.


(Hahahaha on that toilet paper-holding statue above. That's unexpectedly hilarious.)


And good news for us all: the visual yumminess comes in the form of spray paint. Yeehaw.
Pin It Now!

Christmas Tree Centerpiece (a la J. Crew)

So, I doubt you'll remember, but my friend and I were in charge of decorating for a large Christmas dinner. (Original inspiration board here, although we veered from that.)
 
Our budget was verrrrry small. It's not easy to decorate a gym (at all, let alone) on a very small budget. So, inspired by J. Crew's crew cuts catalogue, we went total handmade-vintagey. We're talking cardboard trees and tissue poms and glitter here, friends.
 
And I couldn't love the results more.
 

Here's what we did:
 
Start by collecting some cardboard. We found ours outside a Sears store near the dumpster. (First we double-checked with the guys inside that it was okay if we stole it. They quickly gave us the thumbs-up.)
 
We determined tree sizes (super narrow and tall but not so tall that you couldn't see the people across the table at dinner). I think we went with 20", 16", and 12" heights, and maybe 6", 5", and 4" base widths. Ish. Scored and then cut the triangles in this cut-effective way, where one cut worked toward two triangles:

 
(Because, really, raise your hand if you could live a long happy life without ever cutting out cardboard. Mine's raised, for sure. And I'm even typing, so that's not easy...)
 
You'll end up with lots of pieces like this:

 
Take half of the triangles and cut cardboard-width slits into the top half. Take the other half of the triangles and make slits into the bottom half (shown below):


(The slits will be where the two triangles slide into each other to create a free-standing 3D tree.)
 
Lay out all triangles to prepare for spray painting.


Spray onto 2-3 trees at a time (I used Krylon gold metallic), then quickly drizzle gold glitter onto the wet paint so it sticks.

 
Let them dry, then flip them over and repeat on the other side.
 
Some of the glitter will fall off (as we all know glitter is wont to do), but most of it should stick if you're careful in handling them and if you got the glitter onto the paint while it was still wet.
 
Assemble the trees. Looking kinda cute in their little forest-y setup.

 
Cut about an inch off the tops of the trees so they're flat. Use hot glue to attach little pom-pom tissue paper balls as "stars." (Check pinterest or google on how to make these.)
 

We did three per table, one of each size. Love love love them. The photos don't do their cuteness justice. We used real pine boughs and fake candles (votives) for ambiance, and I love how the light flickers off the glitter.
 
Here's a "daylight" shot. Not as magical, I know.

 
Pin It Now!
Related Posts Plugin for WordPress, Blogger...
Pin It button on image hover