Showing posts with label fabric. Show all posts

How to Waterproof Your Upholstered Dining Chairs

 If you've got kids and you've got upholstery within a meter of your dining table, chances are, you've got stained upholstery. I did a ton of research about the best way to go about incorporating kid- and water-proofed dining room upholstery. Because, let's be honest, kids (try as they might) are not easy on fabric where grape juice and peanut butter oils are concerned.
 
 
I had this great coral-print fabric on-hand that I wanted to use to lighten and brighten the original dark-brick-reddish chair upholstery. But there was no way it was going to stay clean without some sort of protective barrier.
 
There are loads of ideas out there. Buying oilcloth (or leather or vinyl or other water-resistant fabric) outright would work if you didn't already have fabric, but that didn't apply to me here. I was tempted to try my hand at soaking the fabric in boiled linseed oil, but the extreme flammability and the warnings about having the fabric be forever tacky swayed me away from that.
 
 
I read that you could use iron-on vinyl, and thought this would be my answer until I realized it only came in 17" widths. My dining chair seats were wider than that. But wait! Fabric.com sold the stuff in 24" widths!!! (Fabric.com was the only place I could find that offers 24".) And it's cheap, too - like $6/yd or something. Problem solved.
 
I cut my fabric to fit the seats then followed the very easy instructions on my heat&bond iron-on vinyl. (Be careful to double- and triple-check the surface of your fabric before you stick the stuff on to make sure it's clear of lint and hair. Otherwise, you'll have lint and hair on there eternally.)
 
Ended up with a relatively flexible and waterproof piece of fabric. Yesssss.
 
 
I followed this basic tutorial on recovering the dining room seats.  
 
 
Start at the center of each edge and work toward the corners with the staples.
 
 
Do opposite edges.
 
 
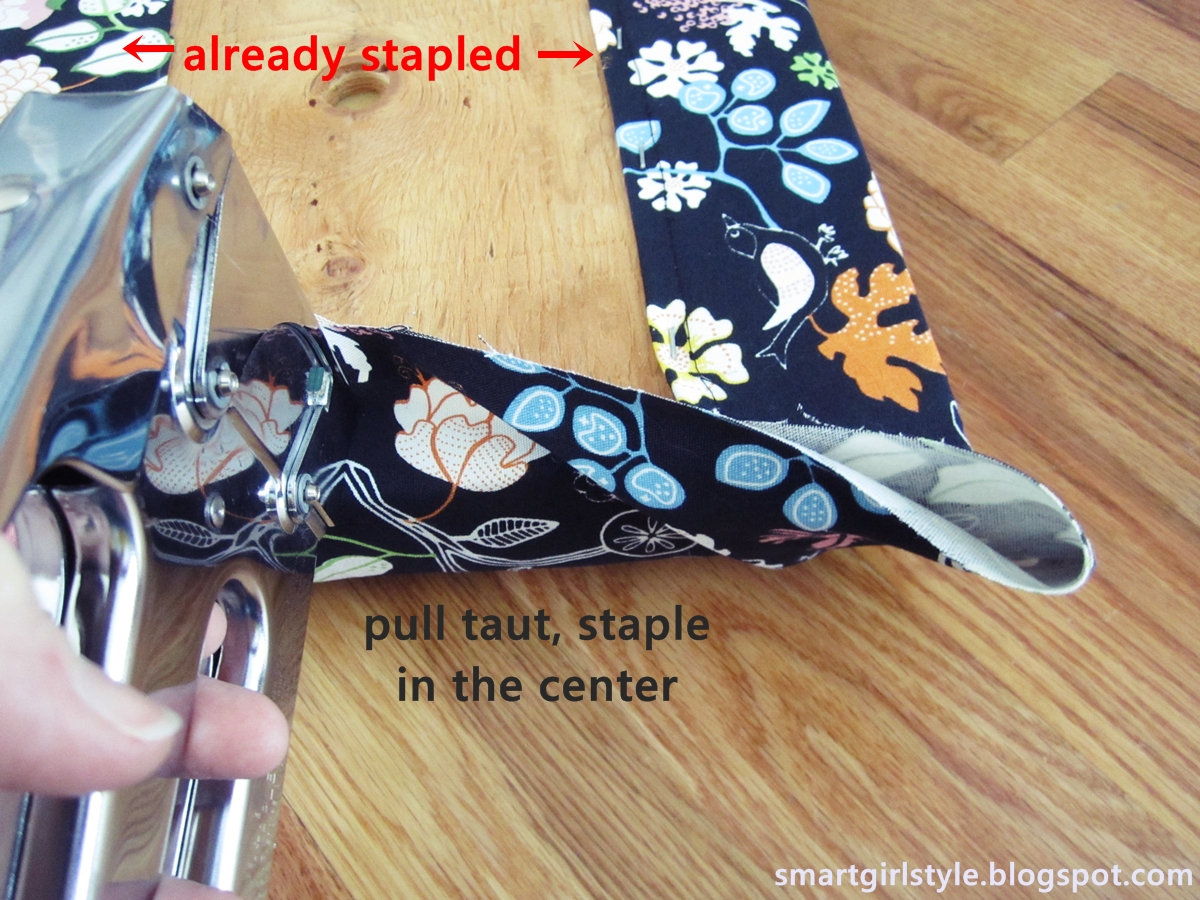
So, when the two opposite sides of the seat were stapled (the front and the back, when the seat would be reinstalled onto the chair frame), I was ready to do corners. Starting in the center of one of the side edges, I stapled half and then, always pulling taut (because vinyl shows off wrinkles baaaaad), curved the staple line upward toward the corner. Like in the photo below.
 
 
Trimmed the excess.
 
 
Neatly folded and pinched the remaining corner fabric, doing my best to minimize the pleating.
 
 
Then stapled the fold down.
 
 
I did that for all four corners, and the seat cushion was ready to rock & roll.
 
 
I love how easy this is to do, how inexpensive, and how it lets you use whatever fabric you want, pretty much anywhere in your house, worry-free.
 
 
Here's the brightening effect of a fabric swap:
 
 
I'm a fan, I'm not going to lie. I love having this option for our dining room. Because I have four kids (the oldest is 9), and spills and fingerprints are part of our daily existence. It's not matte, to be honest, but it's not like covering the seat itself in separate clear vinyl. This is easily more subtle, less shiny, than that.
 
 
There are still some changes I want to make to this dining space before I call it good. But, for now, this quick waterproofing fix provides continuity and a little brightness.
 
 
Now, when I cry over spilt milk, it'll not be because the chair seats are ruined. It'll just be because I don't want to clean it up. Again.
(Just kidding. I don't actually cry over spilt milk. Usually.)


{shared: A Glimpse Inside, A Jennuine Life, DIY by Design, GingerSnap CraftsMy Girlish Whims, Sew Much Ado, Simply Designing, Sugar and Dots, The Happy Housie}
Pin It Now!

How to Make a Roman Shade (using everyday materials)

I don't know why it is, but for some reason, roman shades seem super intimidating to make, don't they? I thought so for a long time, until several years ago I bit the bullet and just made one. Then two. Then a few more. Now I don't know why I ever made curtains. Roman shades are, honestly truly and sincerely, very DIY-able.
 
I hope to convince you in this post. Ready? Let's get to it.
 
 
This post is super photo-heavy, so you'll want to click through for the full tutorial.

Pin It Now!

Yep...Still Loving Mattress Ticking...

I'm loving old-school mattress ticking stripes these days. (And by "these days," I'm talking about the past year or three.) LOVING it. So much so that I'm using the stuff to embark upon my next reupholstery project. It's textural, organic, earthy, down-homey (yep), striped-yet-neutral, versatile, and just plain awesome.

Looking crisp and modern in this bright, eclectic space:

source


This is a great comfy-rumpled yet also plush look. That sweet lounging golden retriever has the right idea...


Perhaps overall this is a little more country than is my taste, but I do like the variety of ticking all lumped together here.

source 

I like how the charming ticking softens this dramatic, otherwise hard-lined living room space.


source

I've been envisioning redoing the frame of my settee into a creamy-colored distressed façade, but the dark wood on this settee makes me rethink that. Isn't the contrast so pretty?
source
 
More ticking and dark(ish) wood.


source

 
Deep down, though, I really really love a creamy antiquey farmhouse finish, like on these chairs from Miss Mustard Seed. Plus, it's a little more forgiving in the life-with-kids realm.


source

 
Anyway. Mattress ticking. So many options.
Pin It Now!

Basic Reupholstery: Seat Cushion

Reupholstering a Chair Seat: A Beginner's Guide

If you've never reupholstered or recovered any piece of furniture and, frankly, are pretty wary of doing so, I'm dedicating this post to Y.O.U. That's right. You're the Guest of Honor today, baby!

(Just don't let the title go to your head and start asking your children to take over dinner duty while you prop your feet up and sip a sparkling beverage while enjoying six hours of Pride & Prejudice. It won't work. Trust me.)
 
 
My 6-year-old daughter spied chair this at a consignment shop the other day and fell in l.o.v.e. with it. (Except "the L-word" is a bad word around here. Same as "k-i-s," says my 4-year-old. Which kind of made Valentine's Day hilarious, but that's another story for another day.) (Maybe when we're both sitting on our newly upholstered chairs I'll share it with you.) Anyway. Despite the ugly seat, the price was right, so we snatched it up. 
 
 
So. Find yourself a chair with an ugly seat cushion like I did, grab some cute home dec fabric and a staple gun, and follow along with me to upholster your very first chair. A Guest of Honor Chair, in fact! Ready? Let's go.
 
Flip the chair over and detach the seat cushion from the frame with a screwdriver. Lay the cushion upside-down on your fabric and cut, leaving 5-6 extra inches on all sides (or more, if your cushion is extra thick). This is where you'll do your stapling.
 
After making sure your fabric is wrinkle-free, you'll start attaching it to your seat. Staple the two longest (opposite) edges, one side at a time, starting from the middle and moving outward.
 
 
If there's one thing I can tell you about upholstering, it's this: no matter how simple the job, pull taut. Like, really tight. Fabric will move and stretch over a short amount of time if it's not stretched almost as tightly as you can muster during the upholstery process.

Also, you'll (almost) always staple from the center of a side outward to the edges, pulling as you go. This is so your fabric will end up smooth and straight, with no surprise bunching anywhere.
 
After both sides of your seat are taut and stapled (flip the seat over to make sure...if there's even a little bunching, remove the necessary staples and fix the problem now, because it's not going away otherwise!), it's time to think about the corners. Other than lumpiness along the upholstered surface itself, corners are huge in making an upholstery job look professional.

Don't stress, though. If you can wrap a present, you can upholster some crisp corners. Here's my new favorite way to do it:

Staple once in the center of one of the open ends of fabric.


(Woah. Weird pinkie finger sitch in the photo above.)
(And also? Apparently "taut" is the Word of the Day. 10 points to whoever ignores the embarrassing number of times the word is used here.)
 
 
You'll want to be simultaneously pulling the fabric toward you during this time and also pulling it toward the corner. Just think "In-N-Out" (in: toward you, out: toward the corner) (or In-N-Out for dinner).


After the corner itself is secure, staple from the center staple toward the corner. Because you've been pulling the fabric tight this whole time (right?), the fabric should lie flat and stapling should be easy.
 
 
Repeat steps for other three corners. Reattach the new-and-improved seat cushion to your chair, and stand back to admire. (And bask in the happy grin of the chair's young owner, if applicable.)
 
Congratulations! You've done it!
 
 
Layla (my daughter) called me down to her bedroom a few minutes after she lugged the freshly reupholstered thing away. She had created a "desk" setup all on her own, using random stuff from throughout the house. (I wonder where she gets that habit?) Like this table from the entryway and this rug from the nursery. Cute girl.
 
 
I'm in the process of rethinking the girls' bedroom space, so even though that table is too shallow even for a piece of paper, we're letting it all stay here for the time being. Regardless of all that, the stool's much cuter now, no?
 
 
When it's warm outside, I may spray paint the wooden armrests. But for now, hooray for a 20-minute project well done.
 
 
Pin It Now!

Ikea LACK Table into Padded Bench

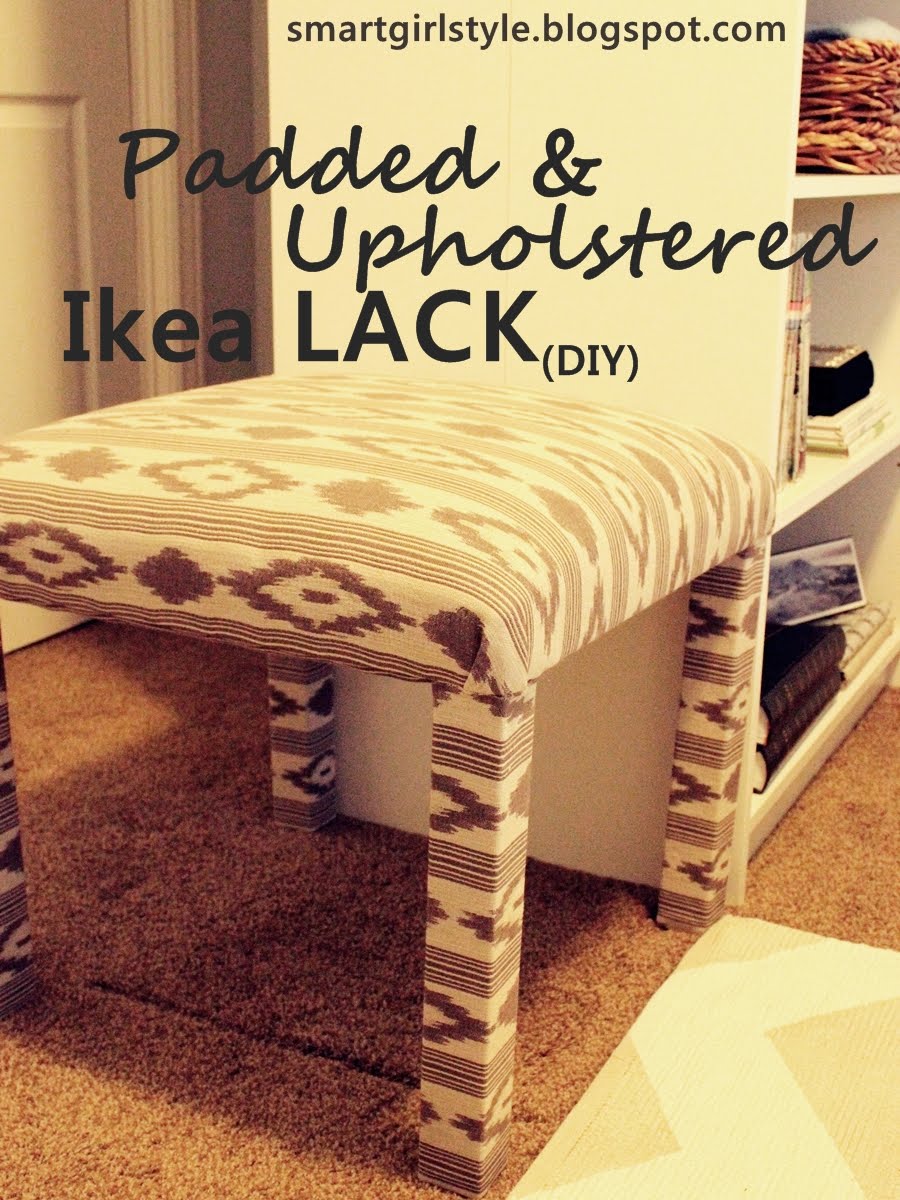
Do you have a LACK table from Ikea? If so, may I humbly recommend giving its mass-produced-ness a quick & easy makeover? Padded & upholstered & fabulous.
 
 
And the good news is: you don't have to have reupholstery experience to do this. Seriously. Anyone can do this!
 
 
Start by removing the legs from your table.
 
 
Cut whatever you're using for your padding. I used high density foam, about 2" thick.
 
 
Layer on the floor these things in this order: batting (you want about 6" larger than your foam on all sides), foam, and upside-down table top.
 
 
Pull up and staple your batting to hold everything in place and smooth out the edges. Don't worry about getting it too taut - that's what you'll do with the fabric.Staple all the edges and the corners down, keeping things as smooth as possible.
 
 
Lay your fabric down (right side down against the floor) and then your freshly padded top (top side down) on it. Fabric should be about 6" larger on all sides as well. Begin stapling as shown below.
 
 
One of the most important things to remember about upholstery is to pull very taut. You want your fabric super smooth. In fact, while stapling mine, I knelt on top of the table (to smoosh down the padding) as I stapled...and I still pulled the fabric very taut before stapling.
 
 
After stapling the edges, fold your corners neatly so there is no bunching or gathering. Staple in place. Trim all excess fabric, because you'll be screwing the legs back in. Mine had a ton of fabric here, so I cut it as close to the staples as I dared and hoped for the best.
 
Now onto the legs. You upholstery purists are probably going to die, but I totally blatantly left visible staples on my legs. My table is going against a wall, and since the legs will all be turned so staples are facing the wall, it will not be noticeable.
 
 
If you feel uncomfortable doing it this way, by all means bust out your nailhead trim and go to town. I did add a dab of hot glue to the tops of my legs to hold the fabric in place (because the fabric at the top of the legs did not overhang. I wanted as little excess fabric there as possible.), and when I screwed the legs on I made sure all the stapled edges were facing the back.
 
 
Fabric used: Mill Creek Beau Geste 100% Cotton Upholstery Fabric in Praline from here. I love this table-turned padded bench now. Like, so so much.
 
 
p.s. I use and recommend this spray adhesive:
 
Pin It Now!

Bedroom Makeover: Bedding

Guest Bedroom Makeover
Day 10: Bedding

**Note: This is part of a 12-step bedroom makeover series. Find the previous steps at the bottom of this post.**
You guys. For some reason, I have been dragging. my. feet. over doing this duvet cover. I don't know why. Just getting close to the end of things here, and this was one of the last gigs, and I have just been feeling super duper lazy lately.
 
What can I say, January does that to me.
 
Thus, it is with great pleasure (and relief) that I present to you today...the guest bedroom bedding!
 
 
Quite possibly the easiest task of them all, ironically enough. I had some old white curtains and sewed them into a duvet cover. Because the curtains were thick and of high quality fabric but were just a few inches too short to ever be curtains around here again..
 
Then I got a yard of fabric from my go-to online fabric store (Premier Prints Towers in Sherbet/Soft Grey), cut it carefully into strips, and sewed it on as a Greek key trim. Same for the pillowcases.
 
 
It's super simple bedding, which happens to be my favorite, both aesthetically and pragmatically. Not that a zillion layers of soft gushy throw pillows isn't beautiful in its own way. Just, y'know, not for me. (And, now, not for my guests. Heh.)
 
That being said, I still need to add trim to the bedskirt. I'm thinking navy velvet would be pretty, but there's already so much blue going on. Hmmm...
 
Come back for Day 11: Throw Pillow. Because (a) it's in these pics, and you're dying to know how to sew one of your own, or (b) you're just a nice person. Either/or.
 
Check out the previous steps to this bedroom makeover:
Day 2: Paint Walls
Day 7: Nightstands
Pin It Now!
Related Posts Plugin for WordPress, Blogger...
Pin It button on image hover