Showing posts with label before and after. Show all posts

Laundry Room Makeover: Reveal

If you have a huge laundry room, good for you. I may or may not be extremely jealous of you.

I, for one, have a teensy tiny laundry room that also doubles as a mud room, random home improvement products and housewares storage room, garden center, and school stuff dropoff. It hasn't been very attractive for many years (if ever)...here's proof.

Although it's far from the laundry room of my dreams, it's now functional and organized and simple and, dare I say, even a little bit pretty.

Directly to the right of the doorway (barely visible in the photo below), I painted the back of a corner shelves/hooks unit to match the walls and added some grey fabric storage cubes. Each of our children has one to throw their bike helmets and lunch boxes and whatever-else-makes-their-hearts-sing into because, hey, no one can see it!
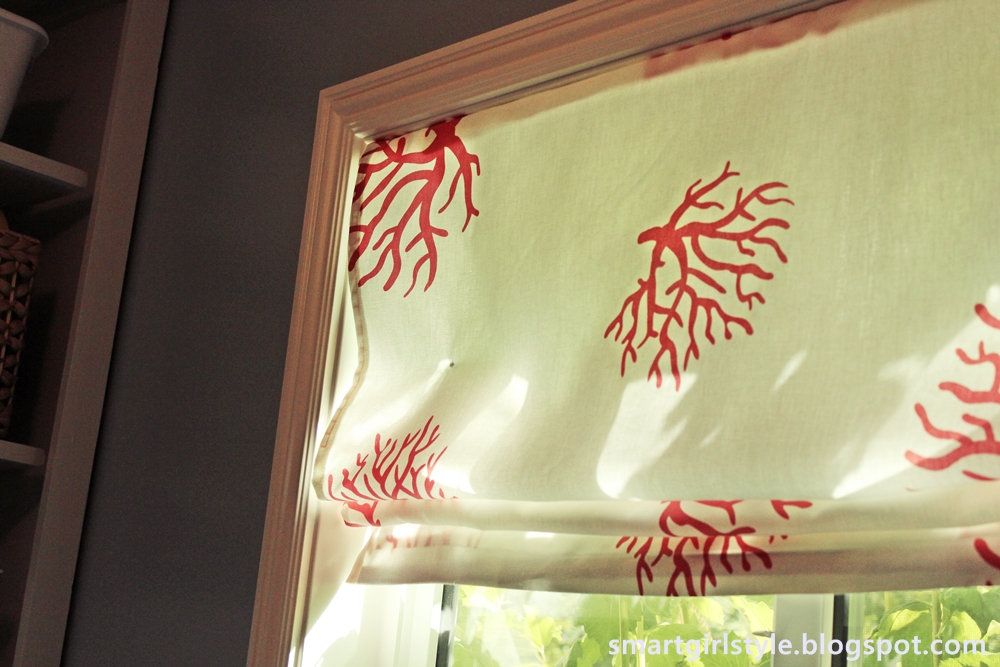
If you recall, we previously had some lame-length curtains hanging here that were constantly attracting dryer lint and getting in the way of the kids' hooks. No bueno. So I took part of one of the panels from my living room drapes FAIL (read all about it here) to create a laundry room window shade WIN. It only took about an hour one afternoon while I watched a What Not To Wear rerun. I absolutely love the funky coral fabric in this space.

Next up: the floor.

Check it (and more!) out after the break.

Pin It Now!

Laundry Room: Painted Walls

Hey guys. Around here we've got going on a little something I like to call "Laundry Room Redo on the Cheap." Because we took a bunch of family vacations this summer, not the least of which involved some boogie boarding off the white sandy beaches of Hawaii, it's going to take a little bit to recover.
 
But I've been wanting to help out my laundry room for a long time now. And I think I can bust out some creativity in here. Or at the very least I could bust out a mop. Because under that washer/dryer situation was some scarrrry stuff. Just sayin'.
 
Here's where we begin, in all its loveliness:
 
 
It's a pretty tiny laundry room. Between the door and the window is this awkward corner. I built these shelves a few years ago, but they're not working as-is.
 
 
"Storage" shelf. Yep. Because hucking a million rags up on a shelf where few people can see it totally counts as storing them, right?
 
 
Cupboards full of years-old caulk containers and about 14 bottles of mostly-gone plant sprays.
 
 
First, I began (side note: coincidentally, this is how I begin all my major re-organization projects) by clearing out the room completely. Emptied the cupboards.
 
 
Moved the washer and dryer (one at a time) so I could clean the floors:
 
 
Basically, I made my kitchen become the dumping ground, so it looked a little something like this:
 
 
I wanted to give the cupboards a facelift, so I peeled off the shelf protector. (So so pretty, I know. It was a hard choice whether or not to let it go.) (Which is totally true if you replace the words "hard choice" with "no-brainer" and "let it go" with "yoink the stuff out as fast as my fingers could pull it.")
 
 
I removed the cupboard doors (permanently) and painted the cupboards in some leftover paint, Husky Grey. (The same paint that I used on the walls in this bedroom makeover.)
 
 
The shelves actually ended up looking like a warmish white next to the BM Buxton Blue of the walls, which was a nice surprise. (The same blue that I used on my lower kitchen cabinets.) Here's a really blotchy shot of the blue in various stages of drying:
 
 
So, that's where we are now. A little more on the cooler end of the spectrum, but I have high hopes it'll come together with some fun touches over the coming week...s... 
 
 
Pin It Now!

Folding Chair Makeover - Reader's Success Story

I love it when one of my readers emails me with a success story of one of your projects. Seriously. I love it almost as much as sitting down with a hot cinnamon roll on a cold wintery night...and, seeing as how it's July and sweltering where I live, it's been a long time since the latter has happened. So.
 
Jennifer emailed me last week with some photos of her folding chair makeover using my folding chair makeover tutorial. She took a lovely *cough* beige beauty and turned it into a bright, cheery seat. Check out the awesome before & after:
 
 
What a difference! I love that fun ikat fabric she chose, but the periwinkle blue painted frame is my absolute fave.
 

Looks so good, Jennifer! Nicely done. 

 
Now if we could only figure out a way to get these babies a tad more comfortable, then we'd really be somewhere in life. :)

Pin It Now!

How to Sew a Professional Pillow Cover

 
I'm no seamstress, you guys. But when I bought this settee with the intent of reupholstering it, I knew that I'd have to BRING IT in the sewing department. Because it's mostly pillows, and the crispness of how they looked would make or break the end result.
 
I'm super happy with the result, and the reason why, in a nutshell, is that I took my time and paid attention to detail. Period. If you're interested, here's how I did it:
 
Here's the original pillow, one of the two back cushions on the settee:
 
 
I decided to take the pillow cover apart, piece by piece, so I could use these bits for my pattern.

Read more about this process after the jump...
Pin It Now!

How to Sew a Patchwork Accent Pillow (DIY)

If you're like me, you probably have a bajillion fabric scraps lying around.
(Hopefully, for your sake, that's where the similarities end...because I do things like burn dinner and "forget" to make my bed.)
 
Let's use those scraps to make something Mr. Anthro Paul Ojee would be proud of, shall we?
(For the record...I'm not proud of that last sentence. Apologies.)
Enter: DIY Patchwork Throw Pillow Tutorial. (Check out this post for other patchwork eye-candy, if you're so inclined.)

Transforming an old drab throw pillow into a patchwork accent pillow is cheery, it's bright, and it costs nothing, or very very little (if you need cording, for example, you might have to buy that).

 
Read more after the jump...
Pin It Now!

New Living Room Curtains and a Can of Worms

You may or may not be familiar with the evolution of my living room. If you're new here, let me catch you up to speed photographically.
 
Phase 1: Just moved in. Sadness. Embarrassing.
 
Phase 2: About 6 years later, slowly evolving. Read all about it here.
 
Phase 3: Pretty recent, colorful updates. Read all about it here.
 
Current Phase: New living room drapes, and I swapped out the loveseat for these two chairs.
My own reaction? NO! No no noooo! This is not what I had envisioned. Bleck.
 
Let me try to redeem myself as a home decorating blogger, though, and tell you my living room ideas to counteract the major fail: Paint the walls and change up the two chairs; they're no good here.
 
I like the Louis ghost chair in the corner; my kids love to come and read here, they think the chair is awesome. (I agree with them!) Needs a reading light, though.
 
My family and I love the view out our large front window. Especially when the trees are still bare and you can spy the mountains. (One of the very few benefits of the drawn-out winters here.) Unfortunately, you can't see the view here, either from the brightness of the outdoors or from your being distracted by my beautiful feet. Seriously. I should be a foot model.
 
Anyway. I think I'll bring back the grey loveseat for the time being, until I can find something else more suitable out here. And then bat my eyelashes an awful lot at my beloved husband during a let's-repaint-the-living-room conversation. Don't let his sagging shoulders and deep sighs fool you. He loves those convos. Trust me.

Pin It Now!

Boys Bedroom: A Bit of Progress

This isn't going to be pretty. I'm warning you now.
 
But I mentioned a little bit ago that I've been working on my son's bedroom, like painting those racecar stripes on his dresser. Here are some "before" shots. It's quite the awkward space to say the least. You can't tell how old the kid is who lives here. And it looks like he has no mother. My poor child.
 
View from the doorway:
 
 
This place is scary. I didn't even have the energy to clean it up for the "before" photos. (Which will significantly hurt my chances for Blogger of the Year. Rats. I was thisclose.) Legos strewn everywhere, bed not made, desk overflowing with junk, legos legos and did I say more legos.
 
A look at the wall to the left of the door. Can we say Ikea overload?
 
 
Here's his bedroom closet. No, your eyes do not deceive you. He has only one closet door. And the last time that thing was even closed was...well...a long time ago. The built-in closet organization system is awesome (it was here when we moved in), it really is a great closet design, but we've never utilized it to its full potential.
 
 
Annnnd his main wall. These pics make me sad that he goes to bed every night in this space, uncomplaining. (And, if I'm being honest, totally oblivious. Because he's a boy and he's 8 years old and he'd rather be - you guessed it - playing legos or reading.)
 
 
So. Now that we're all good and depressed and shocked and awed, let's do an about-face and see what a little paint and some bedroom furniture layout forethought can do, shall we? Even though we're only about 60% finished with the space.
 
New(er) view from the doorway:

(Still to do here: turn the blinds into roman shades, remove the curtain rod, frame his beloved PvZ poster, add artwork, add in a rug; I'm thinking Ikea cowhide but we'll see.)

Carson's favorite color is red. I did a quick upholstered headboard and attached it to his bed here so he could have a soft place to lean against while he reads in bed. Covered the exposed box spring in a red fitted sheet.

 (Still to do here: add large framed world map above the bed, spray paint floor lamp, decopauge smallish map bits onto the bottom blue stripe of the bed to lessen the jarring primary color-ness.)

Left & right sides of the wall shelf above his bed, full of his treasures. I'd love to change many of these out, but Carson's not ready to let them go quite yet. And so they'll stay:

 
Carson thinks he's not any good at art and sometimes struggles to enjoy doing it. However, all on his own, he painted a self-portrait on this round rock a bit ago and was extremely proud of it. So here it sits, for all the world (well, basically, him) to see.
 
 
Same thing here, on his bedside table. He painstakingly searched for a perfectly shaped rock and then painted his boxer dog Charlie on it. (I'm sure you could tell exactly what it was... :) ) We had to put Charlie to sleep last year, which was a hard time for our family. So this simple little slice rests here where Carson sees it every morning and every night.
 

My son is a hugely avid reader, so we brought in a comfy rocking swivel chair that I reupholstered last year in this great herringbone and set up a reading spot for him in the corner of his room.

(Still to do here: hang some shelves from the wall so he can have easy access to multiple books in his reading corner.)

His favorite thing of all is his "new" racecar stripe dresser. It used to be the all-white Ikea Hemnes (you saw it in the "before" photos at the beginning of this post). He's so proud of it, and now the girls want me to paint out theirs (they have the same dresser in their room). You know what they say about imitation = flattery.


A view of his newly reorganized closet. We got rid of some unnecessary stuff and moved other things around and really considered what Carson's needs were in his room. His #1 need: a place (other than the floor) to store his carefully constructed lego things. So we devoted three shelves to his creations, and one more to store the lego pieces in boxes. Hopefully this will keep his floor (and, consequently, the sensitive soles of our bare feet) lego-free.

 (Still to do here: reattach the other closet door...annnnd do laundry.)

(On an unrelated note: Is it normal for 8-yr-old boys to hang up their clean clothes this way? Sighhhh...)


Bookshelf fits just perfectly sideways in the closet (one of my favorite closet organizing tricks whenever possible), leaving space for his hanging clothes and shoe bin.


Despite feeling non-artistic, the kid is creative and loves a project. I'm trying to balance his having a room that looks nice (to me) but that he has ownership in as well and reflects his handiwork and his interests and his style. This is embarrassingly hard for me to do. Case-in-point: These coffee filter stars that he decorated and attached the ceiling somehow managed to stay. Don't ask me how.


So, there you have it. To this point, anyway. What are your guys' tendencies when it comes to decorating your kids' rooms? Is there a point that you just let them have it their way, or do you kind of take over a little bit? I really am interested.

{shared: A Jennuine Life, Parlo & Logi, Somewhat Simple, What-About}
Pin It Now!

Ikea Hemnes Dresser + A Racecar Stripe

**Addendum: See the complete(ish) bedroom makeover here.**

Question: "Can you paint Ikea furniture?" Answer: Yes!
And what's more, you can do a relatively simple upgrade with big-time impact. Paint furniture, then paint stripes to create a two-thumbs-up Racecar Stripe Painted Dresser. Great for a boy bedroom (at least for the boy at my house), and inexpensive to do.
 
 
Here's what I did: Take your furniture...
 ...and pull out all drawers, then remove all hardware. Lightly sand all surfaces to be painted with 220-grit sandpaper. (I know everyone hates sanding. It doesn't take long, though, to just rough up the surface a bit, and the paint job will be so much better in the ened. I'd recommend it.) You don't want to scratch the laminate, but you want to give your primer every possible chance of adhering to the surface.
 
Prime with 1-2-3 Zinsser primer. One or two coats, and sand any obvious areas. Then pull out your oil paint and spread on your first coat. A few things I noticed:

(1) This was my first time using oil based paint. I used Rustoleum's Aluminum oil paint (premixed, from Home Depot). Everything I read prior to painting talked about thinning out your oil-based paint before painting with it, but in this case, my paint was as thin as thin could be. Seriously. Like water. There was a massive glob at the bottom of the can when I first opened it, so I spent quite a long time stirring to break that up. The glob finally did go away/dissolve, but the paint was still very thin.
 
(2) A high quality paintbrush is the way to go. Not a cheapo brush, not a foam brush, not a roller. And it worked best for me when I just applied the paint and left it alone to dry.
 
 
(3) Let each coat dry com.plete.ly. Like, at least 24 hours. At least.
 
 
(4) I ran out of 220-grit sandpaper (which is pretty fine), so before my 2nd coat of paint, I used the finest grit I had. I'm not sure what number it actually was, but using it was a HUGE mistake. Totally scratched the paint rather than sanded it smooth. Then, like a rookie (and a lazy one at that), I thought that I didn't want to re-sand everything again, so *maybe* if I just painted over the scratches, the new coat of oil paint would fill them in. Nope. Let the record show that oil based paint is pretty much the same as latex paint - what you see in smoothness along the way is what you'll get at the end.
 
 
Crap. But it was a good lesson for me, if nothing else (kind of like how this experience was a good lesson in the importance of priming). So I bought the right sandpaper and came home and resanded everything down to the laminate. Basically, I started over. Which was a huge pain, as I'm sure you can imagine. But the finish ended up perfectly smooth. Yessss!
 
Taped out the stripes with frog tape (my new heart-throb of painters tape), painted two coats of blue latex stripes, and applied a topcoat of polyurethane. If you do a furniture painting project like this involving multiple coats and multiple colors, please please please promise me you won't rush it. In one sentence (above), I summarized about 4 days' worth of work and wait.

All in all, the project took me about 6 days (2-3 were due to my mistake. Oops.). Don't be overanxious, and do let the paint dry absolutely thoroughly between coats. I can't stress this enough. If you don't, and you paint on top of a mostly (but not completely) dry surface, it will be forever tacky when you put stuff on the furniture.
 
 
We really really like the finished result. And that oil paint? I'm a believer. My kids aren't exactly easy on furniture, and this paint job is actually standing up to them.
 
 
I like the impact of the stripe - a little retro, a little boyish, a little detail awesomeness that goes a long way. Plus, bonus, it was super simple to measure out (just four strips of frog tape) and paint. 
 
 
Anyone ever painted with oil based paints that were super duper thin before? Or have yours been thick (like all the places I've read) and needed thinning?
 
Either way: I like this look in my son's bedroom. And so does he. Victory all around.

If you're interested, feel free to check out the rest of his simple yet effective bedroom upgrade.

Featured!
      UndertheTableandDreaming


{shared: A Glimpse Inside, A Jennuine Life, A Little Knick Knack, Angels Homestead, Be Colorful, Beyond the Picket FenceBoogieboard Cottage, Busy BeesC.R.A.F.T., Chic on a Shoestring Budget, Coastal Charm, Crafty Texas Girls, Creating my way to Success, DIY by DesignDIY Showoff, Domestically Speaking, Dragonfly Designs, Fireflies & Jellybeans, GingerSnap CraftsHouse of Hepworths, I Should be Mopping the Floor, Lil Luna, Mercy Ink, Miss Mustard Seed, My Girlish Whims, My Romantic Home, My Uncommon Slice of Suburbia, New Nostalgia, Not Just a Housewife, Parlo & Logi, Sew Can DoSew Much Ado, Shabby Nest, Simply Designing, Somewhat Simple, Style Sisters, Sugar and Dots, Sumo's Sweet Stuff, The Shabby Creek CottageUnder the Table & Dreaming, What-About}
Pin It Now!
Related Posts Plugin for WordPress, Blogger...
Pin It button on image hover