Showing posts with label free project. Show all posts

DIY Gift Idea: Door Draft Stopper

I love Christmastime. I really do. We're working this year on keeping the Spirit of the Season in mind around our house. We're doing things more slowly and with greater care. We're trying to smile more. We're reading stories together every night. We're trying to get back to a time (was there ever a time?) when Christmas was simpler. When a candy cane and a cozy blanket and a good book were ingredients for a perfect afternoon. When we lived for Friday night so we could pop some corn and play Christmas bingo as a family.
 
I dunno. Maybe that all sounds a little too nostalgic and weird. But not as weird as what I'm about to recommend as a DIY gift idea. (And if that's not the best segue you've ever read, I'll be shocked.) (Which is absolutely true if by "be shocked," you know I mean "not be shocked." Just so we're clear.)
 
Enter (drumroll please) the door draft stopper.
 
 
Now, I don't live in a drafty cave or anything, but there is a distinct chill that comes through around our exterior doors in the colder weather. So one afternoon, in about 15 minutes, I made two draft stoppers for the front and back doors. I don't know why I've gone seven winters in this house without these babies.
 

Suuuuper easy. Here's what you do:
 
- Measure your door width. Add about 8".
- Cut two strips of fabric that are each the length of your door width plus the 8", and about 8"-10" wide.
- Placing right sides together, sew the two long edges and one short end together to create a very long, narrow sack.
- Turn sack right-side-out. 
- Fill with dried beans, rice, or wheat kernels.
- Fold under the rough edge, then sew up the top.
- Viola. End of door draft stopper creation.

 
It's so simple, you guys. I love this thing, and not just because it's made of mattress ticking. (You'll remember my fetish from here, here, or here.) 
 
I love it because (a) it was so easy to make, (b) it's already made such a big difference in the amount of cold air I feel by the door, and (c) ummm...I can't remember my third reason, but I know there was one. No matter. You'll just have to trust me that I love it.
 
I'd recommend making some of these for yourself and then, if you're stumped about a couple of people on your list, make some for them for the holidays. Great DIY gift.
 
Rather than spending more time trying to convince you of the door draft stopper's merits as a holiday gift, though, I'm now off to get some cleaner for that front entry rug. Hooo-eeee. Kids and winter and boots are a deadly combination.
 
Happy gifting!


Featured!
Pin It Now!

DIY Gift Idea: Herringbone Paint Chip Art

Hey friends! The holidays are in full swing around here, and I couldn't be more thrilled. Other than the fact that every member of my household, sans myself, adores egg nog. Me, I prefer to not drink heart-attack-in-a-mug, thanks.
 
Anyway. If you're like me, you're always on the lookout for a great, fairly fast and easy but still personable, DIY gift idea. It's a bonus if it's inexpensive. This little number checks all those boxes and leaves you the rest of the afternoon to guzzle all the egg nog your soon-to-be-clogged heart desires.
 
 
(p.s. I totally have to give credit for this project's inspiration here.)

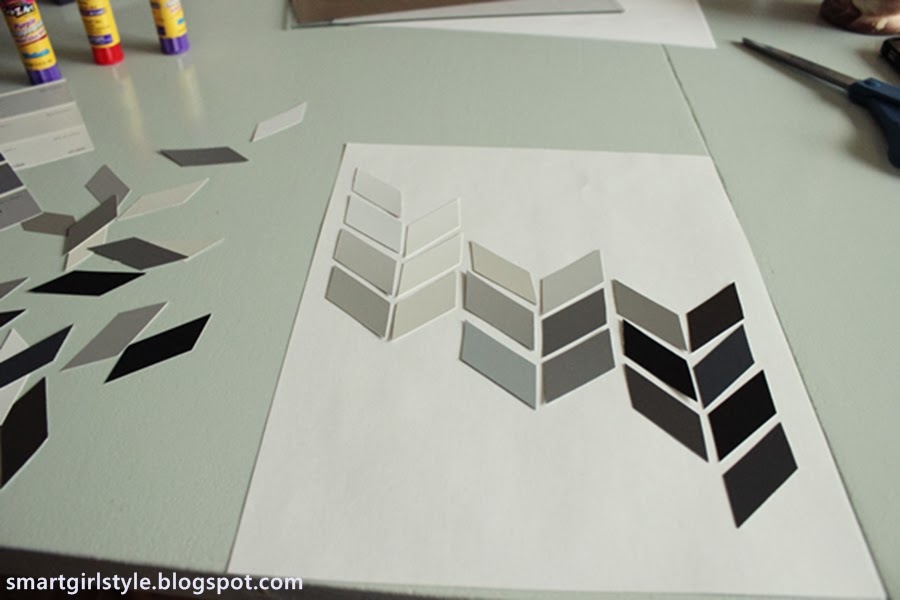
This is a great DIY art project that you can make for your own enjoyment or to give to someone else who has great taste. You'll need a frame, some paper or cardstock, some paint chips in an ombre gradient, scissors (puppy chew marks on said scissors are optional), and glue. I'd recommend grabbing several sticks of glue, because if you have kids the chances are high that half of them are dried out. But, again. Optional.
 
 
I began the project by cutting out the paint chips into herringbone-type parallelograms. I freehanded them, because I'm lazy like that. You could create a template if you prefer more exacting art. Also, be sure as you're cutting them out that you have about half the diagonals "going" each way - mirror images of each other shapewise, I mean. I just cut out a bunch because I wasn't sure what I'd want my ombre to look like.
 
 
Laid them out on the paper (cut to frame size) to get a basic idea of what I wanted, then I started gluing them on piece by piece. I didn't mark anything here. You definitely could, and your herringbone pattern would look like perfection. Depends on how you like your DIY art, I guess!
 
 
Framed it. Loved it. Wanted some more of it...
 
 
...so I made a second one, this time with the herringbone in the landscape orientation.
 
 
Here's one of them, hanging at low height in the living room corner.
 
 
Nothing like mixing the Logan LDS temple, Georgia O'Keefe, and some herringbone paint chip art next to a faux bois table lamp, eh?
 
 
This was such a fun project for me. Therapeutic, with Christmas radio on in the background and my two youngest girls napping. Now go and do one (or four) yourself, either to keep or give away.
 
As always, thanks for stopping by!
 
(Feel free to check out my other ideas for paint chips: an ombre nursery mobile, a bit of art, or other great ideas for decorating on a tight budget.)
Pin It Now!

How to Paint a Striped Rug

So I've been working really hard on redoing my laundry room. Which is a totally true statement if you replace the words "really hard" with "not really all that hard." Heh.
 
Because some makeovers require tons of time and effort. And some require just a little TLC and some new storage containers. Guess which one my laundry room falls into?
 
Be that as it may (a phrase that instantly ages me by about four decades), I've tried to be pretty creative in this transformation to save a little bit of cash and to focus on reusing what we already have. Because, truly, I'm getting tired of waste. Such a drain on this fine planet of ours!
 
So, yeah. Recycling. Starting with creating the rug of my dreams(ish) out of a rug from my closet.
 
 
I started with this old 3x5 flatweave rug that has literally been folded up in my closet for months if not years.
 
 
Wanting to start with the lightest color, I grabbed some old white interior latex paint and eyeballed the chunkiness of my stripes. That's right. Totally guessed on those suckers. I don't think I even get an "A" for effort here. Dah well. "A" for efficiency. So. That's something.
 
 
I didn't focus so much on paint thickness here as just getting the stripes laid out. Because my rug is a flatweave, it was actually quite simple to keep the lines straight. What I did try to do was make sure the sides of each stripe (as in, down into the weave lines) were crisp and well-painted. It didn't matter if I went outside of my "stripe zone."
 
 
The original woven stripes of my rug did show through for the first 2-3 coats. I probably could've primed the rug first to decrease the amount of absorption, but for some reason that was too much work for me. I kept the coats of paint fairly thin and just worked from one end of the rug to the other, over and over and over again.
 
 
I think I ended up doing four(ish) coats of white paint. Then I grabbed some leftover salmon-coral paint (from my ombre painted dresser) and used this for my darker stripes.
 
I didn't even rinse out my brush, that's how laaazzzzzzzyyyy I went on this project.
 
Same method as with the white stripes, except this time I was more careful about the stripe sides. Because I had focused on getting the white paint thoroughly into the weave "grooves," I just painted my darker lines along the tops of the weave lines for a crisp result.
 
This is making no sense, is it. Sighhh...
 
 
I think I only had enough paint to do two and a half coats of the coral, and it kind of shows the original woven stripes. Not super noticeable in real life, though. I let the freshly painted rug dry overnight and brought it inside the next day.
 
 
Not bad for about an hour of painting and $free$. I love the graphicality that a striped rug adds to a space, especially a cheerful one like a laundry room. Oh, and if you're interested, feel free to check out the complete post on my tiny laundry room makeover.

Featured!
    http://linda-coastalcharm.blogspot.com/


{shared: A Glimpse Inside, A Jennuine Life, Angels Homestead, Be Colorful, Be Different Act NormalBoogieboard Cottage, Chic on a Shoestring Budget, Coastal CharmCraft-O-Maniac, Creating my Way to Success, DIY by Design, DIY Showoff, Domestically SpeakingFinding Fabulous, Fingerprints on the Fridge, GingerSnap Crafts, House of Hepworths,  I Should be Mopping, Lines Across, Mercy Ink, My Girlish Whims, My Romantic Home, My Uncommon Slice, New Nostalgia, Not Just a Housewife, Sew Can Do, Simply Designing, Sugar Bee Crafts, Sumo's Sweet Stuff, The 36th Avenue, The DIY Dreamer, The Shabby Creek Cottage, The Shabby Nest, Thrifty Decor Chick, Under the Table & Dreaming, What-About}
Pin It Now!

How to Sew a Patchwork Accent Pillow (DIY)

If you're like me, you probably have a bajillion fabric scraps lying around.
(Hopefully, for your sake, that's where the similarities end...because I do things like burn dinner and "forget" to make my bed.)
 
Let's use those scraps to make something Mr. Anthro Paul Ojee would be proud of, shall we?
(For the record...I'm not proud of that last sentence. Apologies.)
Enter: DIY Patchwork Throw Pillow Tutorial. (Check out this post for other patchwork eye-candy, if you're so inclined.)

Transforming an old drab throw pillow into a patchwork accent pillow is cheery, it's bright, and it costs nothing, or very very little (if you need cording, for example, you might have to buy that).

 
Read more after the jump...
Pin It Now!

Got branches?

This tree in our backyard has been a great climbing tree for the kids when they're too small/short to climb the "big kid" cherry tree.
 
 
Unfortunately, it was becoming dangerously lopsided, and Paul and I feared that one day it would break under the weight of an unsuspecting climbing kidlet. So we chopped it, leaving a stump. (Which, fortuitously, can now double as an au natural hose holder.)
 
 
 Good news, though. See the beautiful ringed pattern in that wood? The branches became the start of our living room fireplace filler.
 
 
I've been looking for something non-lame to do with our unused fireplace for literally years. We definitely need more wood, but I like the direction this is headed.


What do you guys do with your unused fireplaces? Or are we the only ones on the planet who don't actually use the fireplace?
Pin It Now!

DIY Boxwood Wreath

Raise your hand if you're kind of intimidated by the faux foliage aisles at craft stores. (I totally made that name up, btw. Faux foliage, I mean. But I'm going to roll with it.)
 
 You can't see me, but both my hands were raised for about 4 minutes, until I realized this post isn't going to write itself. So. If your hands flew to the sky, let's be new best friends.
 
But I've got boxwood bushes outside. And an old grapevine wreath. (Unless the stick-like wreath I've got isn't grapevine, and if that's the case...my only excuse is that I wasn't kidding about avoiding the faux foliage craft supplies.) And I like greenery that I'm not bringing to a slow yet inevitable black-thumb demise. (Which, for the record, includes about everything.)
 
Nothing ground-breaking in this little tutorial here. But if you're interested:
 
 
I know many people could whip out a great wreath out of almost anything. I'm not one of them. Because I'm usually afraid that (a) the wreath will be crap, (b) it will look like my great-grandmother did it, (c) nothing against my great-grandmother and her craftiness, (d) I really could've stuck with option A and been good here.
 
My, we're chatty today. Let's get started. It really is an easy project. Here's what I used:
 
 
I just kind of started by tucking in the boxwood branches between the wreath's grapevine-sticks.
 
 
Kept working my way around, trying to keep the tips of the boxwoods at an even(ish) distance from the wreath itself as I moved around.
 
 
I added hot glue sparingly at first. Then, as I got into it, I was hot gluing everything...the stems, the leaves, the wreath, my thumb...

 
Ultimately, I wanted things pretty secure without the glue where possible, but having the hot glue there will help me sleep better at night.
 
 
From the side: I didn't go all the way toward the back of the wreath, but after completing the front, I did go back and glue on some light "filler" boxwood branches to camouflage the sticks. I mean grapevines. Whatever.
 
 
And here it is. It's a wild child, and I like it. It actually brings out a little bit of green in the painting above it. We've had that painting there for 2-3 years, and I had no idea it had green in it. Go figure. 
 
 
That blue shelf is still on my hit-list, but I haven't found its replacement yet. The new wreath looks super dark in this pic of my ridiculously ever-evolving (but not necessarily improving) entryway, but it's actually a lovely bit of fresh green in reality:

 
So anyways. There. Go forth and make your own faux foliage wreath now! I think you could really use anything, not just boxwood branches (their benefit is that they stay green). It was actually kind of fun and therapeutic. And I've got two thumbs, anyway, so burning one of them off with hot glue is no big deal in the grand scheme of things.

Featured!
       A Vision to Remember

{shared: 36th Avenue, A Glimpse Inside, A Jennuine Life, A Little Knick Knack, A Vision to Remember, Be Colorful, Beyond the Picket Fence, Boogieborard Cottage, C.R.A.F.T., Chic on a Shoestring Budget, Coastal Charm, Craft-O-Maniac, Crafty Texas Girls, Creating my Way to Success, DIY by Design, DIY DreamerDIY Showoff, Finding Fabulous, Fireflies & Jellybeans, GingerSnap Crafts, House of Hepworths, I Heart Naptime, I Should be Mopping, Keeping it Simple, Lil Luna, Mercy Ink, My Girlish Whims, My Repurposed Life, My Romantic Home, My Uncommon Slice of Suburbia, New NostalgiaNot Just a Housewife, Parlo & Logi, Pretty Things for You, Sew Can Do, Sew Much Ado, Shabby Nest, Simply Designing, Somewhat Simple, Sugar and Dots, Sugar Bee, Sumo's Sweet Stuff, The Busy Bees, The Shabby Creek Cottage, Thrifty Décor ChicUnder the Table & Dreaming, What-About Co.} Pin It Now!

Painted Ceramic Birds

Once upon a time there were two ceramic birds I bought on clearance and brought home to paint but instead stuck them on a shelf and promptly forgot about them...
 
 
...until one day when I remembered how I wanted them to be colorful...
 
 
...and so I pulled out some leftover paint and painted them up...
 
 
...and stuck them back on their perch, which will soon be replaced with a more modern shelf...
 
 
...but until then, they'll be happy in their new faboo chartreuse getup.
 
The end.
Pin It Now!

DIY Art Frame (out of Painter's Tape)

My 6-year-old daughter would cover her entire room in tape if I'd let her. Scotch tape, masking tape, duct tape, washi tape. Doesn't matter. She loves it all.
 
And the apple doesn't fall far from the tree, apparently...
 
Similar to this DIY Art Frame I showed you last week, I've been playing around with other ways to frame stuff. Today's DIY is neither ground-breaking nor drool-worthy. But it's simple and it's free, and it frames up art. So.

(Note: I painted this black-and-white abstract on foam board myself. Picasso, I ain't. But it got the job done. I wouldn't recommend this framing method for "real" artwork.)
 
Take your art piece and lay it on a flat surface, like the dining room table. Take two cookie sheets (mmmm...cookies) and lay each down so it's a couple of inches wider than the widest part of your art. Weigh them down with something. (Like sick plants that are on their way to the dumpster. Because they can do this one last thing in life.)
 
 
Pull out strips of painter's tape so they stick to the sides of the pan. I did three strips - two for the top and bottom edges of my art, and one to be cut in half for the sides. Paint them with whatever color of paint you want your frame to be.
 
 
Let them dry thoroughly. If you use acrylic paint, like I did, it'll dry quickly. Then, using this method, create your art frame. Hang up art.
 
 
(Never mind the blankets hanging there awaiting laundry put-away time.)


This is the verrrry beginnings of an art gallery wall in our master bedroom. Because I moved the grey loveseat from the living room in here, where the vanity used to be, and I thought an art wall would lend sophistication to the space...or, at the very least, counter-balance the smashed cheerios from our delightful 11-month-old crawling destructo-baby.
 
Happy painted-tape-framing, people.

Pin It Now!

Maps in Home Decor

In my house growing up, an entire wall in our family room was covered in a world map wallpaper, like this one:
 
Houzz
 The wallpaper map, coupled with a much-used pool table a few feet away, made the family room of my youth an awesome hangout.

So, I know they're pretty trendy and all, but I've kind of been in love with maps since. I love the casual global-mindedness of a map, be it contemporary or vintage, bold or muted, framed or taped to the wall.

source
Tumblr
Domino


Domino
Bellamumma


Well, anyway. Those photos are all well and good I suppose, but I think I took world-map-classiness* to a whole new level with some mod podge and pages of an old road map book in my son's bedroom:
 
*sense the sarcasm, please.
 

Don't be jealous of the sophistication abounding around here...or of the fact that my son will likely learn driving directions for every major thoroughfare from Vermont through Wyoming (alphabetically speaking) by age 9.

 
[Editor's note: Truth be told, Carson loves this addition to his room, and we bonded doing the decor project together, so despite its obvious DIYness, I'm totally chalking the thing up to a W.]
Pin It Now!
Related Posts Plugin for WordPress, Blogger...
Pin It button on image hover