Showing posts with label fabric scraps. Show all posts

How to Sew a Patchwork Accent Pillow (DIY)

If you're like me, you probably have a bajillion fabric scraps lying around.
(Hopefully, for your sake, that's where the similarities end...because I do things like burn dinner and "forget" to make my bed.)
 
Let's use those scraps to make something Mr. Anthro Paul Ojee would be proud of, shall we?
(For the record...I'm not proud of that last sentence. Apologies.)
Enter: DIY Patchwork Throw Pillow Tutorial. (Check out this post for other patchwork eye-candy, if you're so inclined.)

Transforming an old drab throw pillow into a patchwork accent pillow is cheery, it's bright, and it costs nothing, or very very little (if you need cording, for example, you might have to buy that).

 
Read more after the jump...
Pin It Now!

Patchwork Furniture, How Do I Love Thee?

I heard somewhere that granny squares are making a comeback. Awesome.

On a semi-unrelated note...let's talk patchwork. I have no idea if this is making a "comeback" or not, but I really and truly love patchwork in unexpected places. Like on furniture. So fresh, fun, and dare I say rebellious?

Yes, yes I dare.
(But this blog is written by a girl with a rebel's heart, so beware. Case-in-point: I ate oatmeal cake for breakfast. So.)


source
source


source

source
source


You all know by now, because I keep blabbing incessantly about it (cough and sniff), that I'm reupholstering a settee. (Tutorials forthcoming.)

The throw pillows that came with the settee were screaming for a makeover. And, hey, what better facelift than patchwork?


I heart them.
I think (hope? fingers crossed) they'll be a nice brightening touch for the new settee.


If you want, feel free to check back here tomorrow for a full-blown tutorial on an easy way to make these bad boys.
Pin It Now!

A Ruffle Shower Curtain & Its Awesomeness

We've got a sick 6-year-old with stomach flu around here (poor little lamb)...which can only mean one thing: everyone washes his/her hands a zillion times a day. Mandatory. Because no one wants baby Violet catching a bug. Baldy or not, she's the household sweetheart, and for good reason. Those cheeks!
 
 
Let me show you what's been inspiring me lately. After I tell you. That's right, show-and-tell. I just love when academia meets real life. (Because kindergarten activities are considered "academic"...?)
 
Ready? Go. 
 
Ruffle waterfall curtains. Aren't they so pretty? All those tiers? These tie-dyed ruffled curtains from Anthro are amazing.
Anthropologie
 
But I'm specifically on the hunt for ruffle shower curtains. I like this white one okay, although it seems slightly stiff. If that's possible with ruffles.

Ruffle Blackout Panel
Pottery Barn
The mismatched vibe of this one below is fun, although it's not quite to my taste. A little too peppy for me. Because I'm not a morning person all the time. (Translation: I was a morning person on one day in my life, and that was my wedding day. The 14 million other mornings I've lived? Nurp.)

Ruffle curtain
source
This is a pretty grey, as far as curtains go. It almost looks ombre, but I can't tell if that's just the lighting.

Urban Outfitters
 
And I esPESHially love this one. Eclectic vintage, with soft yellows and whites. Annnnd...you guys spy the pom trims, too, right? K. Just checking.

Pinned Image
source

I'm starting a makeover process of our main bathroom. Nothing crazy (maybe), but just a little pick-me-up. Here's the final ruffled shower curtain:
 
 
This isn't a full-on ruffle curtain tutorial, but I'll show you in a nutshell what I did. Because apparently I am a glutton for self-punishment and because I love ruffles lately, I went through my fabric scraps and pulled out everything white. Ish.
 

I cut out a ton of strips, then laid them out on top of fabric that was cut to be the same size as the actual finished shower curtain. (Will you be shocked that I recycled the window curtains from here? No? Good.) Each strip was about 1.5-2x the actual width of the curtain itself (to allow room for gathering).


I then sewed the pieces together into strips, hemmed the sides & bottom of each strip, baste-/ruffle-stitched the top of each strip, and sewed them onto the large fabric piece. Then I cut off the reinforced top from my old shower curtain, covered it in white fabric, and sewed it to the top of the now-ruffled curtain. Button holes finished it up. I reattached the ivory liner behind this curtain.


I didn't want the curtain to feel super country; I wanted it to be eclectic-chic. (Heh. I totally just made that up. But do you know what I mean?) I love the various textures and subtle pattern of the white strips.


Violet had to hustle right in and check it out after I hung it up. Baby-approved. Yesssss.


 I have some ideas brewing for the whole space, but I like the start this curtain gives.


What about you guys? Are you a fan of ruffle waterfall curtains like this or not so much? What's your very favorite way to show personality in a shower curtain?
 
Featured!
The DIY Dreamer   mop it up mondays feature

Pin It Now!

Bedroom Makeover: Throw Pillows

Guest Bedroom Makeover
Day 11: Throw Pillows (or: How to Sew a Ruched Throw Pillow)

**Note: This is part of a 12-step bedroom makeover series. Find the previous steps at the bottom of this post.**
 
 
This tutorial is kind of cheating. It's like take-n-bake pizza, where the metaphorical "pizza place" that does all the hard work is this lady's tutorial on how to sew an envelope pillow, and your hypothetical "oven" is my post here on how to do the ruching.
 
Which...mmmmm...pizza.
 
So. First become familiar with how to do an envelope-style pillow. Then combine that knowledge with the simple steps in this post. Then pop something pre-made into the oven and feel domestic.
 
*For explanation purposes, I'm assuming a square pillow form. If yours is different, adjust accordingly.*
 
For the front (ruched) pillow piece, you'll want a rectangle that's as wide as your pillow form (maybe give yourself an extra half inch, but don't go too big) and about 2ish times as long as it is wide. (Longer than that for a more intense ruche, shorter than that for more subtle gethers. Measure to your taste.)
 
Decide how many lines of gathering you want in your ruche. (I wanted 4.) To figure out uniform spacing between each ruche line, divide the width of your pillow by one more than that (in my case, 5) to determine the spacing between each ruche line. 
 
So, for example: if your pillow width is 18" and you want 4 ruche lines, you would divide 18 by 5 for a spacing distance of approx. 3.5". (You can fudge the actual measurements slightly.)
 
Start by doing a baste-stitch along the two sides as close to the edge as you can safely do it. Then measure, mark (pin or pencil on the fabric's wrong side), and baste-stitch (or ruffle-stitch) down each of those lines, which run the length of your fabric piece.
 
Because I wanted four lines of ruching on my pillow, I ended up actually sewing six lines. This is because the two sides must be gathered in order to fit to the pillow's back-side fabric. (They're hard to see on the photo above, but the lines are there in light blue thread.)
 
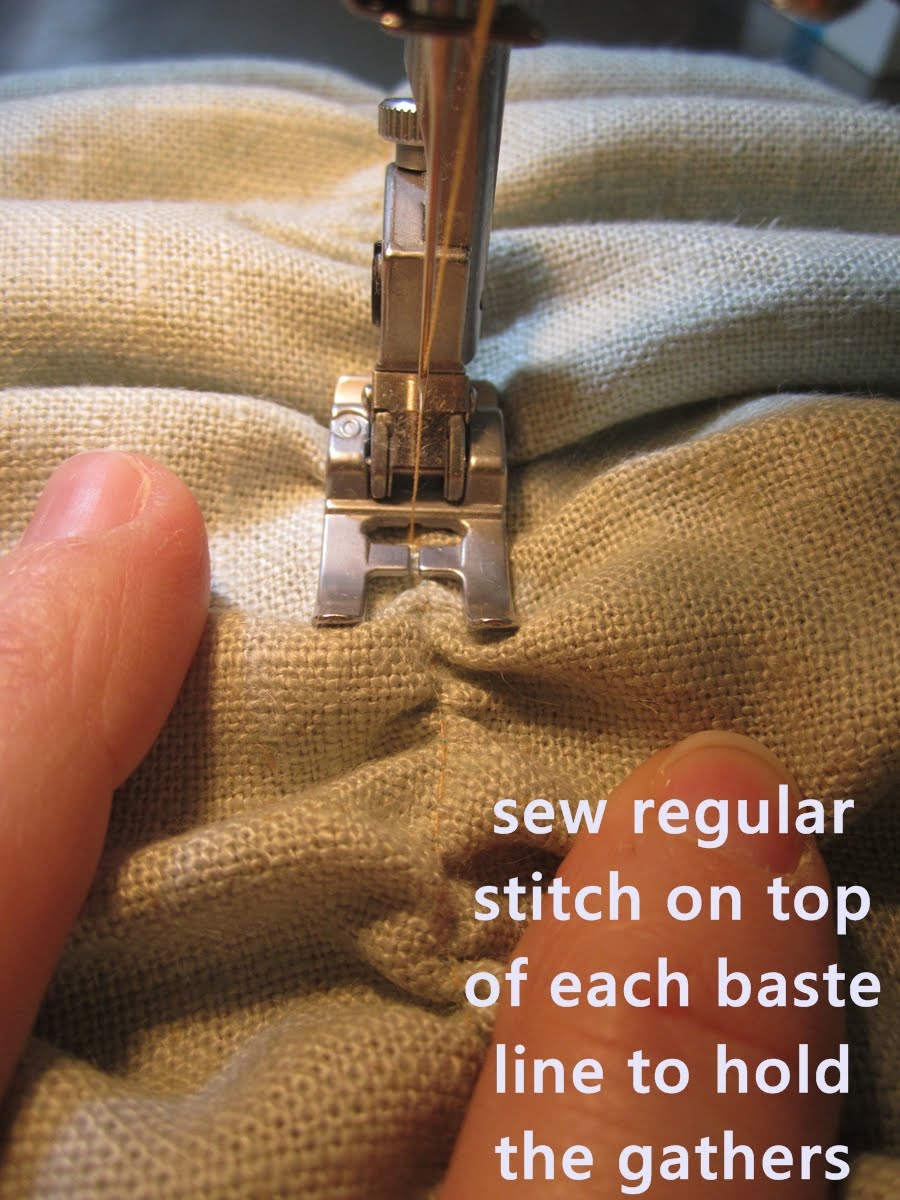
Gather a line until it is as long as the width of your fabric (for example, 18"). Secure it in place by sewing a regular stitch on top (or just to the side) of your baste-stitch. (You can then rip out your baste stitches if you want. I did not, because you can't really see the thread anyway on mine.)  
 
 
Do this for each baste-stitch line. This is the most time-consuming part, for sure. You should have a securely ruched square when you're done. Sew your ruched piece to your two envelope-style back pieces (right sides together), all four sides.
 
 
From the back:
 
Turn it right-side out, and put in your pillow form. Success!
 

Come back for Day 12: Putting it All Together to see the whole room (mostly) completed! This is my favorite day of this whole process, hands down, when I get to share the finish line with you all.
Check out the previous steps to this bedroom makeover:
Day 2: Paint Walls
Day 7: Nightstands
Day 10: Bedding
 
Featured!
Project Inspire   
 
Pin It Now!
Burlap Tree Skirt: No-Sew DIY

Let's pretend you have an old tree skirt that you don't love, about a yard of burlap and red fabric, and 25 sticks of hot glue gun glue that you don't know what to do with. Oh, and a naked Christmas tree. And also two hours. And a handful of cookies.
 
If I just described you, go buy yourself a lottery tickey (you'll only need one) because today is your lucky day. (Actually, you better make it two.) (Okay, fine, maybe three. But three really should cover you for some big winnings.) Because those are the only ingredients you need to make a no-sew tree skirt just like this one:
 
 
(I supPOSE the cookies might be optional. But barely.)
 
Let's start at the beginning of this very short and, let's be honest, probably boring tale.
 
Recently, someone handed-me-down (handed-down-me?) this tree skirt:


It wasn't quite to my taste, but I didn't turn it down because...well, I just didn't. I thought I could make it work somehow. And that "somehow" became today. With chunky stripes of burlap.
 
(We scour the forest and cut down our own tree every year, which is a great tradition. However, these trees are much sparser than artificial ones, and a tree skirt definitely shows up.)
 
I started by cutting lots of strips (probably used about a yard of each fabric) about 4" wide. You probably all know this, but just in case you don't: to cut burlap straight, make a snip on the edge and then pull a single strand all the way through the full length of the burlap. That opens up a straight line wide enough to cut.


K, so now we have lots of red and burlap strips. Perfect. I flipped my tree skirt over and started hot gluing the burlap to the quilted side. You'll figure out a method that works for you, but basically what I ended up doing was laying down a line of hot glue about 6-8" long on the existing skirt, gluing the strip to it (while leaving a little extra fabric/burlap at the top as a "pleat"), then gluing down the pleat.


I started using a weight (rather than my fingers) to hold down the freshly glued pleats while I moved on to the next 8", and that worked well.

 
Around and around. My circles had gotten a little off by the time I got to the top/inside of the tree skirt. There was an awkward space there -- too much to be covered by one ruffle, but not enough for two ruffles all the way around. So I glued down some red fabric to hide the white skirt and did my last red ruffle on top of that.

 
Then I decided that I actually had a little more space than I thought but just a small strip of burlap left, so I added a "half" ruffle. (An exact science, this ain't.) I did make sure that the top ruffle was centered to the front of the tree skirt. *gold star*

 
Here she is:


And look what cuteness I spied: my sweet 6-year-old daughter already leaving Christmas gifts for everyone under the tree.

 
Welp, there you have it.* I'd highly recommend this project. It's inexpensive (free!), and the end result is delightful.
 
Happy burlap-ing.
 
*Addendum: I just saw a verrrry similar skirt like this on Pinterest. Hooray for great minds thinking alike!
 
Featured!
IhookedupwithHoHlamespice  


Pin It Now!

Designs by Kids

You know something I love about doing home projects, like what I show you on this blog? The fact that my kids enjoy seeing what changes around here every week...or day, heh...
 
And, on occasion, one of them loves something so much they put in an order for me to make a similar item just for them. Like this red-and-gold folding chair specifically designed by my 8-year-old son.
 

He loves this chair, especially because he got to choose everything about it. Sure, it's not what I would've chosen, and it's something that'll never be blogged (well, I guess it is now...but it's a poorly photographed specimen that, therefore, SHOULDN'T be blogged...), but stuff like this makes my kids so happy.
 
Which, frankly, is super rewarding.
Pin It Now!

An amateur's guide to decorating shelves

So, remember my living room shelves? Here:
 
 
Seen from the get-go of walking into our house, these have become a little stale. And square. And blugh. I wanted to freshen things up, but I wanted to do it for $0. Possible? Maybe...
 
Step 1: Gather up random stuff from storage bins and around the house. As I wandered around, I was scoping out things that were light in color, varied shapes & sizes, texturally diverse, and/or easily modifiable.

 
(Yes, that is a GPS Tom-Tom box you see above. What can I say, a zero-budget forces me to get creative. Perhaps uncomfortably so...)
 
Find out more after the break...
 
Pin It Now!
Related Posts Plugin for WordPress, Blogger...
Pin It button on image hover