Showing posts with label makeover. Show all posts

Home Office Makeover...Almost Done...

This post is written in collaboration with CozyWallArt.com. Opinions expressed are 100% my own.
 
Hey guys!
 
I apologize for my absence over the past week. We've been a bit sick around here, plus I picked up
Gone With the Wind on a whim last week and couldn't blog because that book is a saddening 1,000+ pages. Priorities, people.
 
Anyway. You perhaps read about my excruciatingly un-inspiring home office and how I was determined to do something about it.
(Who are we kidding. You've lost sleep over it, I know you have.)
(You haven't? In fact, you've never even heard of me and this is your first time to this little part of cyberspace and so far you think I'm odd and too tangential? Huh. Welp, I'll say this for you: You're insightful. And welcome.)

So, between my wanting to throw my book across the room in frustration over Scarlett O'Hara and my rocking and holding and rocking some more my very sweet-clingy-sick toddler, I actually got started on the home office makeover. 
 
Here's the super awesome and accurate mockup of my vision:
 
 
Annnnd, here's a sneak peek of the real thing:
 
 
My first order of business was to delineate just, exactly, where the home office was going to be in the corner of my family room. I did this by painting a 9' section of the corner wall white.
 
 
I then got these jacks decals from CozyWallArt in black. (You guys might remember this other recent project I did with awesome decals from CozyWallArt.)
 
 
I used the 6" ones and spaced them one-per-square-foot. Originally, I had planned on using 10" jacks and spacing them one-per-14-inches. But the awesome designers at CozyWallArt, who knew the size of my wall, thought that the end result might not end up how I was envisioning. They sent me some .pdf files depicting a few different layout options - and they were absolutely right. I changed my order right away. You guys, this company is the real-deal for quality and for wanting what's best for the customer.
 
 
I used a measuring level and dotted out a grid on my wall - 12" between dots, and each dot would touch the same spot on the individual jacks. I also used a level on each jack before firmly placing it on the wall.
 
 
Oh yeah. Every once in awhile, I'd stand back and check out the growing geometry of the wall. Love the retro, almost sputnik vibe of these jacks and how, overall, they look like super retro-modern geometric wallpaper.
 
 
I had to choose between making part of the top jacks go onto the ceiling or part of the middle jacks go onto the chair rail. I chose the former, and I'm happy I did.
 
 
I like how the chair rail kind of disappears with the graphic wall. And I looove the graphic wall. It was surprisingly quick to put up, too - maybe took 3-4 hours, including measuring and leveling and all. Maybe less.
 
 
 I moved office stuff around to make it work better for my home office space. There are now two chairs, and two workspaces, instead of one. The desk itself is cleared off, which makes it much easier for using it as an actual work station.
 
 
I got the green chair for a few bucks at a thrift store - it was previously an ugly not-cream-not-brown color (you know the color I'm talking about), so I spray painted it this happy kelly green. Also, you can't really see it in this photo, but the lamp is a sweet vintage desk lamp that was also an unfortunate shade of brown but was brought into this millennium with some black spray paint.
 
 
I'm awaiting the arrival of a rug (should come in a couple of days). And I'm on the hunt for the perfect simple-retro wall clock. But, that being said, I genuinely couldn't be happier about the change to this little corner of our family room.
 
Don't forget to check out CozyWallArt.com for yourselves. In my opinion, their decals on the wall are the best part of this very basic home office upgrade. In fact, my husband was working down here yesterday and said he liked being able to look at the geometric wall as he worked. I think it's mentally stimulating without being distracting, you know? 
 
Do you have a "home office" space? What do you guys think is the best or worst or most important component of a successful home office?

(shared: Mums Make Lists)
Pin It Now!

Girls Bedroom Makeover

Happy day-after-Halloween. I hope you've stolen and eaten as much of your kids candy as I have. Because then we can be sick to our stomachs together...
 
You've been waiting with bated breath, I can tell. Sleepless nights, trouble concentrating, unexplained fidgeting. It's finally here. The (semi)makeover of my daughters' bedroom.
 
Here's the thing. I liked my girls' bedroom before. It was cute, with the matching twin beds and everything. But there was just not enough space, and the ladies were begging for bunk beds. So we obliged, and they couldn't be happier. Which, I'm not going to lie, is totally rewarding.
 
(My apologies in advance for the odd lighting going on in these photos.)
Here's the view from the doorway:
 
 
We moved the twin bed that previously lived under the window and put their desk, which previously stuck out into the doorway, in its place. There's nothing like sitting at a desk and daydreaming out the window, I tell you.
 
But I digress. Here's a view of the closet and wall directly to your right if you're entering the room. The closet doors have been removed for ages, since they kept coming off their track. I had a spare curtain and so moved the old curtain rod to the closet and hung a fabric closet door. It's open here just for your viewing entertainment. You're welcome.
 
 
Four double hooks on the wall have been a huge help already. My daughters somehow have come to own a huge assortment of bags, which previously found homes on the floor because there was no place to put them. It's much easier to keep things clean when there's a place for stuff. (I'm still looking for the perfect large yet minimalist piece of art for the wall above the hooks. Will find it eventually, but for now, the wall itself is the art. Yep.)
 

Rounding the corner of the hook wall is the newly facelifted Hemnes dresser. I've said it before, and I'll say it again: I LOVE this cherry blossom decal. So simple, fresh, and pretty. (Unlike the top of the dresser, but we'll address that another day.)

 
Continuing along the dresser wall is the previously mentioned desk. This thing is vintage and awesome. I recovered two equally vintage chairs (that the girls picked out...can you tell some personality differences? I love it.) with the same closet-covering fabric. Which happens to match the new roman shade. I don't normally match stuff so much, but I just happened to have the fabric, and my daughters like stuff to match. The end of that story.
 
 
Turning the corner on the other side of the dresser is the pink monstrosity. It's huge and pink and I kind of make fun of it, but, man, it pulls more than its share of the storage workload around here. Did I ever tell you the story about how we saw this at Ikea almost five years ago on MAJOR clearance, and we bought it knowing full well it was huge and pink because it was a girls' bedroom bookshelf come true.
 
(I have equally fascinating accounts of most of the furniture in our house, if you'd care to hear them.) (What's that? You wouldn't? There's nothing you'd hate more than hearing me prattle on about the sordid histories of my home's existing inanimate objects? Oh. Okay.)
 
I suppose I should've organized things a bit for this photo shoot. Minnie Mouse looks like she's dying on that top shelf, there. Dah well.
 
 
Here're the bunkbeds. Complete with golden reading lamps and ruched duvet covers I made myself. (My youngest daughter's duvet cover has been washed a bazillion times, including one time accidentally with bleach, so the ombre effect has decreased substantially. Heh.) I actually had an idea for new-and-improved quilts (they would've been so stinking perfect here), but the girls didn't want to part with these yet. I suppose I should be glad, and I suppose I am. Kind of.
 

And just like that, we've come full-circle. From henceforth, I think this room will be known as The Room That Holds Crazy Amounts of Stuff.


I like how it's finished enough for the girls to enjoy their space, but not so much that I won't be able to poke my grubby little paws into a project or two to continue cleaning things up. I'd love to change out that rug, for starters...


Feel free to check out some more rooms on my ever-evolving house tour.


{shared Chic on a Shoestring Budget, Fingerprints on the Fridge, Fireflies & Jellybeans, Mums Make Lists, My Romantic Home, Remodelaholic, Shabby Nest, Simply Designing, Thrifty Décor Chick, What-About}

Pin It Now!

Ikea Hack (Hemnes) with Cozy Wall Art Decal

This post is sponsored by Cozy Wall Art - creating products that accent the life and personality of a home. All opinions expressed are 100% my own.
 
Most of you guys probably know by now that I have a thing, some might call it a fetish, for customizing Ikea furniture. (If you don't believe me or have forgotten, check out what I did to a Hemnes dresser, Lack table, and Malm dresser.)
 
While I've loved the results of my previous Ikea furniture personalization efforts, I have to say that those projects were waaaay more labor-intensive than the dresser makeover I'm about to show you now. And I love this one just as much, if not moreso.


 Let's start at the beginning. A few weeks ago, Cozy Wall Art contacted me and asked if I'd be willing to do a product review for them. I checked out their website and immediately fell in love with many of their products. The decals are actually designed for walls, but as soon as I saw this one, I knew I had to have it for my girls' dresser as a key part of their bedroom makeover.
 
Why would their dresser need any attention, you might be wondering? Three words: boring. white. laminate.
 

(Continue reading after the jump.)
Pin It Now!

Laundry Room Makeover: Reveal

If you have a huge laundry room, good for you. I may or may not be extremely jealous of you.

I, for one, have a teensy tiny laundry room that also doubles as a mud room, random home improvement products and housewares storage room, garden center, and school stuff dropoff. It hasn't been very attractive for many years (if ever)...here's proof.

Although it's far from the laundry room of my dreams, it's now functional and organized and simple and, dare I say, even a little bit pretty.

Directly to the right of the doorway (barely visible in the photo below), I painted the back of a corner shelves/hooks unit to match the walls and added some grey fabric storage cubes. Each of our children has one to throw their bike helmets and lunch boxes and whatever-else-makes-their-hearts-sing into because, hey, no one can see it!
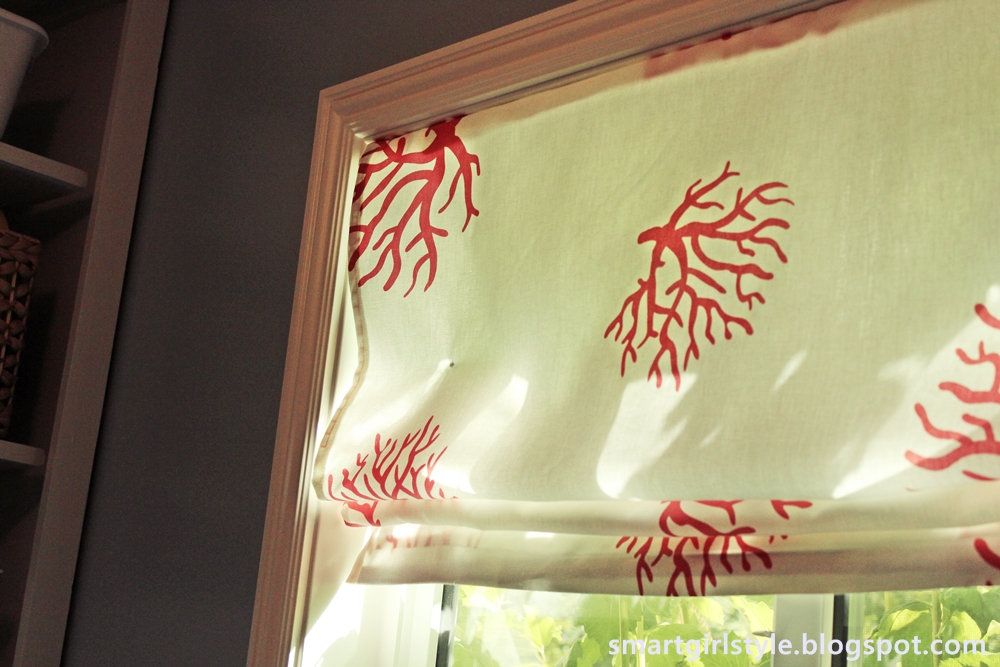
If you recall, we previously had some lame-length curtains hanging here that were constantly attracting dryer lint and getting in the way of the kids' hooks. No bueno. So I took part of one of the panels from my living room drapes FAIL (read all about it here) to create a laundry room window shade WIN. It only took about an hour one afternoon while I watched a What Not To Wear rerun. I absolutely love the funky coral fabric in this space.

Next up: the floor.

Check it (and more!) out after the break.

Pin It Now!

Laundry Room: Painted Walls

Hey guys. Around here we've got going on a little something I like to call "Laundry Room Redo on the Cheap." Because we took a bunch of family vacations this summer, not the least of which involved some boogie boarding off the white sandy beaches of Hawaii, it's going to take a little bit to recover.
 
But I've been wanting to help out my laundry room for a long time now. And I think I can bust out some creativity in here. Or at the very least I could bust out a mop. Because under that washer/dryer situation was some scarrrry stuff. Just sayin'.
 
Here's where we begin, in all its loveliness:
 
 
It's a pretty tiny laundry room. Between the door and the window is this awkward corner. I built these shelves a few years ago, but they're not working as-is.
 
 
"Storage" shelf. Yep. Because hucking a million rags up on a shelf where few people can see it totally counts as storing them, right?
 
 
Cupboards full of years-old caulk containers and about 14 bottles of mostly-gone plant sprays.
 
 
First, I began (side note: coincidentally, this is how I begin all my major re-organization projects) by clearing out the room completely. Emptied the cupboards.
 
 
Moved the washer and dryer (one at a time) so I could clean the floors:
 
 
Basically, I made my kitchen become the dumping ground, so it looked a little something like this:
 
 
I wanted to give the cupboards a facelift, so I peeled off the shelf protector. (So so pretty, I know. It was a hard choice whether or not to let it go.) (Which is totally true if you replace the words "hard choice" with "no-brainer" and "let it go" with "yoink the stuff out as fast as my fingers could pull it.")
 
 
I removed the cupboard doors (permanently) and painted the cupboards in some leftover paint, Husky Grey. (The same paint that I used on the walls in this bedroom makeover.)
 
 
The shelves actually ended up looking like a warmish white next to the BM Buxton Blue of the walls, which was a nice surprise. (The same blue that I used on my lower kitchen cabinets.) Here's a really blotchy shot of the blue in various stages of drying:
 
 
So, that's where we are now. A little more on the cooler end of the spectrum, but I have high hopes it'll come together with some fun touches over the coming week...s... 
 
 
Pin It Now!

Folding Chair Makeover - Reader's Success Story

I love it when one of my readers emails me with a success story of one of your projects. Seriously. I love it almost as much as sitting down with a hot cinnamon roll on a cold wintery night...and, seeing as how it's July and sweltering where I live, it's been a long time since the latter has happened. So.
 
Jennifer emailed me last week with some photos of her folding chair makeover using my folding chair makeover tutorial. She took a lovely *cough* beige beauty and turned it into a bright, cheery seat. Check out the awesome before & after:
 
 
What a difference! I love that fun ikat fabric she chose, but the periwinkle blue painted frame is my absolute fave.
 

Looks so good, Jennifer! Nicely done. 

 
Now if we could only figure out a way to get these babies a tad more comfortable, then we'd really be somewhere in life. :)

Pin It Now!

Entryway Revisited

If you read my blog regularly (which is more than I can say about my posting habits lately), you know that I am in a constant state of changing up our entryway and living room.
 
The entryway has gone from this to this with an entryway bench (and lots of unphotographed stuff in between) to, currently, this:


My 7-year-old daughter loves the zebra chair here. It's pretty bold, but I'm going to be honest...I don't hate it, either. The blue striped pillow doesn't seem quite right for it, but I'll figure out something.
 
 
The old entryway table got a glossy red facelift. I loved the dipped legs from before, but the green was just too dark and heavy for this space.
 
 
L.O.V.E. the table now. Hello, my name is Brittney, and I like shiny stuff. And that bike-centered print from 20x200. (That site has been under construction forEVer, has anyone noticed? I miss it.)
 
 
The table needs a slender gourd-like lamp, I think. And I'm still looking for cane-handled umbrellas, but I think that's something that will present itself to me when I least expect it. (Does it count that I chant to myself, "I don't expect to find a cane-handled umbrella...I don't expect to find a cane-handled umbrella" at least once a week?) 
 
I also spray painted the shoe basket a cheerful sky blue...which is filled with only mine and my daughter's shoes. Because we're female, that's why.
 

Is anyone else a fan of Georgia O'Keefe's art? I love an awful lot of it. I cut these prints out of my large art book of hers and framed them simply.
 
Welp. That's where we're at...for now. It's a little heavy on the right angles currently, but I really truly love the colorful cheeriness of the space. Think I'll stick with this arrangement for awhile with only minor tweaks here and there.

Featured!
Dragonfly Designs      mop it up mondays
Pin It Now!

New Living Room Curtains and a Can of Worms

You may or may not be familiar with the evolution of my living room. If you're new here, let me catch you up to speed photographically.
 
Phase 1: Just moved in. Sadness. Embarrassing.
 
Phase 2: About 6 years later, slowly evolving. Read all about it here.
 
Phase 3: Pretty recent, colorful updates. Read all about it here.
 
Current Phase: New living room drapes, and I swapped out the loveseat for these two chairs.
My own reaction? NO! No no noooo! This is not what I had envisioned. Bleck.
 
Let me try to redeem myself as a home decorating blogger, though, and tell you my living room ideas to counteract the major fail: Paint the walls and change up the two chairs; they're no good here.
 
I like the Louis ghost chair in the corner; my kids love to come and read here, they think the chair is awesome. (I agree with them!) Needs a reading light, though.
 
My family and I love the view out our large front window. Especially when the trees are still bare and you can spy the mountains. (One of the very few benefits of the drawn-out winters here.) Unfortunately, you can't see the view here, either from the brightness of the outdoors or from your being distracted by my beautiful feet. Seriously. I should be a foot model.
 
Anyway. I think I'll bring back the grey loveseat for the time being, until I can find something else more suitable out here. And then bat my eyelashes an awful lot at my beloved husband during a let's-repaint-the-living-room conversation. Don't let his sagging shoulders and deep sighs fool you. He loves those convos. Trust me.

Pin It Now!
Related Posts Plugin for WordPress, Blogger...
Pin It button on image hover