Showing posts with label art. Show all posts

DIY Gift Idea: Herringbone Paint Chip Art

Hey friends! The holidays are in full swing around here, and I couldn't be more thrilled. Other than the fact that every member of my household, sans myself, adores egg nog. Me, I prefer to not drink heart-attack-in-a-mug, thanks.
 
Anyway. If you're like me, you're always on the lookout for a great, fairly fast and easy but still personable, DIY gift idea. It's a bonus if it's inexpensive. This little number checks all those boxes and leaves you the rest of the afternoon to guzzle all the egg nog your soon-to-be-clogged heart desires.
 
 
(p.s. I totally have to give credit for this project's inspiration here.)

This is a great DIY art project that you can make for your own enjoyment or to give to someone else who has great taste. You'll need a frame, some paper or cardstock, some paint chips in an ombre gradient, scissors (puppy chew marks on said scissors are optional), and glue. I'd recommend grabbing several sticks of glue, because if you have kids the chances are high that half of them are dried out. But, again. Optional.
 
 
I began the project by cutting out the paint chips into herringbone-type parallelograms. I freehanded them, because I'm lazy like that. You could create a template if you prefer more exacting art. Also, be sure as you're cutting them out that you have about half the diagonals "going" each way - mirror images of each other shapewise, I mean. I just cut out a bunch because I wasn't sure what I'd want my ombre to look like.
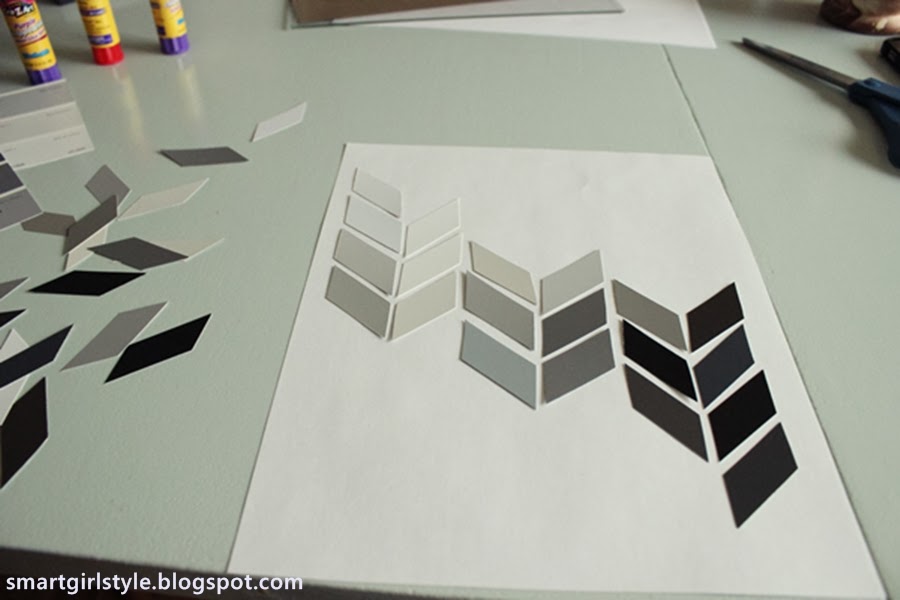
 
 
Laid them out on the paper (cut to frame size) to get a basic idea of what I wanted, then I started gluing them on piece by piece. I didn't mark anything here. You definitely could, and your herringbone pattern would look like perfection. Depends on how you like your DIY art, I guess!
 
 
Framed it. Loved it. Wanted some more of it...
 
 
...so I made a second one, this time with the herringbone in the landscape orientation.
 
 
Here's one of them, hanging at low height in the living room corner.
 
 
Nothing like mixing the Logan LDS temple, Georgia O'Keefe, and some herringbone paint chip art next to a faux bois table lamp, eh?
 
 
This was such a fun project for me. Therapeutic, with Christmas radio on in the background and my two youngest girls napping. Now go and do one (or four) yourself, either to keep or give away.
 
As always, thanks for stopping by!
 
(Feel free to check out my other ideas for paint chips: an ombre nursery mobile, a bit of art, or other great ideas for decorating on a tight budget.)
Pin It Now!

DIY Art Frame (out of Painter's Tape)

My 6-year-old daughter would cover her entire room in tape if I'd let her. Scotch tape, masking tape, duct tape, washi tape. Doesn't matter. She loves it all.
 
And the apple doesn't fall far from the tree, apparently...
 
Similar to this DIY Art Frame I showed you last week, I've been playing around with other ways to frame stuff. Today's DIY is neither ground-breaking nor drool-worthy. But it's simple and it's free, and it frames up art. So.

(Note: I painted this black-and-white abstract on foam board myself. Picasso, I ain't. But it got the job done. I wouldn't recommend this framing method for "real" artwork.)
 
Take your art piece and lay it on a flat surface, like the dining room table. Take two cookie sheets (mmmm...cookies) and lay each down so it's a couple of inches wider than the widest part of your art. Weigh them down with something. (Like sick plants that are on their way to the dumpster. Because they can do this one last thing in life.)
 
 
Pull out strips of painter's tape so they stick to the sides of the pan. I did three strips - two for the top and bottom edges of my art, and one to be cut in half for the sides. Paint them with whatever color of paint you want your frame to be.
 
 
Let them dry thoroughly. If you use acrylic paint, like I did, it'll dry quickly. Then, using this method, create your art frame. Hang up art.
 
 
(Never mind the blankets hanging there awaiting laundry put-away time.)


This is the verrrry beginnings of an art gallery wall in our master bedroom. Because I moved the grey loveseat from the living room in here, where the vanity used to be, and I thought an art wall would lend sophistication to the space...or, at the very least, counter-balance the smashed cheerios from our delightful 11-month-old crawling destructo-baby.
 
Happy painted-tape-framing, people.

Pin It Now!

How to Make a Custom Art Frame (for under $5!)

I can't think of a segue into today's post, so let's just pretend I wrote something witty and endearing and intriguing and succinct here, and as a result you can't wait to read the rest of this post and follow my blog daily until the end of time.
 
There, that wasn't so hard now, was it? :)
  
I recently finished Nake Berkus' book, The Things That Matter. I have mixed feelings about the book overall, but one thing that keeps replaying over and over in my mind is when he said something to the effect of, "People ask me all the time if something is 'good' art. I ask them if they like it. If they like it, then, yes, it's 'good' art."
 
I love that.

A few weeks ago, I posted about a vintage art goldmine I happened across on eBay. I ended up ordering a bunch of prints (eight, to be exact, for a gallery wall) because I couldn't get them out of my mind. No, seriously. They haunted my dreams deliciously. (By the way, the store owner, LeeAnn, is awesome to work with. No lie. I'll be using her again for sure.)
 
Fast-forward to the happy day when I received said prints in the mail. It was like Christmas! (C'mon, you guys know the feeling. Admit it.) I loved them so much. However, the prints were a slightly odd size (bigger than 10x13 but smaller than 11x14), and custom framing for eight prints wasn't in my budget.
 
Enter the discovery of this idea, which got my wheels turning. I modified the process to create my own custom frames. I did eight of them in an hour or two, each one cost less than $5, AND my adorable husband thought they were made of wood when he got home from work that night. Dear man.
 
 
Due to photo overload, the full tutorial is after the break. I apologize for the inconvenience.
 
Pin It Now!

Great Vintage Art

I've just spent a dreamy (and embarrassingly lengthy) amount of time perusing art prints on this random eBay store. Chock full of amazing vintage art (some from books from the 50s, 40s, 30s, even 20s), many of which I have added to my Watch list until I narrow it down. So hard to choose!

I'm dying over the colors of this watercolor:

here
And this gritty, moody-hued patriotic print:
here
Epitome of vintage, I love the softness here:
here
There are loads of these pretty Redoute florals. Can't you see a wall of of them, all framed in simple black frames? Stunning.
here
This southwestern style is great...and I love that she's a Navajo shepherdess. (And also that her shoes kind of just sort of remind me of Chuck Ts.)
here
The details in this village print are charming. I'd love to take a time machine and visit this era for a while. (But, let's face it, I'm a bigger fan of running hot water and wearing pants. So.)
here
Is it just me, or does that track look slightly precarious? Regardless, it's a beautiful vista.
here
My son would love this. Great color and detail, and he looks so confident for a one-armed warrior. I'd mat and frame it in white.
here
These butterflies look almost transparent. So delicate and vibrant at the same time. Lovely.
here

Well, I think I've convinced myself to make some purchases. Right now. There are pages more of this amazing vintage art (and at great prices, too), so you may want to snag one or three that you love. Any of these catch your eye?
Pin It Now!

Paint Chip Art

I've been dreaming in paint-chip again. And my dreams took me to this point:

 (Yes, I'm aware that that archaic thermostat under the shelf is about the most hideous thing, but it's one "architectural element" of ye ol' house that we just have to live with around here. My goal in general is to distract from it with other stuff.)

It all began a few weeks ago, when I ran across these two beauties from art.com:

source

source
 
I loved them both at first sight. One day I hope to buy at least one of them, but for today, I went with a little something I like to call "Inspired Freecreation."
 
Gathered materials (although I never ended up using the mod podge).

 
Punched some circles. (Compared to this project, this was cake.)

 
Got an old piece of particle board, cut it to the size I wanted, covered it with rice paper using this method (you could paint yours if you wanted), and measured out where I wanted the center of each circle.


(Here's my info: 1.5" circle punch, arranged in 6 circles x 11 circles columns/rows, cut particle board to 13"x23", marked first circle center 1.5" in from the top and 1.5" in from the side of the particle board, spaced each dot 2" away thereafter. All of this is from memory, so please double-check the math before you take my word for it.)

Added a small glue dot at each mark and glued the circles down.


Covered the whole thing with weights while it dried. (Encyclopedias. Remember those? Blast from the past, I know.)

 
Hung it on an existing nail above a shelf in our dining room.


Threw some stuff up on the shelf. Pinecone in a bowl? Sure.


I can't get enough of this wooden bird. One of my favorite pieces in my whole house, found at a yard sale.
 

And there it sits. Paint chip art.


 Have you used paint chips for anything innovative? I'd love to hear/see!

p.s. I used and recommend this spray adhesive to attach the rice paper to my board:


Featured!


{shared A Vision to Remember, Be Different Act Normal, Finding Fabulous, Fingerprints on the Fridge, Funky Junk Interiors, House of Hepworths, I Heart Naptime, Lovely Crafty Home, Nifty Thrifty Things, Or So She Says, Positively Splendid, Serenity Now, Shabby Nest, Six Sisters' Stuff, The 36th Avenue, WhipperBerry, and other links found here}

 
Pin It Now!

Make a Tray out of an old Photo Frame

Happy (?) Black Friday! May the deals you found bring you joy and sleep.
 
Want to see what my kids are giving my parents for Christmas this year?
 
(Don't worry. We're currently visiting my parents, who live in another state, for T-day, and chances are about 95% that they open their Christmas gifts before we leave here. I for one can't keep a gift a secret, and my children inherited the faulty gene.)
 
Drumroll please. Or not. You can read ahead in silence, if you'd like.
 
His and Hers snack trays (a.k.a. "Bed Trays" around here...so you can eat snacks in bed, of course!) made out of two photo frames.
 

The three oldest kids designed and colored two pictures, one for gramma's tray and the other for grampa's tray.


My 4-year-old was adamant about the tray handles she picked out. I tried to show her other (*cough way better cough*) options at the store, but she wouldn't budge. How much do you argue with a preschooler when she is conVINCED that her grandparents will love her picks?


Answer: Not at all. Because she's absolutely right. They will love them.

 
I love this idea and secretly hope my kids will make one for me. Orrrr maybe even not so secretly. Maybe I'll set the supplies out on the kitchen table and lock myself in my bedroom while forcing them to make me one, rooster handles and all.
 
Happy weekend!
 
Pin It Now!

Master Bedroom Makeover: Wall Art

Master Bedroom Makeover
Day 8: Wall Art
** Note: This post is part of a 12-step series in my master bedroom makeover. Links to the other (previous) steps are listed at the end of this post.

Okay, so here's my thing about art. It's deeply personal, what speaks to each of us, don't you think? I'm a little hesitant to share these with you (which I find strange...of all the things to hesitate on! Art?!), because part of me is all, "Other people know so much about art, they'll probably roll their eyes at this," and another part of me is like, "I need some more time to develop my art collection!" and the last part of me is going, "The snack situation around here stinks. Really? Chocolate chips on solo? Scraping the bottom of the barrel..."

Regardless, here's our master bedroom wall art as it currently stands, though it will likely change tomorrow. I'm fickle like that:

 
Here's before: one lone, sorry photo smack-dab between the window and bathroom.


 I replaced that with a watercolor my 4-year-old did. She calls it "Sunset on a Waterfall," and you can laugh your faces off at me, but I couldn't love it more. Also, I wanted it to be part of the bedroom itself and thus hung it lower and off-center of the wall, closer to the window.

 
The far corner also has a small trio of frames, one of which is our temple marriage certificate. (I know, I know. Awwww....) We noticed it was looking kind of faded, so that came down and is filed away for when we purchase a more protective glass frame.

 
I hung up this new organically themed trio of frames. I bought two of the prints from 20x200 a while ago and luuuuurve them. The texture shown in the Nature books photo is unreal, and I love the story behind it. And, hello, a random gumball machine on the sidewalk outside a chain link fence? The possibilities of interpretation are endless.
 

There. Art I love. Go ahead and laugh, if you must. I'll be over there, drowning my shame in a glass of chocolate (chip'd) milk...

Tomorrow is Day 9: Lighting. I have a super pretty DIY chandelier tutorial for you, so excited to share!

Check out previous steps during the 12 Days of Master Bedroom Makeover:
Pin It Now!

Happy weekend.

My goal over the next few days is to enjoy lots of moments like the creation of this fine work by my 4-year-old:
 
 
I mean, look at that hair. Wowza.
 
Happy weekend.
 
xox
Pin It Now!

holidays + coffee filters

So, I don't drink coffee. But I bought myself a sackful of about 5.4 million coffee filters a few years ago. Firstly, because they make excellent disposable (translation: no dishes!) popcorn bowls for family movie nights. Secondly, because...I dunno. Frankly, I was just giddy about the dishes-free Utopia of "firstly."
 
Enter: holidays. Holidays with a large(ish) picture window in our living room. (A picture window that would, by the looks of things, enjoy having its own special window-cleaning holiday. Unfortunately for all the vertical glass planes in my life, it's not that time of the decade yet...)
 
 
So. I discovered that coffee filters make *perfect* window decorations for nearly every holiday. And for those months with zero (or lame) holidays (I'm looking at you, National Static Electricity Day), there's still something to celebrate. Proudly, for the whole neighborhood to see.

It's super hard to do, so get ready to take notes. Ready? Here we go:
Step 1: Get coffee filters.
Step 2: Flatten them.
Step 3: Have kids color on them with crayons or markers. Or anything else.
Step 4: Tape to window.
Step 5: Pat yo' festive self on the back for a job well done.

This new tradition's great for my family. Why? Because: (a) It involves the kids. Big-time. (b) It takes up zero storage space for excessive decor after the month is over. (c) It's festive from inside and outside, thanks to the translucent coffee filters. (d) We change things up from month to month based upon how we hang/display them, i.e., tape, fishing line, twine, pine boughs, etc. (e) After the initial purchase of a zillion coffee filters, which was just a few bucks anyway, it's freeee!

January: Static Electricity (snowmen/snowflakes)
February: Valentine's Day (hearts)


March: St. Patrick's Day (gold coins)
April: April Fool's Day (sunshines)
May: May Day (flowers)
June: Family Reunion Season (smiley faces)
July: Independence Day (flags)
August: Dog Days of Summer (ice cream cones)
 
September: Back to School (apples)
 
October: Halloween (pumpkins & jack-o-lanterns)
(view from outside...aren't those reflected Fall trees gorgeous?!)
November: Thanksgiving (turkeys)

(love the baby turkeys peeking their heads up)
 
December: Christmas (ornaments)
 
(Note: I realize these are examples for the U.S.; I'm sure seasons and holidays can be swapped out for other countries as well. Just use your imagination! Or steal some from your kids. I'm sure they've got plenty to spare.)
 
{shared here, here, here, and here}
Pin It Now!
Related Posts Plugin for WordPress, Blogger...
Pin It button on image hover