
I can't think of a segue into today's post, so let's just pretend I wrote something witty and endearing and intriguing and succinct here, and as a result you can't wait to read the rest of this post and follow my blog daily until the end of time.
There, that wasn't so hard now, was it? :)
I recently finished Nake Berkus' book, The Things That Matter . I have mixed feelings about the book overall, but one thing that keeps replaying over and over in my mind is when he said something to the effect of, "People ask me all the time if something is 'good' art. I ask them if they like it. If they like it, then, yes, it's 'good' art."
I love that.
A few weeks ago, I posted about a vintage art goldmine I happened across on eBay. I ended up ordering a bunch of prints (eight, to be exact, for a gallery wall) because I couldn't get them out of my mind. No, seriously. They haunted my dreams deliciously. (By the way, the store owner, LeeAnn, is awesome to work with. No lie. I'll be using her again for sure.)
A few weeks ago, I posted about a vintage art goldmine I happened across on eBay. I ended up ordering a bunch of prints (eight, to be exact, for a gallery wall) because I couldn't get them out of my mind. No, seriously. They haunted my dreams deliciously. (By the way, the store owner, LeeAnn, is awesome to work with. No lie. I'll be using her again for sure.)
Fast-forward to the happy day when I received said prints in the mail. It was like Christmas! (C'mon, you guys know the feeling. Admit it.) I loved them so much. However, the prints were a slightly odd size (bigger than 10x13 but smaller than 11x14), and custom framing for eight prints wasn't in my budget.
Enter the discovery of this idea, which got my wheels turning. I modified the process to create my own custom frames. I did eight of them in an hour or two, each one cost less than $5, AND my adorable husband thought they were made of wood when he got home from work that night. Dear man.

Due to photo overload, the full tutorial is after the break. I apologize for the inconvenience.

So. Let's get started, shall we?
Supplies needed for one frame:
- One acrylic (plexiglass) sheet cut to the size you want (I bought mine pre-cut to 11x14 at Home Depot for about $4 each).
- One piece of cardboard or posterboard cut to the size of the acrylic sheet (this will be the back of your frame).
- Mat to size (optional; I didn't mat mine).
- Paper tape (I bought mine at the UPS Store, of all places, after scouring a bazillion craft stores and coming up empty-handed).
- Scissors.
- Artwork of choice.

If your artwork isn't exactly the size of the acrylic sheet, put a small piece of double-sided tape on your posterboard and tape your art to it. Or, if you're using a mat, tape your art to that so it stays in place.

Center your print on the posterboard.

Peel off just one side of the protective plastic on your acrylic sheet.

Place acrylic sheet peeled-off-side-down on your artwork. Peel up just a few inches of the protective plastic on the other side, as shown. (Basically, peeling it like this simply protects your acrylic sheet from unwanted fingerprints as you're man-handling framing the thing. If you want to peel it all off at once and deal with fingerprints later, that's fine!)

(This next step is where you can take artistic liberty in finding a method that works for you, but I did several of these prior to this tutorial, and this was the cleanest and best way for me.)
Lay your paper tape UPSIDE-DOWN across your print, lining up the tape's end exactly even with the edge of your acrylic sheet. Cut the paper tape at the opposite edge of your acrylic sheet so that your paper tape is exactly the same width as your acrylic sheet.
Lay your paper tape UPSIDE-DOWN across your print, lining up the tape's end exactly even with the edge of your acrylic sheet. Cut the paper tape at the opposite edge of your acrylic sheet so that your paper tape is exactly the same width as your acrylic sheet.

Holding your exact-acrylic-sheet-width paper tape, align the bottom edge of your acrylic sheet (and print & posterboard) with the edge of your table/countertop. Make it exact, and double-check each corner several times, because exactness here will make the difference between a straight or slanted "frame."

Figure out your desired "frame" (taped) thickness, then hold the paper tape close to the bottom of the frame and gauge its placement. You can't see through the paper tape to tell where you're putting it, but because your acrylic sheet is lined up exactly at the bottom of your table, you can use the distance from the edge of the table to line up the tape squarely on each side. When you're even on both sides, lay the tape down lightly and then press it down with your thumb.

(Instead of the table's edge, you could also use a sewing cutting board or another graph-type surface under your frame to line up the tape. Like I said, this is just what worked for me.)
Flip your acrylic sheet (plus print & posterboard, at this point) over and, after making sure that the posterboard edge to be taped is exactly aligned with the acrylic sheet, tightly pull the paper tape around to the back. Pull the tape around to the back in the middle of the frame first, then the two corners, then everywhere else before running your thumb along to smooth out the tape lengthwise. This way it doesn't go wonky on you as you're smoothing tape from one end to the other.
(Am I making any sense? I'm trying to give you all the tips I learned the hard way, but it might just be confusing...unless you're actually doing it, then maybe helpful?)

Once the paper tape is securely pulled around to the back, smooth it down with your thumb.

Remove the rest of your protective plastic (don't forget this step! I had to do a re-do on one edge because I forgot. Heh.), and repeat this step on the opposite edge of your frame, then the two sides (in that order). Make sure that you smooth your posterboard/print down flat each time prior to attaching the paper tape to the back, just to create a polished end result.

When all four edges are done, run your fingernail along each edge.

Voila. Looks good, right?

You can place your legitimately framed art prints wherever you want. As for me, I had seven more to do, then I hung them to create a gallery wall on our staircase:

The plan is to spray paint the chandelier as soon as it gets warm, just to brighten the space a little bit from its current greyishness.

Here's a closeup:
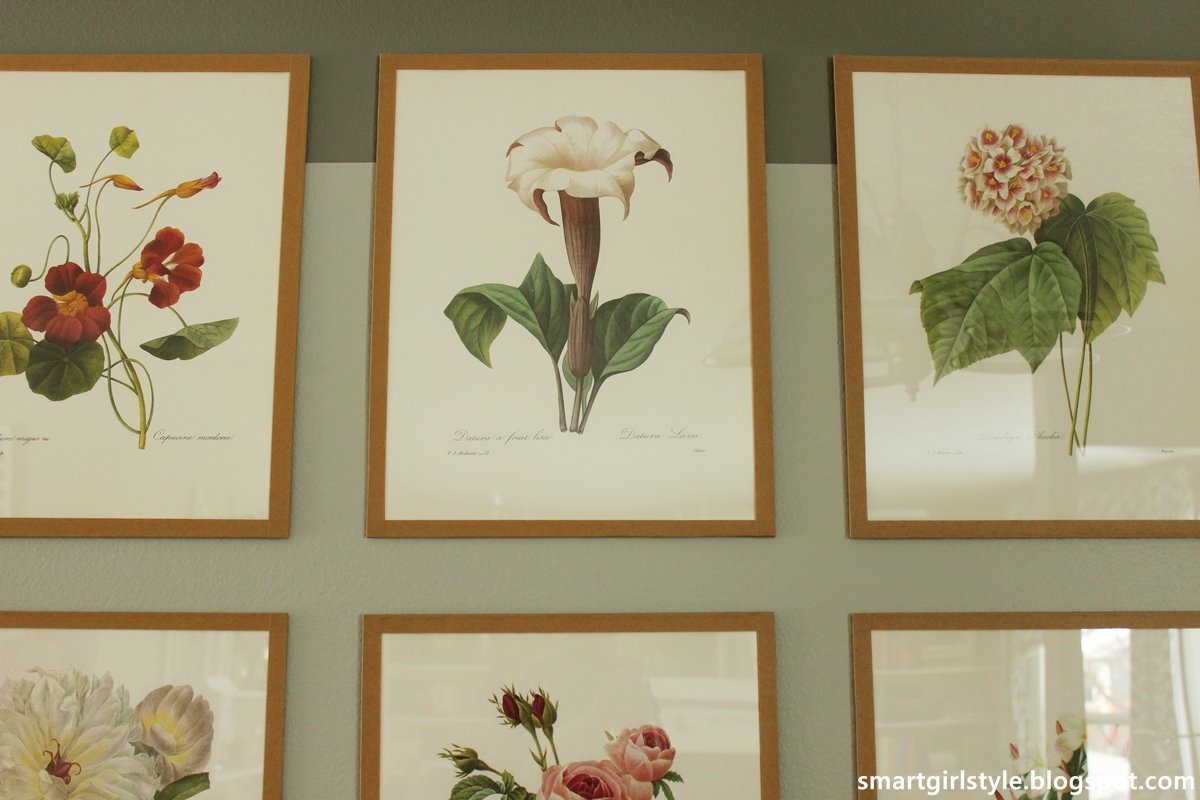
I like the simple, natural feel of the taped frames. A lot. I feel like it goes really well with the content of these fantastic vintage P.J. Redoute prints.
Please let me know if you need clarification on any of this...or if you stumble across a tip that I should include.
Happy framing!
Featured!


{shared: A Glimpse Inside, A Jennuine Life, A Little Knick Knack, Be Colorful, Beyond the Picket Fence, Boogieboard Cottage, Coastal Charm, Craft-O-Maniac, Crafty Texas Girls, Creating my way to Success, Creating Really Awesome Free Things, DIY by Design, DIY Showoff, Finding Fabulous, Fireflies & Jellybeans, GingerSnap Crafts, Homecoming, House of Hepworths, Housewife How-Tos, I Gotta Try That, I Should be Mopping the Floor, Keeping it Simple, Lil' Luna, Mercy Ink, My Girlish Whims, My Romantic Home, My Uncommon Slice of Suburbia, New Nostalgia, Sew Can Do, Sew Much Ado, Somewhat Simple, Suburbs Mama, Sumo's Sweet Stuff, The Busy Bees, The DIY Dreamer, The Girl Creative, The Rustic Pig, The Shabby Creek Cottage, The Shabby Nest, Under the Table & Dreaming, What-About}
Happy framing!
Featured!
{shared: A Glimpse Inside, A Jennuine Life, A Little Knick Knack, Be Colorful, Beyond the Picket Fence, Boogieboard Cottage, Coastal Charm, Craft-O-Maniac, Crafty Texas Girls, Creating my way to Success, Creating Really Awesome Free Things, DIY by Design, DIY Showoff, Finding Fabulous, Fireflies & Jellybeans, GingerSnap Crafts, Homecoming, House of Hepworths, Housewife How-Tos, I Gotta Try That, I Should be Mopping the Floor, Keeping it Simple, Lil' Luna, Mercy Ink, My Girlish Whims, My Romantic Home, My Uncommon Slice of Suburbia, New Nostalgia, Sew Can Do, Sew Much Ado, Somewhat Simple, Suburbs Mama, Sumo's Sweet Stuff, The Busy Bees, The DIY Dreamer, The Girl Creative, The Rustic Pig, The Shabby Creek Cottage, The Shabby Nest, Under the Table & Dreaming, What-About}
Very nice, frugal and creative!
ReplyDeleteBy the way, I see why you love those prints so much, they are awesome!
Selene @ restorationbeauty.com
Don't you love them? I sit and stare at them every time I'm nearby...it's definitely "good" art for me!
DeleteThese are so perfect! What a clever way to custom frame
ReplyDeleteThanks, Elizabeth. I'm happy with how they turned out.
DeleteThose prints are simply gorgeous! They looks soooo good on your wall too! And the price makes it even more attractive........!
ReplyDeletehugs x
Crystelle
http://www.crystelleboutique.com
Price often has a way of amping up the merits of something, doesn't it? :) Thanks so much, Crystelle.
DeleteGreat idea! I host a DIY link party every Monday and would love for you to join! http://homecomingmn.blogspot.com/2013/02/the-diyers-link-party.html
ReplyDeleteWill do, Kayla. Thanks for the invite.
DeleteWhat pretty prints you have here and I love how thrifty you framed them. Thanks for linking up at my NTT party.
ReplyDeleteBlessings,
Linda
Aw, thanks Linda! You're welcome...I enjoy your NTT party.
DeleteLove the prints and what a genius solution for framing. You have done an amazing job with your home. I love that you tackle anything and you make your home reflect you. Nice job girlie!
ReplyDeleteJoann, this is one of the nicest comments I've ever gotten. That is absolutely my goal in decorating. Thank you!
DeleteWouwww...........these are so pretty! Clever idea!!
ReplyDeletehttp://www.curiositaellya.blogspot.com/
Aww, thanks. :)
DeleteI'm in love with these flower images, and the framing is so cool! I can't wait to give it a try. Thanks so much for sharing. Have a wonderful day!
ReplyDeleteI know, right? The botanicals are super pretty in real life, I couldn't pass them up. Thanks, Brooke.
DeleteWhat a wonderful idea! I'm going to have to try this. So creative! and they look beautiful.
ReplyDeleteI'm all about framing on the cheap, if at all possible, and I'm so glad they turned out! Thanks, Maryann.
DeleteThese came out wonderful! Please share it on Creative Crafts Thursday, www.creativecraftsthursday.blogspot.com, and any of your favorite projects each and every week!
ReplyDeleteI'm sorry I missed your party originally, Jennifer. I'll try to make it this week. Thanks for the invite!
DeleteGood idea and budget friendly too! Love it and would love for you to share at my link party this week.
ReplyDeletehttp://www.bloominghomestead.com/2013/02/crafty-tuesday-22513.html
-Marie
I'll try to add it to your party tomorrow, Marie. Thanks (belated) for the invite!
DeleteI love the look of the paper tape. It does look like wood! Or at least a nice frame:)
ReplyDeleteHaha! Yes, I agree. Not quite wood, but I'm happy with the final look. Thank you, Alison.
DeleteSo clever and beautiful! Vintage botanical prints are so expensive...your DIY version is awesome!
ReplyDeleteVintage botanicals are pretty expensive, true. I love art, though, and I'm constantly on the lookout for inexpensive ways to showcase the artwork nicely. I think the paper tape works well with the botanicals here - both kind of earthy and organic, you know?
DeleteWicked smart. :D Thanks for sharing.
ReplyDeletep
Oh so PRETTY Brittney!!!
ReplyDeleteThanks for sharing this at The DIY Dreamer last week. Can't wait to see what you link up tomorrow evening! Have a great day!!
Looks wonderful! I love the prints, so beautiful.
ReplyDeleteSo pretty! Absolutely stunning on your striped wall!
ReplyDeleteStopping by from your feature at Sew Can Do's Craftastic Monday :)
I, too, love the contrast of the feminine botanicals and the chunky grey striped walls. Thank you, Lorene.
DeleteYou did such a great job. I will be featuring this tonight at my Winter Blues Wednesday party that opens at 8pm EST. Please stop by and pick up an I've Been Featured button. Thanks.
ReplyDeleteNicest. Thanks, Judy! You made my week.
DeleteWow! Amazing job. I've got to try this! Thanks for sharing ;)
ReplyDeleteJamie www.somuchbetterwithage.com
i really like it! but how exactly do you hang them?
ReplyDeleteLove these prints! Awesome framing solution! Thanks so much for sharing at Suburbsmama!
ReplyDeleteConcerning financial and business news you can buy in to a RSS channel. This gets you email alarms on the most recent breaking news in the business and hold division. Driving news channels and reporting work environments have overwhelmed the web. medios independientes
ReplyDelete