
Master Bedroom Makeover
Day 4: Headboard
** Note: This post is part of a 12-step series in my master bedroom makeover. Links to the other (previous) steps are listed at the end of this post.
I couldn't be more excited about this headboard redo. It was my first experience with non-trim nailhead, and although it's far from perfect, I'm super happy with the transformation.

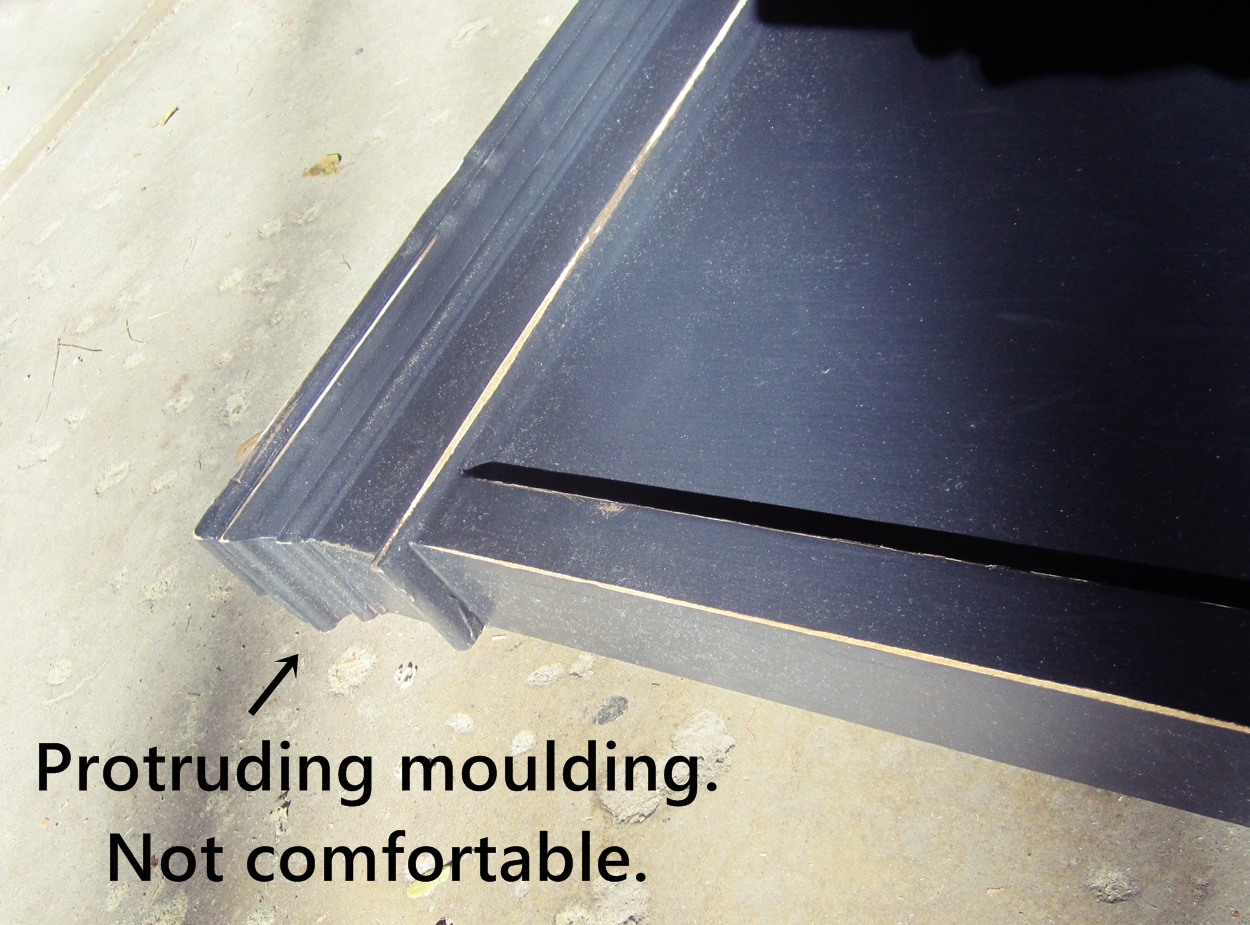
The headboard (below) I made a few years ago out of an old door and some trim and moulding. The primary problem with it was how the protruding top moulding dug into one's (a.k.a., my) back while leaning against the headboard, to read or write or whatever. No good.

The headboard (below) I made a few years ago out of an old door and some trim and moulding. The primary problem with it was how the protruding top moulding dug into one's (a.k.a., my) back while leaning against the headboard, to read or write or whatever. No good.

Plus, I've just wanted to do an upholstered headboard forever. Seize the day.
Because I'm a use-what-you've got kind of girl, I decided I'd makeover the door-headboard itself, rather than start from scratch. What can I say, landfills everywhere love me.
So do ice cream shoppes, but that's neither here nor there.
Removed all moulding and trim.
So do ice cream shoppes, but that's neither here nor there.
Removed all moulding and trim.

Here it is, trim-free, feeling at home on the garage floor amidst a few inches of sawdust and some fall leaves. Sanded the door quickly, just to get rid of excess caulk and peeling paint. Sanding's not a big deal here, because the headboard will be upholstered.

(I also cut off a few inches from the bottom of the leg posts because I wanted my headboard lower than it has been.)
Headboard itself is ready. Next I prepared the foam - measured, cut out, and angled the top and sides. (Angling the foam depends on the overall thickness. Because I wanted an ultra-cushy headboard, my foam was 4" thick, and there's no way nailhead would stick and stay through that much foam without tapering the edges.)

I then laid the foam on the headboard (mine did not extend the full height of the headboard back, just the part that's above the mattress) and stapled down the bottom two corners. If you do this, make sure you staple in far enough to avoid the nailhead line.

Next, I laid a thin piece of foam (you could use batting; I just didn't have a large enough piece on-hand) over top and staple it down. I put one or two staples through the top foam on the headboard side near the top, then the opposite side near the top, just to keep it in place. I then stapled from the middle of the top of the foam outward...

...then down the sides and loosely across the bottom.

Ironed my fabric (Robert Allen linen in mint...isn't it pretty? I told you I'm obsessed) and laid it right-side DOWN on the floor inside.

Had my husband help me carry the headboard-heavyweight down and lay it on the fabric. Made sure fabric was straight and then pulled it taut all around.
Stapled the top center with a few staples, then pulled the bottom center taut and stapled there. Did the same with the centers of the sides. Worked my way outward (from center toward corners) with the stapler, always pulling taut. Don't be afraid to really yank it tight, this will ensure fewer bumps at the end.

(I'll explain about the legs in a minute. First: the upper corners.) My upper corners were so sharp and I had such weird wood bumps from the posts that, after experimenting with several different methods, I decided an intentional fold along the corner looked the most professional. To do this, pull the side fabric and staple all the way to the corner.

Neatly fold the side fabric so the fold will lie directly on top of the corner.

Staple the heck out of it. Trim the excess.

My legs, being on the very edge of the headboard (not ideal as a rule, but for a number of reasons that's how mine had to be) would potentially be visible. So even though I wasn't going to extend the nailhead trim all that way down the legs, I decided to still cover them in fabric for consistency.
Cut a diagonal slit in the fabric toward the corner so both sides (of the fabric -- one at the bottom of the headboard, one on the leg) could be stapled tightly.

Staple both sides of the fabric down the leg. Cut off top part of fabric (this is the back of the leg and won't be seen). Fold inward, staple in place. Fold upward (like you're wrapping a present). Staple.

Nailhead. This part was pretty fun. Therapeutic, maybe? I had really wanted to do a double line of nailhead around the edges, but (despite my careful angling) the foam was just too thick. I was initially bummed, I'll be honest, but I'm over it.

Happy with the end result (although I wish I could've lifted the heavy door to stretch the fabric a teensy bit more, but whatevs). I especially like how it's lower now and can actually be centered under a window. Because what if I wanted to turn our master bedroom window into a drive-up* beverage stand? Now I could, friends. Now I could.
*As in, people drive up to the window to pass me beverages while I lie in the comfort of my bed. Because I think it would be a wildly successful business venture.
*As in, people drive up to the window to pass me beverages while I lie in the comfort of my bed. Because I think it would be a wildly successful business venture.

Forgive the bedding...changing that out is forthcoming. But I love how the headboard really lightens up the whole room. Annnnd, one more time. Just for kicks:

Next is Day 5: Furniture Arrangement.
Check out previous steps during the 12 Days of Master Bedroom Makeover:
Day 3: Floor
{shared Sugar Bee, New Nostalgia, My Uncommon Slice of Suburbia, Coastal Charm, Sew Can Do, Project Inspire, Keeping it Simple, Craft-O-Maniac, Be Colorful, A Round Tuit, Simply Designing, Finding Fabulous, Not Just a Housewife, LambAround, Be Different Act Normal, Vision to Remember, Shabby Nest, My Romantic Home, A Little Knick Knack, Fingerprints on the Fridge, and Fireflies & Jellybeans}
Pin It Now!
{shared Sugar Bee, New Nostalgia, My Uncommon Slice of Suburbia, Coastal Charm, Sew Can Do, Project Inspire, Keeping it Simple, Craft-O-Maniac, Be Colorful, A Round Tuit, Simply Designing, Finding Fabulous, Not Just a Housewife, LambAround, Be Different Act Normal, Vision to Remember, Shabby Nest, My Romantic Home, A Little Knick Knack, Fingerprints on the Fridge, and Fireflies & Jellybeans}
Nice Work! Way to keep that old orange door in business.
ReplyDeleteHaha! Those doors just might outlive us all...
DeleteThis comment has been removed by the author.
ReplyDeleteIt looks awesome! I love the nailhead trim I totally want that in my bed frame, too!
ReplyDeleteI was surprised at how easily it went in 90% of the time, and then the other times the nail would randomly go somewhere weird. I'm sure there's a science to this, I just have to learn it... :)
DeleteYou did it! It's much lighter in your room. I like. The nails were trick-eee for us. We had to remove some and start over to get our curved line to look decent. It's not perfect but it was made with love and i love it anyway.
ReplyDeleteI think when I'm feeling up for it, there are about 5 nails total that I need to remove (from the sides) and redo. That will straighten out the lines. Yeah, they're not the easiest, but I'm going to have a hard time ever using nail trim again, you know?
DeleteVery cute. I love upholstered headboards. Maybe one day I'll actually do one :)
ReplyDeleteI love this one already. So comfy to lounge against! I'm a new believer, for sure. You should totes do one. Yep. "Totes." Because apparently I'm allsofasudden 13 years old... :)
DeleteThanks for stopping by, Robyn!
You are one bold, adventurous, and ambitious woman. :D This turned out wonderfully. Yay you. Thanks for sharing your project on Motivated Monday at BeColorful this week.
ReplyDeletep
Haha! "Yay you." That made me smile. :)
Delete