
Reupholstering a Chair Seat: A Beginner's Guide
If you've never reupholstered or recovered any piece of furniture and, frankly, are pretty wary of doing so, I'm dedicating this post to Y.O.U. That's right. You're the Guest of Honor today, baby!
(Just don't let the title go to your head and start asking your children to take over dinner duty while you prop your feet up and sip a sparkling beverage while enjoying six hours of Pride & Prejudice. It won't work. Trust me.)

My 6-year-old daughter spied chair this at a consignment shop the other day and fell in l.o.v.e. with it. (Except "the L-word" is a bad word around here. Same as "k-i-s," says my 4-year-old. Which kind of made Valentine's Day hilarious, but that's another story for another day.) (Maybe when we're both sitting on our newly upholstered chairs I'll share it with you.) Anyway. Despite the ugly seat, the price was right, so we snatched it up.

So. Find yourself a chair with an ugly seat cushion like I did, grab some cute home dec fabric and a staple gun, and follow along with me to upholster your very first chair. A Guest of Honor Chair, in fact! Ready? Let's go.
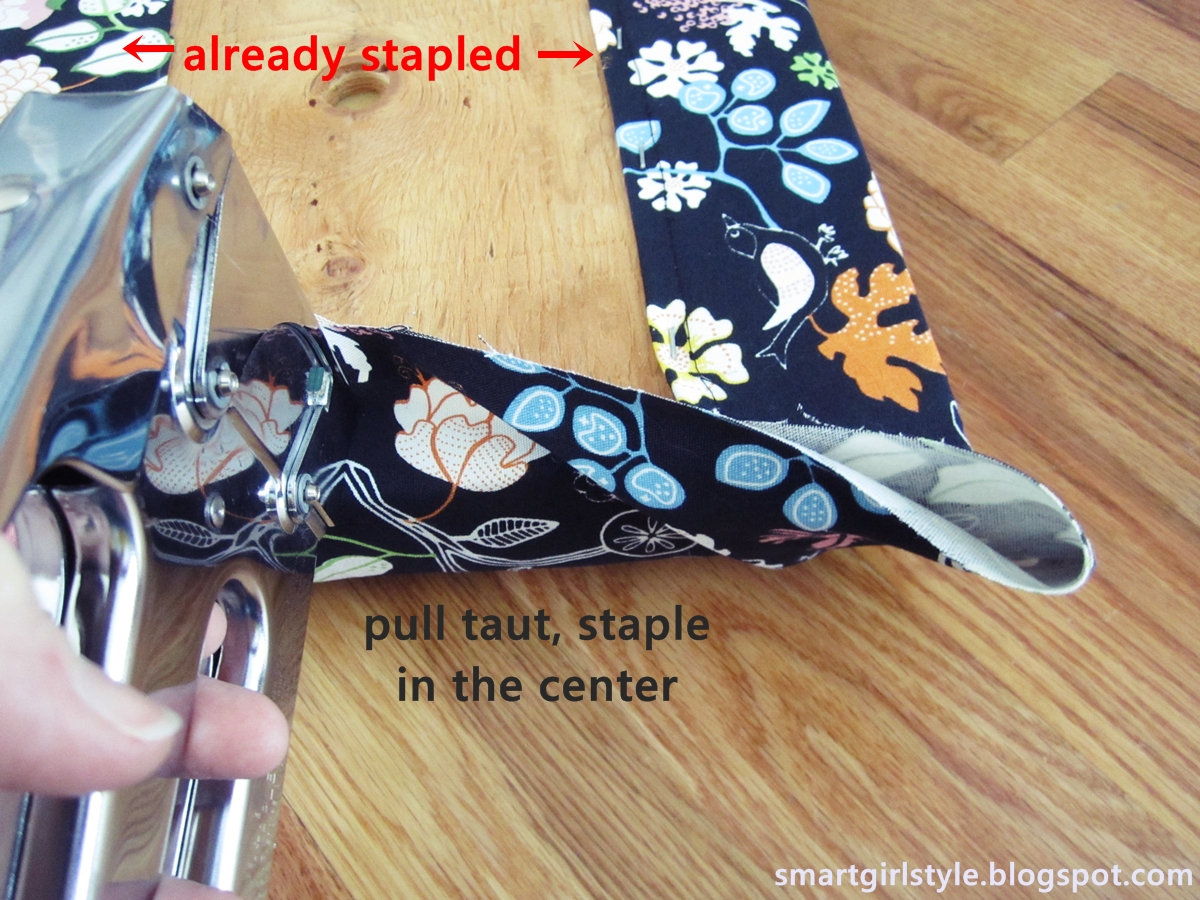
Flip the chair over and detach the seat cushion from the frame with a screwdriver. Lay the cushion upside-down on your fabric and cut, leaving 5-6 extra inches on all sides (or more, if your cushion is extra thick). This is where you'll do your stapling.
After making sure your fabric is wrinkle-free, you'll start attaching it to your seat. Staple the two longest (opposite) edges, one side at a time, starting from the middle and moving outward.

If there's one thing I can tell you about upholstering, it's this: no matter how simple the job, pull taut. Like, really tight. Fabric will move and stretch over a short amount of time if it's not stretched almost as tightly as you can muster during the upholstery process.
Also, you'll (almost) always staple from the center of a side outward to the edges, pulling as you go. This is so your fabric will end up smooth and straight, with no surprise bunching anywhere.
Also, you'll (almost) always staple from the center of a side outward to the edges, pulling as you go. This is so your fabric will end up smooth and straight, with no surprise bunching anywhere.
After both sides of your seat are taut and stapled (flip the seat over to make sure...if there's even a little bunching, remove the necessary staples and fix the problem now, because it's not going away otherwise!), it's time to think about the corners. Other than lumpiness along the upholstered surface itself, corners are huge in making an upholstery job look professional.
Don't stress, though. If you can wrap a present, you can upholster some crisp corners. Here's my new favorite way to do it:
Staple once in the center of one of the open ends of fabric.
Don't stress, though. If you can wrap a present, you can upholster some crisp corners. Here's my new favorite way to do it:
Staple once in the center of one of the open ends of fabric.

(Woah. Weird pinkie finger sitch in the photo above.)
(And also? Apparently "taut" is the Word of the Day. 10 points to whoever ignores the embarrassing number of times the word is used here.)
(And also? Apparently "taut" is the Word of the Day. 10 points to whoever ignores the embarrassing number of times the word is used here.)

You'll want to be simultaneously pulling the fabric toward you during this time and also pulling it toward the corner. Just think "In-N-Out" (in: toward you, out: toward the corner) (or In-N-Out for dinner).


After the corner itself is secure, staple from the center staple toward the corner. Because you've been pulling the fabric tight this whole time (right?), the fabric should lie flat and stapling should be easy.

Repeat steps for other three corners. Reattach the new-and-improved seat cushion to your chair, and stand back to admire. (And bask in the happy grin of the chair's young owner, if applicable.)
Congratulations! You've done it!

Layla (my daughter) called me down to her bedroom a few minutes after she lugged the freshly reupholstered thing away. She had created a "desk" setup all on her own, using random stuff from throughout the house. (I wonder where she gets that habit?) Like this table from the entryway and this rug from the nursery. Cute girl.

I'm in the process of rethinking the girls' bedroom space, so even though that table is too shallow even for a piece of paper, we're letting it all stay here for the time being. Regardless of all that, the stool's much cuter now, no?

When it's warm outside, I may spray paint the wooden armrests. But for now, hooray for a 20-minute project well done.

{shared: A Glimpse Inside, A Jennuine Life, A Little Knick Knack, A Vision to Remember, Angels Homestead, Be Colorful, Be Different Act Normal, Beyond the Picket Fence, Chic on a Shoestring Budget, Coastal Charm, DIY by Design, DIY Dreamer, DIY Showoff, Finding Fabulous, Fingerprints on the Fridge, Fireflies & Jellybeans, GingerSnap Crafts, House of Hepworths, Housewife How-Tos, I Heart Naptime, I Should be Mopping, Lil' Luna, Miss Mustard Seed, My Girlish Whims, My Romantic Home, My Uncommon Slice of Suburbia, New Nostalgia, Not Just a Housewife, Or So She Says, Parlo & Logi, Sew Much Ado, Simply Designing, Somewhat Simple, Sugar Bee, Sumo's Sweet Stuff, Sweet Living, The 36th Avenue, The Shabby Creek Cottage, The Shabby Nest, Under the Table & Dreaming, What-About}
Pin It Now!
I just love to see the transformation a good reupholstery job can do! This is definitely one of them! You did an amazing job!!
ReplyDeleteSelene @ restorationbeauty.com
Selene, have I told you lately how much I love your comments? You are so positive. Thank you! (And I'm with you all the way on reupholstery transformations. They're the best. Well, paint transformations, too. But still. :) )
DeleteThe BBC version right?? It is my go to show for background tv or just for fun. My 3 year old loves it too. Got to start them early. :)
ReplyDeleteP.S. cute chair btw :)
TOOOOOOTALLY the BBC version. The others are okay, but I view them as knockoffs. Heh. Sorry, Kiera Knightley.
DeleteMy ottomans turned out awesome. I should have recorded it better so I could guest post!
ReplyDeleteI KNOW! You're right on both counts. Seriously. You're allsofasudden a crazy talented furniture gal. I need to come take a real live tour and hear all the stories! Miss you, friend.
DeleteMy ottomans turned out awesome. I should have recorded it better so I could guest post!
ReplyDeleteGreat!
ReplyDeleteI love this how-to... really clear!
Tx for sharing,
MammaNene from
SergerPepper.blogspot.it
I'm glad it's helpful. :)
DeleteWhat a fantastic transformation, and your tutorial was so clear even I could try it!
ReplyDeleteI'd love if you'd come join my How To Tuesday link party, too.
http://housewifehowtos.com/link-party-2/how-to-tuesday-link-party-9/
- Katie B. of HousewifeHowTos.com
Thank you for inviting me, Katie! I linked up.
Deletedefinite improvment, excellent job!
ReplyDeleteMan, if every project I attempted ended in "definite improvement," I'd be a very happy girl. Thanks, Sharlyn.
DeleteYou did a great job with the corners... Such a tricky part for me!
ReplyDeleteLooks great.
I think corners are the tricky parts for everybody. Makes such a difference in the overall polish, don't you think? Thanks, Taylor.
DeleteLooks great and the way you explained the corners was really helpful for me. Thanks so much for sharing.
ReplyDeletep
Glad it was helpful, Pam!
DeleteOh wow Brittney!! LOVE IT!!!!!!
ReplyDeleteThanks for linking up at The DIY Dreamer... From Dream To Reality! See you tomorrow evening! :)
You know it, Christine. Wouldn't miss it for anything. :)
DeleteOne of my cousins used to reupholster things like this, and I was always amazed that she could do something like that. Thank you for showing me how easy it really is. Thank you so much for sharing with Saturday Spotlight. Have a great week and come back soon!
ReplyDeleteI hope you try it, April. It's super satisfying! For real. :)
DeleteWe offer a nationwide re upholstery service, offering full re upholstery on all types of furniture, this includes both leather and fabric furniture. Re Upholstery is not a cheap option but will give you many years of use in comparison to today mass produced furniture.
ReplyDeleteConcerning financial and business news you can buy in to a RSS channel. This gets you email alarms on the most recent breaking news in the business and hold division. Driving news channels and reporting work environments have overwhelmed the web. medios independientes
ReplyDelete