
Guest Bedroom Makeover
Day 11: Throw Pillows (or: How to Sew a Ruched Throw Pillow)
**Note: This is part of a 12-step bedroom makeover series. Find the previous steps at the bottom of this post.**

This tutorial is kind of cheating. It's like take-n-bake pizza, where the metaphorical "pizza place" that does all the hard work is this lady's tutorial on how to sew an envelope pillow, and your hypothetical "oven" is my post here on how to do the ruching.
Which...mmmmm...pizza.
So. First become familiar with how to do an envelope-style pillow. Then combine that knowledge with the simple steps in this post. Then pop something pre-made into the oven and feel domestic.
*For explanation purposes, I'm assuming a square pillow form. If yours is different, adjust accordingly.*
For the front (ruched) pillow piece, you'll want a rectangle that's as wide as your pillow form (maybe give yourself an extra half inch, but don't go too big) and about 2ish times as long as it is wide. (Longer than that for a more intense ruche, shorter than that for more subtle gethers. Measure to your taste.)
Decide how many lines of gathering you want in your ruche. (I wanted 4.) To figure out uniform spacing between each ruche line, divide the width of your pillow by one more than that (in my case, 5) to determine the spacing between each ruche line.
So, for example: if your pillow width is 18" and you want 4 ruche lines, you would divide 18 by 5 for a spacing distance of approx. 3.5". (You can fudge the actual measurements slightly.)
Start by doing a baste-stitch along the two sides as close to the edge as you can safely do it. Then measure, mark (pin or pencil on the fabric's wrong side), and baste-stitch (or ruffle-stitch) down each of those lines, which run the length of your fabric piece.

Because I wanted four lines of ruching on my pillow, I ended up actually sewing six lines. This is because the two sides must be gathered in order to fit to the pillow's back-side fabric. (They're hard to see on the photo above, but the lines are there in light blue thread.)
Gather a line until it is as long as the width of your fabric (for example, 18"). Secure it in place by sewing a regular stitch on top (or just to the side) of your baste-stitch. (You can then rip out your baste stitches if you want. I did not, because you can't really see the thread anyway on mine.)
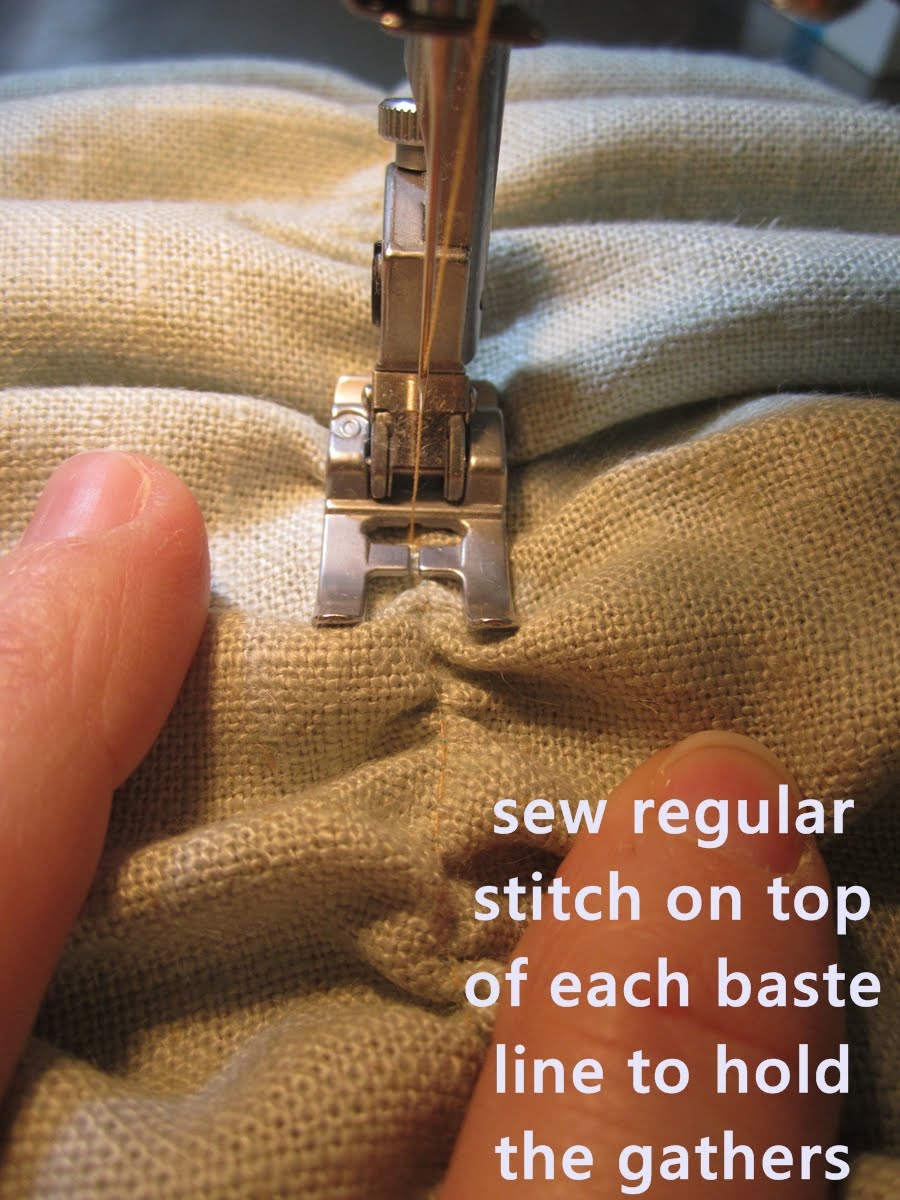
Do this for each baste-stitch line. This is the most time-consuming part, for sure. You should have a securely ruched square when you're done. Sew your ruched piece to your two envelope-style back pieces (right sides together), all four sides.

From the back:

Turn it right-side out, and put in your pillow form. Success!

Come back for Day 12: Putting it All Together to see the whole room (mostly) completed! This is my favorite day of this whole process, hands down, when I get to share the finish line with you all.
Check out the previous steps to this bedroom makeover:
Day 1: Inspiration Board
Day 2: Paint Walls
Day 3: Ikea Malm Dresser Makeover
Day 7: Nightstands
Day 8: Reading Lamps
Day 9: Stuff on the Walls
Day 10: Bedding
Featured!


{shared: Boogieboard Cottage, Brassy Apple, Craft-O-Maniac, Creating my Way to Success, DIY by Design, DIY Dreamer, GingerSnap Crafts, I Gotta Try That, I Should be Mopping the Floor, Ladybug Blessings, Lil Luna, Lines Across, Making the World Cuter, My Girlish Whims, Pinkapotamus, Project Inspire, Sew Can Do, Shades of Amber, Sugar Bee, The Kurtz Corner, The Rustic Pig, The Winthrop Chronicles}
Pin It Now!
You have crazy mad skills! The pillow is stunning!
ReplyDeleteOh my gosh, I don't know about crazy mad skills. More like, "what do I have around here already that I can use for a pillow?" paired with a little bit of ruching. Because, really, everything is better with a little ruching on it.
DeleteThe pillow is lovely!! great color!
ReplyDeleteThat whole room is going to have such a cool earthy vibe.
(also. When I opened your post in Google Reader all I saw was "Ruched Pill" and was like, whoa. Girl takes her abbreviating SERIOUSLY. haha.)
Watch out, next time I might go with something like "r'pih." Wouldn't THAT be abbrev'd of me. :)
DeleteMan, I miss you. We need to get togethah.
haha, YES. (I mean, Ye.)
DeleteLooks great. :) And I love your headboard too! I've been eying similar headboards myself. Anyhow, I'm featuring this pillow in my "Best of" round up from this week's linky part over at Project Inspire. I hope you'll stop by tomorrow and check it out. :) XO
ReplyDeleteYou just made my day, Diana. Of course I'll stop by! Thanks!
DeleteAwesome project! Sharing on my fb page tonight. First the animal book ends and now this?! Glad you shared on Cowgirl Up this week!
ReplyDelete:) Samantha @ Crafty Texas Girls
PS- You need throw your name in the hat to host Cowgirl Up one week, your blog is COOL!
https://www.facebook.com/pages/Crafty-Texas-Girls/140299076008437
Thanks, Samantha. You're my new eBFF, you know that? :)
DeleteSo cute! Love the look of that pillow and natural color/fiber.Someday I'll get a sewing machine and make one of these...love the headboard too!
ReplyDeleteHah! Yeah, don't attempt this without a sewing machine. That would be killer.
DeleteBeautiful pillow project! Love your clear directions too. I'm your newest follower. Thanks for sharing and inspiring!
ReplyDeleteWelcome, Casandra! You're welcome.
DeleteGreat pillow!!
ReplyDeleteThanks for linking to a Round Tuit!
Hope you have a fabulous week!
Jill @ Creating my way to Success
http://www.jembellish.blogspot.com/
LOVE this pillow :) xo, Kelly
ReplyDeleteThank you, Kelly! And it doesn't hurt that it's really quite simple to make.
DeleteLove this pillow and I would love to make one, but I'm sure it would not turn out like this. My sewing machine hates me! Thanks for sharing at my party.
ReplyDeleteHugs,
Marcie
I Gotta Try That
Marcie, you're so funny. I'm sure your sewing machine doesn't HATE you. But if it does...I completely understand the appliance-to-owner hatred, because my power drill feels the same way about me. Thanks for stopping by.
DeleteI'm sooo LOVING the pillow!!!!! I want it!
ReplyDeleteThanks for sharing this at The DIY Dreamer... From Dream To Reality! I'm looking forward to seeing what you share tonight!
You're so sweet to comment every week, Christine! I'm thrilled you love this pillow. :)
DeleteThanks for linking up to Your Whims Wednesday, I featured this on my blog tonight! http://www.mygirlishwhims.com/2013/01/your-whims-wednesday-96-and-features.html
ReplyDeleteAww, I'm super honored, Rebecca. Thanks! It's definitely a girlish whim, this pillow is.
DeleteI love this pillow! I love the gathering and how it adds charm! I just started a new link party and would love for you to come over and share your post or any social media sites. Talkin’ About Thursday - http://designeddecor.com/talkin-about-thursday-link-party-5/
ReplyDeleteDeDe@DesignedDecor
Thank you, DeDe. I love the gathering, too!
Delete: Throw Pillows (or: How to Sew a Ruched Throw Pillow) ... decorativepillowsforteens.blogspot.com
ReplyDelete
ReplyDeleteThanks for your informative writing.
Get 30%-70% Discount from FZillion.com on all branded Quilts Coverlets .
You can get excellent product with Great discount from Amazon and Ebay
USA Free shipping and free return. 75 days Return Policy.
This is so cool. I am such a huge fan of their work. I really am impressed with how much you have worked to make this website so enjoyable. suzani embroidery
ReplyDelete