Living Room Mood Board

Hi. Most of you don't even remember me, I know. Because I took a month-long hiatus from blogging whilst the holidays were upon me. Forgive me? No? Rats. But...oh well. We'll both live, now, won't we. :)
 
I'm helping my super awesome and stylish artistic friend update her living room. Like I said, she's a legitimate artist and has a great eye for colors, lines, and textures. She recognizes trends without being trendy, if you know what I mean. The main challenges of their living room are:
 
1) Space. With a large farmhouse dining table on one end of the modest-sized living room, there's not a ton of extra space.
2) Her husband digs contemporary minimalist style, she leans toward eclectic with soul and personality - a little tribal, vintage, industrial.
3) There are five children and a puppy to consider.
4) Budget. It's not inexpensive to makeover an entire living/dining room in one fell swoop. But they're ready to take a stab at it.
 
Without further ado, here is the preliminary (translation: expendable, jumping-off point, could be waaaaay off) mood board for their updated living room design:
 

(pre-script: Walls will be white.)
 
1 - Contemporary sofa. This Avec sofa from CB2 has clean, modern lines, while its grey tweed upholstery adds a bit of warmth and texture. (A similar form could also be replaced with light leather.) 
 
2 - Two-tiered coffee table. I like the combination of square shape (we'd use two), warm wood tones, and industrial vibe of this table. The under-shelf is necessary for a select few of the family's many many books and cool treasures.
 
3 - Red wooden side chair. They have a fireplace, and I envision a vintage chair pair (mismatched would be fantastic) flanking it. This little vintage red number caught my eye.
 
4 - Navy gooseneck barn sconces. Because floor space is so limited, side tables (and, consequently, their table lamps) are a big fat question mark. A couple of wall-mounted lamps will make a big difference in the room's lighting.  
 
5 - Palm frond throw pillow. What can I say? Just for fun. A little unexpected pattern and earthiness.
 
6 - Suzani rug. Tribal meets geometric meets modern meets perfect foundation for eclectic in this bold, graphic area rug. The colors can read as neutral or as great jumping-off points for other parts of the room.
 
7 - Mint velvet throw pillow. Nothing adds freshness to a fairly traditionally colored space than a bit of mint velvet. It's unexpected. I'd add contrasting navy piping.
 
8 - Medium-tone wooden bookcases. Two of these exist in the living room and aim to stay. Great wood bookshelves can almost always be worked with successfully.
 
9 - Leather butterfly chair. Provides a hip, retro vibe while still being classic in leather. Also, what can beat those lines? Nothing, that's what. Breaks up the solid chunks of a living room's inherently larger pieces (e.g., fireplace, sofa, dining table, etc.).
 
10 - Mustard and white herringbone window shades. Paying homage to the love of geometric shapes without competing with the rug or other pieces, this simple fabric adds just the right touch of visual interest and color.
 
11 - Medium-tone wood floor. Looooove a wood floor, especially if that wood floor is authentic and well-lived. A perfect start to a room's makeover, if you ask me.
 
12 - Brass pharmacy floor lamp. This type of lamp successfully bridges the gap between classic traditional and modern. Plus, every living room needs a bit of brass.
 
13 - Newsprint rhino head. A wall-mounted animal head, just for the fun of an eclectic living room. (Actually, upon seeing the mood board, my friend nixed the rhino head. No sweat. I want her to be happy!)
 
14 - Printed throw pillow. We'll vary the prints, patterns, and colors of the throw pillows. Not too many, but enough to bring a little life into the room.
 
15 - Leather armchair. This already exists in the room, which I'm glad about. Classic comfort.
 
16 - Mismatched dining chairs. As I mentioned, a large chunky wood farmhouse-style dining table sits at one end of the living room. It has a significant visual presence. Currently, the chairs are all dark wood like the table. I'd like to encourage a mix-and-match feel with the chairs, leaning toward vintage industrial.
 
This will be such a fun project; I'm excited to get going and will keep you all updated on our progress. Stay tuned!
Pin It Now!

Christmas Decorations: Bows

Bows. We put them in hair, we put them on gifts, we even put them on our car grilles. (Okay, we maybe don’t put them on our cars, but we’ve all seen it done. That counts for something.)
 
The truth is, bows have been around forever, and it’s for a reason. Bows can provide a polishing touch to whatever they’re put on…and they often provide a bit of heart-warming nostalgia as well, which is never a bad thing, especially during the holidays. You might want to consider adding a few bows to your décor this season – inside or out, it’s never too late.


  Welcome guests to your home with some oversized bows atop miniature Christmas trees. Keeping the tree décor restricted to the bows alone helps this look not be too overdone, although the stars on the silver buckets are a festive and unobtrusive addition.
source

Large red bows on your green garland on the stair railing is a classic look. And the thing about classic looks is: you can’t really go wrong with them. Ever. Add bows to both ends of the garland (start and finish) and a few places in the middle.
 
source

Hanging a simple boxwood wreath (or a greenery wreath of any kind, for that matter) is a hallmark of Christmas décor. (Psst - it's not hard to make your own boxwood wreath.) You can customize the look with an oversized satin bow and hanging ribbon. Keep the bow ribbon light and neutral for a fresh, modern look.
 
source

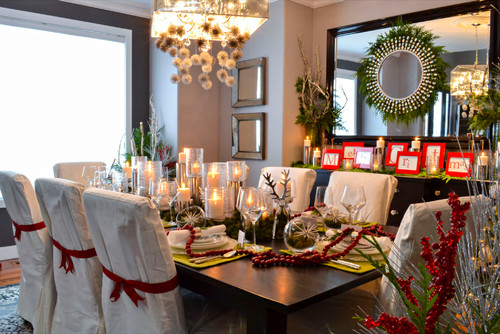
 A perfect and unique idea for a holiday dinner, or just to dress up your dining room for the season, is to tie bows around each chairback. This is particularly striking against white slipcovers, although the bows would look well against any color (and type) of chair.
 
Centering a large bow on your mantel garland is a good way to capitalize on the attraction of symmetrical décor on a naturally symmetrical feature. This one isn't exactly to my taste, but I can certainly appreciate the holiday spirit behind it. (But, for the record, that brass-legged coffee table? Yes, please.)
source
 
We’ve all seen stars or angels or other items atop a tree (which are lovely), but if you’re looking to freshen things up one year, you might consider adding a bow as your tree’s finishing touch. This is an especially sweet look in a rustic or country styled Christmas space.
source
 
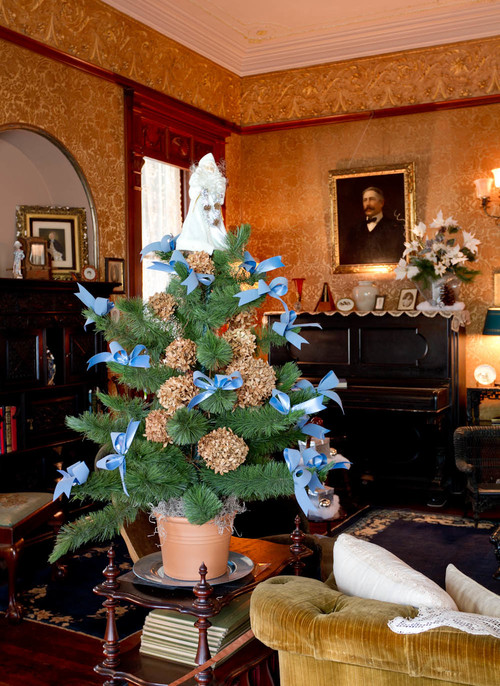
Or, if you really like your figurine on top of the tree, maybe decorating the tree itself with bright, cheery bows is the thing for you. Contrast bright satin ribbons with something natural, like pinecones or, in this case, dried hydrangeas.
 
What about you? Do you like adding bows to your Christmas décor, or is it not your style?
Pin It Now!

Bits of Christmas at my House

I usually keep Christmas décor pretty simple.
 
 
I visited Sweden a few years ago while my parents were there for three years and picked up some Tomta. (Don't know about the spelling. But I love their hidden faces all the same.)
 

I will forever love Swedish style and décor.

 
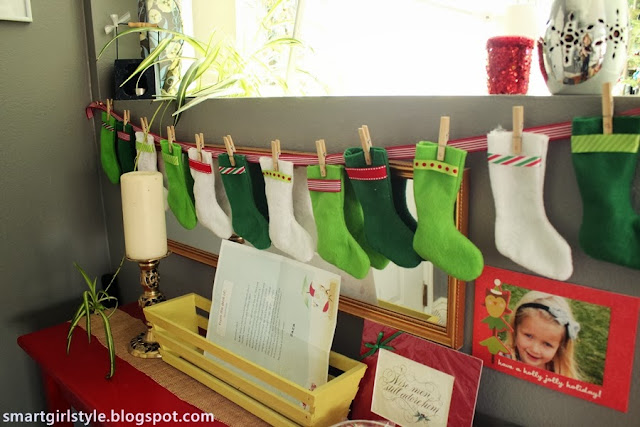
Below is my kids' favorite advent activity each year: Mini felt stockings that hold mystery treats for the 12 days leading up to Christmas every year. Made by my sis-in-law, this was the greatest handmade Christmas gift for a family with young kids. Ever. In the history of the world.
 

Happy Friday, friends.
Pin It Now!

DIY Gift Idea: Door Draft Stopper

I love Christmastime. I really do. We're working this year on keeping the Spirit of the Season in mind around our house. We're doing things more slowly and with greater care. We're trying to smile more. We're reading stories together every night. We're trying to get back to a time (was there ever a time?) when Christmas was simpler. When a candy cane and a cozy blanket and a good book were ingredients for a perfect afternoon. When we lived for Friday night so we could pop some corn and play Christmas bingo as a family.
 
I dunno. Maybe that all sounds a little too nostalgic and weird. But not as weird as what I'm about to recommend as a DIY gift idea. (And if that's not the best segue you've ever read, I'll be shocked.) (Which is absolutely true if by "be shocked," you know I mean "not be shocked." Just so we're clear.)
 
Enter (drumroll please) the door draft stopper.
 
 
Now, I don't live in a drafty cave or anything, but there is a distinct chill that comes through around our exterior doors in the colder weather. So one afternoon, in about 15 minutes, I made two draft stoppers for the front and back doors. I don't know why I've gone seven winters in this house without these babies.
 

Suuuuper easy. Here's what you do:
 
- Measure your door width. Add about 8".
- Cut two strips of fabric that are each the length of your door width plus the 8", and about 8"-10" wide.
- Placing right sides together, sew the two long edges and one short end together to create a very long, narrow sack.
- Turn sack right-side-out. 
- Fill with dried beans, rice, or wheat kernels.
- Fold under the rough edge, then sew up the top.
- Viola. End of door draft stopper creation.

 
It's so simple, you guys. I love this thing, and not just because it's made of mattress ticking. (You'll remember my fetish from here, here, or here.) 
 
I love it because (a) it was so easy to make, (b) it's already made such a big difference in the amount of cold air I feel by the door, and (c) ummm...I can't remember my third reason, but I know there was one. No matter. You'll just have to trust me that I love it.
 
I'd recommend making some of these for yourself and then, if you're stumped about a couple of people on your list, make some for them for the holidays. Great DIY gift.
 
Rather than spending more time trying to convince you of the door draft stopper's merits as a holiday gift, though, I'm now off to get some cleaner for that front entry rug. Hooo-eeee. Kids and winter and boots are a deadly combination.
 
Happy gifting!


Featured!
Pin It Now!

Aqua Chesterfield Sofa...and Being Green with Envy

Sometimes the holidays make me think of blue and silver. You know, like cool winter ice.
 
Or, more importantly, like this aqua Chesterfield sofa set. Good grief. The walls. The art. The rug. The sofas. (The sofas!!) 

source
The end.
Pin It Now!

DIY Gift Idea: Herringbone Paint Chip Art

Hey friends! The holidays are in full swing around here, and I couldn't be more thrilled. Other than the fact that every member of my household, sans myself, adores egg nog. Me, I prefer to not drink heart-attack-in-a-mug, thanks.
 
Anyway. If you're like me, you're always on the lookout for a great, fairly fast and easy but still personable, DIY gift idea. It's a bonus if it's inexpensive. This little number checks all those boxes and leaves you the rest of the afternoon to guzzle all the egg nog your soon-to-be-clogged heart desires.
 
 
(p.s. I totally have to give credit for this project's inspiration here.)

This is a great DIY art project that you can make for your own enjoyment or to give to someone else who has great taste. You'll need a frame, some paper or cardstock, some paint chips in an ombre gradient, scissors (puppy chew marks on said scissors are optional), and glue. I'd recommend grabbing several sticks of glue, because if you have kids the chances are high that half of them are dried out. But, again. Optional.
 
 
I began the project by cutting out the paint chips into herringbone-type parallelograms. I freehanded them, because I'm lazy like that. You could create a template if you prefer more exacting art. Also, be sure as you're cutting them out that you have about half the diagonals "going" each way - mirror images of each other shapewise, I mean. I just cut out a bunch because I wasn't sure what I'd want my ombre to look like.
 
 
Laid them out on the paper (cut to frame size) to get a basic idea of what I wanted, then I started gluing them on piece by piece. I didn't mark anything here. You definitely could, and your herringbone pattern would look like perfection. Depends on how you like your DIY art, I guess!
 
 
Framed it. Loved it. Wanted some more of it...
 
 
...so I made a second one, this time with the herringbone in the landscape orientation.
 
 
Here's one of them, hanging at low height in the living room corner.
 
 
Nothing like mixing the Logan LDS temple, Georgia O'Keefe, and some herringbone paint chip art next to a faux bois table lamp, eh?
 
 
This was such a fun project for me. Therapeutic, with Christmas radio on in the background and my two youngest girls napping. Now go and do one (or four) yourself, either to keep or give away.
 
As always, thanks for stopping by!
 
(Feel free to check out my other ideas for paint chips: an ombre nursery mobile, a bit of art, or other great ideas for decorating on a tight budget.)
Pin It Now!

How to Waterproof Your Upholstered Dining Chairs

 If you've got kids and you've got upholstery within a meter of your dining table, chances are, you've got stained upholstery. I did a ton of research about the best way to go about incorporating kid- and water-proofed dining room upholstery. Because, let's be honest, kids (try as they might) are not easy on fabric where grape juice and peanut butter oils are concerned.
 
 
I had this great coral-print fabric on-hand that I wanted to use to lighten and brighten the original dark-brick-reddish chair upholstery. But there was no way it was going to stay clean without some sort of protective barrier.
 
There are loads of ideas out there. Buying oilcloth (or leather or vinyl or other water-resistant fabric) outright would work if you didn't already have fabric, but that didn't apply to me here. I was tempted to try my hand at soaking the fabric in boiled linseed oil, but the extreme flammability and the warnings about having the fabric be forever tacky swayed me away from that.
 
 
I read that you could use iron-on vinyl, and thought this would be my answer until I realized it only came in 17" widths. My dining chair seats were wider than that. But wait! Fabric.com sold the stuff in 24" widths!!! (Fabric.com was the only place I could find that offers 24".) And it's cheap, too - like $6/yd or something. Problem solved.
 
I cut my fabric to fit the seats then followed the very easy instructions on my heat&bond iron-on vinyl. (Be careful to double- and triple-check the surface of your fabric before you stick the stuff on to make sure it's clear of lint and hair. Otherwise, you'll have lint and hair on there eternally.)
 
Ended up with a relatively flexible and waterproof piece of fabric. Yesssss.
 
 
I followed this basic tutorial on recovering the dining room seats.  
 
 
Start at the center of each edge and work toward the corners with the staples.
 
 
Do opposite edges.
 
 
So, when the two opposite sides of the seat were stapled (the front and the back, when the seat would be reinstalled onto the chair frame), I was ready to do corners. Starting in the center of one of the side edges, I stapled half and then, always pulling taut (because vinyl shows off wrinkles baaaaad), curved the staple line upward toward the corner. Like in the photo below.
 
 
Trimmed the excess.
 
 
Neatly folded and pinched the remaining corner fabric, doing my best to minimize the pleating.
 
 
Then stapled the fold down.
 
 
I did that for all four corners, and the seat cushion was ready to rock & roll.
 
 
I love how easy this is to do, how inexpensive, and how it lets you use whatever fabric you want, pretty much anywhere in your house, worry-free.
 
 
Here's the brightening effect of a fabric swap:
 
 
I'm a fan, I'm not going to lie. I love having this option for our dining room. Because I have four kids (the oldest is 9), and spills and fingerprints are part of our daily existence. It's not matte, to be honest, but it's not like covering the seat itself in separate clear vinyl. This is easily more subtle, less shiny, than that.
 
 
There are still some changes I want to make to this dining space before I call it good. But, for now, this quick waterproofing fix provides continuity and a little brightness.
 
 
Now, when I cry over spilt milk, it'll not be because the chair seats are ruined. It'll just be because I don't want to clean it up. Again.
(Just kidding. I don't actually cry over spilt milk. Usually.)


{shared: A Glimpse Inside, A Jennuine Life, DIY by Design, GingerSnap CraftsMy Girlish Whims, Sew Much Ado, Simply Designing, Sugar and Dots, The Happy Housie}
Pin It Now!
Related Posts Plugin for WordPress, Blogger...
Pin It button on image hover